Introduction
Data security in the cloud is a critical concern for organizations due to evolving threats, compliance requirements, and growing data sprawl. Data Security Posture Management (DSPM) helps organizations identify, classify, and protect sensitive data stored across cloud platforms like AWS, Azure, and Google Cloud.
This tutorial will guide you through the step-by-step process of implementing DSPM, including its challenges, solutions, cloud account integration, and use cases.
Step 1: Understanding the Challenges of Cloud Data Security
Challenge 1: Lack of Data Visibility
With data spread across multiple cloud platforms, SaaS applications, and geographic locations, organizations struggle to keep track of where their sensitive data resides. If you don’t know where your data is, you can’t protect it—leading to security gaps and compliance risks.
Challenge 2: Identifying & Protecting Sensitive Data
Not all data requires the same level of protection. Highly sensitive data—such as personal information, financial records, and confidential business data—must be handled with extra security measures. Without clear identification and classification, organizations risk failing compliance audits and facing heavy fines.
Challenge 3: Uncontrolled Data Access
Many employees and systems have more access than necessary to sensitive data. Overly permissive access controls increase the risk of unauthorized use, insider threats, and accidental data exposure. Without proper restrictions, organizations put their data at risk.
Challenge 4: Unmonitored Data Movement
Data doesn’t just sit in one place—it moves between cloud applications, storage locations, and regions. If organizations don’t have control over data flows, they could unknowingly expose sensitive information to security threats or regulatory violations.
Challenge 5: Weak Security & Misconfigurations
Many organizations assume their cloud data is secure, but common misconfigurations, missing encryption, and lack of backup strategies create security vulnerabilities. Even a single misconfiguration can lead to a major data breach, financial losses, and reputational damage.
Without addressing these challenges, organizations face serious consequences—including data leaks, compliance violations, cyber threats, and business disruptions.
Step 2: Understanding DSPM as a Solution
Enhanced Cloud Data Visibility
DSPM provides automated discovery of sensitive data across multiple cloud environments and SaaS applications. It enables organizations to track and monitor their data in real time, ensuring they always know where their critical information resides.
Data Flow & Residency Tracking
DSPM helps analyze data flows within and across cloud platforms, allowing organizations to understand how their data moves. This insight ensures that data remains within regulated boundaries, preventing compliance breaches.
Access Control & Risk Management
DSPM identifies overly permissive access settings, helping organizations enforce least privilege access policies. It also flags unauthorized access attempts, ensuring that only the right people and systems interact with sensitive data.
Cloud Data Security & Vulnerability Management
By continuously scanning for misconfigurations, missing encryption, and potential security weaknesses, DSPM helps organizations identify risks before they become threats. It provides risk-based prioritization and remediation recommendations, allowing security teams to focus on the most critical vulnerabilities first.
Agentless & Non-Intrusive Deployment
Unlike traditional security tools, Guardium DSPM is agentless, meaning it does not impact business operations or system performance. It operates with read-only permissions, ensuring minimal disruption while maximizing security.
By implementing DSPM, organizations gain full visibility, control, and protection over their cloud data—reducing risks, ensuring compliance, and preventing costly security incidents.Step 3: Setting Up DSPM – Adding Cloud Accounts
Step 3: Setting Up DSPM – Adding Cloud Accounts
Prerequisites
Before adding accounts, ensure:
- You have admin access to your cloud provider (AWS, Azure, GCP).
- You have an active DSPM platform account.
Example Scenario: AWS Integration:
- Log in to the DSPM console.
- Click on the Hamburger menu (☰) in the top-left corner of the DSPM.
- Go to Configurations → Connections → Cloud Accounts.
- Click on "Connect Cloud Account".


- Select AWS as the cloud provider and Click Next

- In the next screen provide the Account ID, Account Name & the Environment Type which you can fetch from the AWS console.
NOTE: Open your AWS console in the same window where you have opened the DSPM

- Expand the Cloud Account entry you just added and Click on Connect+

- In the Next Screen, click on Create Stack which will open the associated AWS console and initiate CloudFormation stack creation in the AWS console that will create the necessary polar roles

- Checkmark the acknowledgment section to proceed and Click on "Create Stack" to generate the required AWS Polar roles.

Note: To check the status of the CloudFormation stack progress, navigate to the AWS CloudFormation page and look for the polar-security-roles-<region> stack. The process typically takes about 5-10 minutes to complete. While the stack is running, new events will appear in the Events tab. The stack is considered fully deployed when the status changes to CREATE_COMPLETE, though some sub-events may still display CREATE_IN_PROGRESS, which is normal.

This step is totally optional.
In the AWS IAM page, we can see the 3 roles created as part of the polar-security-roles-<region> stack.

- Meanwhile, in the DSPM console, the status will initially appear as In Progress and will change to Connected once the stack creation is complete.
- Wait for the Stack Creation Progress to change to "Connected".
- Once the connection is established, click Next.

- In the Next Screen, you should see accounts connected. You may choose the regions that you want to deploy the Analyzer(For installing analyzer take a phased approach either by region or by the application priority).

- Click Create Stack option again with respect to your region(in our case it is US,N.Virginia - us-east-1) which will start deploying analyzer

- Once you Click " Create Stack " on the DSPM page this will open the AWS CloudFormation Create Stack page in a new browser tab.
NOTE: This stack will deploy analyzer EC2 instances (t2.large) in the chosen region.
- Under Parameters section, select the existing subnet/vpc to deploy the analyzer. Read details here.

- Click Create Stack to initiate the deployment.

NOTE: You can optionally check the status of the polar-security-asg-<region> stack creation from the AWS CloudFormation page. The stack takes about 5-10 mins to complete in small test aws workshop environment.

NOTE :You can optionally see the resources created as part of the of the polar-security-asg-<region> stack.

- Meanwhile, in the DSPM console, the status will first appear as In Progress.

- Once the stack creation is complete and the first analyzer is deployed, the status will update to Connected, indicating that the analyzer for the region is successfully set up.
- Click Done


Depending on how many data stores you have in your aws account, it may take some time to discover all the data stores. While it runs, you should slowly see some data stores showing in DSPM.
Step 4: Verify Cloud Account Integration
- Click on the Hamburger menu (☰) and navigate to Assets → Cloud and SaaS Stores.
- You should now see the connected AWS data stores listed.
- Your AWS account is now successfully integrated with Guardium DSPM!
- DSPM will begin scanning, monitoring, and securing your cloud data automatically.

- Once DSPM has completed the discovery and classification process, a checkmark will appear under the status.

Meanwhile in the AWS console:
- Polar analyzer scales automatically to be cost and resource-effective.
- You may see different numbers of PolarHelper EC2 instances deployed at different time of the day while it is discovering/classifying data stores.
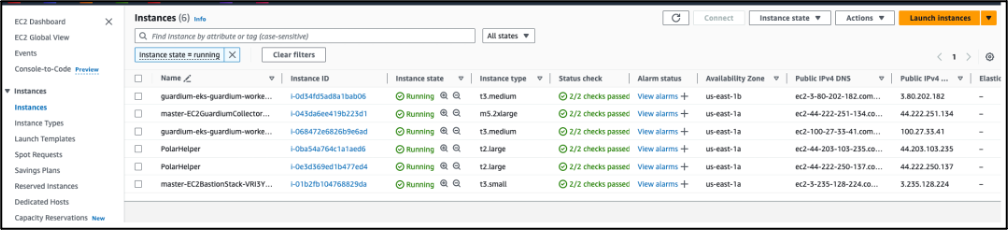
- An example scenario where Polar analyzer auto scaling in action.

Step 5: Sample Use Case based on the current Data.
Auto-detecting vulnerabilities in the data store – No backup set up on data store
- Navigate to Intelligence → Vulnerabilities → Cloud Data Stores to view vulnerable assets, predefined filters, check vulnerability status, and see a widget displaying asset counts by criticality (High, Medium, Low).


- Select the vulnerability linked to the asset to view detailed information about the asset and its associated risk.

Step 1: Review Vulnerability Details
- When you select a vulnerability, a popup screen appears displaying key information, including:
- Issue: No backup configured for the S3 bucket.
- Criticality: Low risk.
- Detected on: March 17th, 2025.
- AWS Account & Region: tu994652 in US, N. Virginia.
- Reason: The S3 bucket has no backup due to versioning-configuration.Status = Disabled.
- Recommendation: Enable versioning in the S3 bucket settings to define a backup process.
Step 2: Update the Vulnerability Status
- The Status dropdown provides three options:
- Pending (default): Requires action.
- Resolved: Select if the issue has been fixed.
- Ignore: Choose if no action is needed.
Step 3: Check Asset Details
- Navigate to the Assets section to view the sensitive data types stored in the S3 bucket, such as credit card details, personal emails, private keys, and more.

Step 4: To know more about the Asset
- Click on the Asset section and Click Expand

- This below screen provides comprehensive details about the S3 bucket, including its vulnerabilities and sensitive data. You can also navigate to the AWS console with a single click from this screen.
Additionally, an export option is available if you need to download the details of sensitive information.


Step 6: Summary & Next Steps
- DSPM identifies, classifies, and protects sensitive cloud data.
- It helps detect misconfigurations, compliance risks, and security threats.
- Integrating cloud accounts enables automated data security monitoring.
- DSPM enhances data visibility, security posture, and compliance adherence.
What’s Next?
- Start a trial DSPM deployment for your cloud accounts.
- Explore DSPM policies & automation for security best practices.
- Integrate DSPM with SIEM/SOAR tools for proactive security response.
Final Thought: Implementing DSPM is crucial for modern cloud security. By continuously monitoring data security posture, organizations can proactively prevent breaches, ensure compliance, and secure sensitive data in the cloud.
🚀 Ready to secure your cloud data? Get started with DSPM today!
Authors: Rahul K P & Sudhagar Tiroucamou