IBM DevOps Code ClearCase Integration with Visual Studio Code
The IBM DevOps Code ClearCase Integration with Visual Studio Code enables the user to perform basic ClearCase operations from inside the VS Code IDE for both UCM and Base ClearCase. This integration supports Dynamic, Snapshot, Web and Automatic views running on Windows and Linux platforms.
Visual Studio Code is a lightweight, powerful, desktop source code editor. For more information, please visit https://code.visualstudio.com
IBM DevOps Code ClearCase is a software configuration management (SCM) tool used for version control, which provides controlled access to source code, design documents, models, test plans and test results. It features secure version management and authoritative build auditing. For more information, please visit https://www.ibm.com/products/devops-code-clearcase
Visual Studio Code Extension and ClearCase Support Matrix
|
ClearCase-VSCode Extension Version
|
Supported ClearCase Version
|
Product Log
|
|
1.0.0, 1.0.1, 1.0.2
|
cc_10.0.1, cc_11.0.0
|
Initial Release - Supported Web and Automatic View on the Windows Platform Using REST API
|
|
1.0.3
|
cc_11.0.0.1, cc_10.0.1.02
|
Supports Web and Automatic View on the Windows Platform Using Named Pipe
|
|
1.0.4, 1.0.5
|
cc_11.0.0.03, cc_10.0.1.03
|
Extended Support for Dynamic and Snapshot Views on Windows and Linux
|
This integration supports following ClearCase operations.
-
-
-
- Add Existing View
- Connect to WAN Server
- Activities - Create Activity, Set Existing Activity
- Add To Source Control
- Check Out
- Check In
- Undo Checkout
- Hijack
- Undo Hijack
- Rename
- Remove
- Refresh
- Update From Repository
- Disconnect from WAN Server
Prerequisite
-
-
- A ClearCase Client (Full offering or CCRC offering) is installed on the local system.
- Download and install Visual Studio Code from https://code.visualstudio.com
- A ClearCase view must be created using ClearCase tools.
The integration utilizes a background process that automatically exits when idle for 15 minutes. The default timeout can be overridden as follows:
-
-
- Create a file in <user_home>\.ccase_ide_integration\.config if it does not exist.
-
-
- Add the following timeout configuration value to the .config file:
idle_timeout=15
Note: The timeout unit is in minutes.
If the app remains idle beyond the idle_timeout, the backend service will automatically exit and restart upon the next request.
1. IBM DevOps Code ClearCase Extension installation in Visual Studio Code IDE
The IBM DevOps Code ClearCase extension is available in the Visual Studio Code Marketplace. To install the extension in the Visual Studio Code IDE, click the Extensions icon in the left panel and search for “IBM DevOps Code ClearCase”. Then, click on the “Install” button.
2. ClearCase Settings Page
You can configure options related to ClearCase in the Settings page. To open the Settings page, navigate to File->Preferences->Settings->Extensions->ClearCase.
 Figure 3 ClearCase Setting page
Check In Identical
If you want to check in the file even though it is identical to the previous version, enable this option; otherwise, disable it.
Reserved Checkout
During a Check Out operation, if you want to do reserved checkouts, enable this option; otherwise, disable it.
Undo Checkout Keep
During an Undo Checkout operation, if you want to retain a backup copy of the file with a suffix '.keep', enable this option; otherwise, disable it.
Undo Hijack Keep
During an Undo Hijack operation, if you want to retain a backup copy of the file with a suffix '.keep', enable this option; otherwise, disable it.
Check In Identical Error String
The integration implements special handling for a check-in failure caused by an identical version.When working in a non-English locale, the error string in the resulting error message equivalent to "identical to predecessor" should be supplied as the value for this setting to enable the integration to optimize error handling.
3. ClearCase Operations
3.1 Add Existing View
ClearCase views must be created using ClearCase tools. Adding or importing an existing view can be done in two ways.
a. Using the “Add Existing View” Command Palette:
Click View->Command Palette menu option to open the command palette.

Figure 4 Command Palette
Enter “Add Existing View” text in the search box and hit enter or click on the listed “Add Existing View…” option.

Figure 5 Add Existing View command palette
It opens a new dialog box. Navigate to a directory within the ClearCase view and click on ‘Open View’ button to add the view path into Visual Studio Code IDE.

Figure 6 Select View Path

Figure 7 View Path imported in Visual Studio Code
b. Add using “Open Folder” option:
Click File->Open Folder menu option, which opens a new dialog box. Navigate to the root directory of the view and click on ‘Select Folder’ button to add the view path into Visual Studio Code IDE.

Figure 8 Select View Path folder

Figure 9 View Path imported in Visual Studio Code
3.2 Connect to WAN Server
For WAN based view types (Web and Automatic), users must authenticate with the CCRC WAN server. To do this, select the Source Control icon from the left panel, then click the ‘More options’ (represented by three dots).
 Figure 10 Connect to WAN Server
From the menu, select ClearCase -> Connect to WAN Server. This will prompt you to enter the WAN server URL and credentials. Provide the CCRC WAN server URL, username, and password to complete the authentication process.

Figure 11 CCRC WAN server URL

Figure 12 User Name

Figure 13 Password
You will see an authentication successful notification message at the bottom.

Figure 14 Authentication is successful.
Note: If you are connecting to a CCRC WAN server over HTTPS, you might encounter a SSL certificate issue. If the certificate is not stored and trusted on the client, you must use the IBM DevOps Code ClearTeam Explorer or rcleartool to establish a connection with the CCRC WAN server and permanently accept the certificate of the WAN server. This step is necessary before proceeding with using Visual Studio Code.
3.3 Create Activity
For a UCM view you need to create an activity and set it in the view. Select the Source Control icon from left panel, then click the “more” option … (three dots) and click the ClearCase->Create Activity… option.

Figure 15 Create Activity
Enter the Activity Headline

Figure 16 Activity Headline
Enter the Activity ID

Figure 17 Activity ID
Note: Create Activity will also set the activity in the view

Figure 18 Activity is created
3.4 Set Activity
You can set the activity in the current imported view. Select the Source Control icon from the left panel, then click the “more” option … (three dots) and click the ClearCase->Set Existing Activity… option.
 Figure 19 Set Existing Activity
Select the activity and hit enter to set the activity.

Figure 20 List of Existing Activities

Figure 21 Activity has been set into view
Note: You can also execute the Create and Set Activity operations from the file editor context menu. Open a file in an editor and right click. You should see ClearCase->Create Activity… and ClearCase -> Set Existing Activity…

Figure 22 Create and Set Existing Activity
3.5 Add To Source Control
In a ClearCase source control repository (VOB), new files and folders are referred to as 'view private'. You can add these new resources to the repository. In the Visual Studio Code Explorer, you have the option to create new files and folders. When you create files or folders for the first time, they will be available under the 'View-Private' section in the Source Control page.
 Figure 23 View Private files/folders list
Once you have created a new file/folder, you likely want to bring it under source control, there are two places from where you could execute “Add To Source” operation.
a. File Context Menu
Open the view private file and right click in file editor, select the ClearCase->Add to Source Control… option which prompts you for a comment. Using this option, you can add a single file to source control.
 Figure 24 File Context Menu - Add to Source Control...
Enter the comment and hit enter to add the file to source control.

Figure 25 Add to Source Comment
After adding file to source control, the item will no longer appear in the View-Private section.

Figure 26 File Added to Source Control
b. Source Control Page (SCM)
Select the Source Control icon from the left panel to see a list of view private files under “View-Private”. From here you can add a single, selected, or all view private files/folders to source control.

Figure 27 List of View Private files/folders
You can click the “+” symbol in front of the file/folder item under View-Private to add a single resource to source control.

Figure 28 Adding single resource to source control
You can select the file/folder items under View-Private and right click on the selected items, then click “Add to Source Control…” to add files/folders to source control.
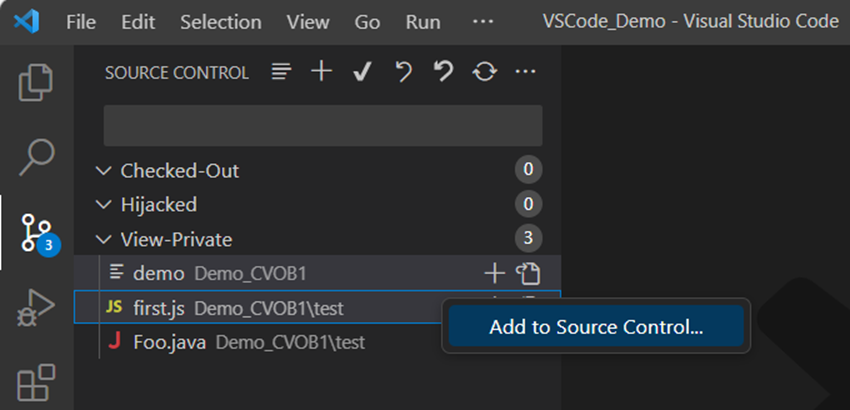
Figure 29 Add selected items to source control
To add all view-private files/folders to source control, click the “+” symbol in front of “View-Private” or “SOURCE CONTROL”.

Figure 30 Add all view private items to source control (click '+' in front of View-Private)

Figure 31 Add all view private items to source control (click '+' in front of SOURCE CONTROL)
Enter the comment and press enter to add the resources to source control.

Figure 32 Add to Source Comment

Figure 33 Added resources to source control
After adding the resources to source control, the items will no longer appear in the View-Private section.
3.6 Check Out
To modify a source-controlled file, you must checkout or hijack the file. To check it out, open the file and right click in the file editor, select the ClearCase->Check Out… option which prompts for a comment.
 Figure 34 Checkout the resource
Enter the comment and press enter to check out the file.

Figure 35 Checkout Comment
Post checkout, files will be listed under the Checked-Out section in the Source Control page.

Figure 36 List of checked out resources
3.7 Check In
Check in the checked out files will create new versions in the VOB. There are two places from where you can execute a “Check In…” operation.
a. File Context Menu
Open the checked out file and right click in the file editor, select the ClearCase->Check In… option which prompts for a comment. Using this option, you can check in a single file.

Figure 37 File Context Menu – Check In
Enter the comment and press enter to check in the file.

Figure 38 Check In Comment
After checkin, the file will no longer appear in the Checked-Out section in the Source Control page.

Figure 39 Resource is Checked In
b. Source Control Page (SCM)
Select the Source Control icon from the left panel, you will see list of checked out resources under “Checked-Out”. From here you can check in single, selected, or all checked out files/folders.

Figure 40 List of checked out files
You can click the “✓” symbol in front of file/folder items under Checked-Out to check in the file/folder.

Figure 41 Check In single file
You can select the file/folder items under Checked-Out and right click on selected item, then click “Check In…” to check in the files/folders.

Figure 42 Check In selected items
To check in all checked out files/folders, click “✓” symbol in front of “Checked-Out” or “SOURCE CONTROL”.

Figure 43 Check In all checked out files (click '✓' in front of Checked-Out)

Figure 44 Check In all checked out files (click '✓' in front of SOURCE CONTROL)
Enter the comment and press enter to check in the resources.

Figure 45 Check In files

Figure 46 Resources are Checked In
After checking in resources, the items will no longer appear in the Checked-Out section.
3.8 Undo Checkout
Reverts the checked out file/folder to its pre-checked out state. It retains a backup copy of the file with a suffix '.keep', if the 'Undo Checkout Keep' option is enabled in the ClearCase Settings page (Refer ClearCase Settings Page). There are two places from where you can execute “Undo Checkout…” operation.
a. File Context Menu
Open the checked out file and right click in the file editor, select ClearCase->Undo Checkout… Using this option, you can undo checkout on a single file.

Figure 47 Undo Checkout single file

Figure 48 Resource is undo checked out
After undoing the checkout, the file will no longer appear in the Checked-Out section in the Source Control page and changes will be reverted.
b. Source Control Page (SCM)
Select the Source Control icon from the left panel, you will see list of checked out resources under “Checked-Out”. From here you can undo checkout on a single, selected, or all checked out files/folders.

Figure 49 List of checked out files
You can click the  symbol in front of file/folder item under Checked-Out to revert the file/folder.
 Figure 50 Undo Checkout single file from SCM
You can select the file/folder items under Checked-Out and right click on the selected item, then click “Undo Checkout…” to revert the changes.

Figure 51 Undo Checkout selected files
To revert all the checked out files/folders, click the symbol in front of “Checked-Out” or “SOURCE CONTROL”.

Figure 52 Undo Checkout all checkedout files

Figure 53 Undo Checkout all checkedout files

Figure 54 Resources are undo checked out
Post undo checkout, the items will no longer appear in the Checked-Out section and will be reverted to the pre-checked out state.
3.9 Hijack
Loaded files may be hijacked to allow modification without checking them out. Open the file and right click in file editor, select ClearCase->Hijack…
 Figure 55 Hijack file
Note: Dynamic views do not support Hijack operation
Post hijack, files will be listed under Hijacked section in Source Control page.

Figure 56 Resource is hijacked
3.10 Undo Hijack
Reverts the hijacked file to its pre-hijacked state. Retains a backup copy of the file with a suffix '.keep' if the 'Undo Hijack Keep' option is enabled in the ClearCase Settings page (Refer ClearCase Settings Page). If you do not want to create a ‘.keep’ file, then disable the option. There are two places from where you can execute “Undo Hijack…” operation.
Note: Dynamic views do not support Undo Hijack operation
a. File Context Menu
Open the hijacked file and right click in the file editor, select ClearCase->Undo Hijack… Using this option, you can undo hijack of a single file.

Figure 57 Undo Hijack file

Figure 58 Resource is undo hijacked
Post undo hijack, the file will no longer appear in the Hijacked section in Source Control page and changes will be reverted.
b. Source Control Page (SCM)
Select the Source Control icon from left panel to see the list of hijacked resources under “Hijacked”. From here you can undo hijack of a single, selected, or all hijacked files.

Figure 59 List of hijacked files
You can click the  symbol in front of file item under Hijacked to undo hijack on the file.

Figure 60 Undo Hijack single file
You can select the file items under Hijacked and right click on selected item, then click “Undo Hijack…” to revert the changes.

Figure 61 Undo Hijack selected files
To revert all the hijacked files, click the  symbol in front of “Hijacked” or “SOURCE CONTROL”.

Figure 62 Undo Hijack all checked out files

Figure 63 Undo Hijack all checked out files

Figure 64 Resources are undo hijacked
Post undo hijack, the items will no longer appear in the Hijacked section and the files will be reverted to their pre-hijacked state.
3.11 Rename
Rename the version-controlled resource to a new name in the same directory. Open the file and right click in the file editor, select the ClearCase->Rename… option which prompts you to enter a new name.

Figure 65 Rename resource
Enter the new name and press enter to rename the file.

Figure 66 Rename Comment

Figure 67 Resource Renamed
3.12 Remove
Delete the source-controlled resource. It is like using the ClearCase `rmname` command. This command removes the resource from future versions of its parent directory, but it does not remove the element (i.e., the version history) from the VOB so it is still present in older versions or baselines. Its history will also remain accessible. Open the file and right click in the file editor, the select the ClearCase->Remove… option which prompts you for a comment.

Figure 68 Remove resource
Enter the comment and press enter to remove the file.

Figure 69 Remove Comment

Figure 70 Resource is removed
3.13 Refresh
Refresh the version-controlled resource. If the resource was changed outside Visual Studio Code which includes by any other ClearCase editor tools, Refresh will update Visual Studio Code with the changes. Open the file and right click in file editor, select ClearCase->Refresh.
Note: Dynamic views do not support Refresh operation

Figure 71 Refresh resource

Figure 72 Resource is refreshed
3.14 Update from Repository
If any changes were made to the VOB, perhaps by other users delivering their code, Update from Repository will update the resources to the latest versions and refresh the sections in SCM page like Checked-Out, Hijacked and View-Private
Note: Dynamic views do not support Update from Repository operation

Figure 73 Update from Repository

Figure 74 Repository Updated
3.15 Disconnect from WAN Server
To log out, disconnect from the WAN server. Select the Source Control icon from the left panel, then click the “more” option … (three dots) and click the ClearCase->Disconnect from WAN Server option.

Figure 75 Disconnect from WAN server

Figure 76 WAN server is disconnected