IBM Ceph Storage vSphere Plugin 1.0.0 Integration for vSphere Environment to Manage the Block Ceph RBD Device.
Installation
Install the IBM Ceph Storage Virtualize Plugin for vSphere. The IBM Ceph Storage Virtualize Plugin for vSphere is built upon the VMware remote plugin architecture and is distributed as a VM appliance. The plugin appliance is delivered as an OVA and is deployed into vSphere as a standard OVA template. After deployment, you are required to register the plugin into the vCenter environment via the appliance CLI.
Downloading the vSphere Plugin
Download the IBM Ceph Storage Virtualize Plugin for vSphere OVA from Fix Central.
Deploying the applianceDeploy the IBM Ceph Storage Virtualize Plugin for vSphere appliance into an existing vSphere environment and configure the DHCP/Static IP Address.
-
From the vSphere Client, right-click on the VMware cluster that the appliance will be deployed to and select Deploy OVF Template.
-
In the Select an OVF Template step of the Deploy OVF Template wizard, select Local file > Upload Files.
-
From the local file system, select the IBM Ceph Storage Virtualize Plugin for vSphere OVA.
-
In the Select a name and folder step, provide a name of the virtual machine followed by selecting a folder for it to be deployed into.
-
In the Select a compute resource step, select a VMware cluster or specific ESXi host that the virtual machine (VM) will run on.
-
Verify the details are correct in the Review details summary.
-
Read and accept appropriate license agreements in the License Agreements step.
-
In the Select storage, select a compatible datastore, where the appliance will be stored.
-
In the Select networks step, select the appropriate destination network to use for the plug-in.
Note: You must select a network that allows communication between vCenter and the management interfaces for IBM Ceph Storage systems.
-
Pre-configure the networking details from within the Customize Template step.
Networking details that are provided here are automatically configured in the operating system of the VM upon deployment.
-
Under Network Type, select either DHCP or Static configuration.
-
If Static IP configuration is selected, complete the necessary information:
-
Hostname (optional)
-
IP Address
-
Gateway
-
Netmask
-
DNS Server(s)
-
DNS Domain (optional)
-
Use the Ready to complete step to review the final list of chosen settings.
-
Click Finish to deploy the OVA with defined customizations.
-
After the OVA is successfully deployed, power on the appliance.
After the initial power-on and configuration, the plug-in appliance should be available on the network.
Note: By default, the appliance is configured with a firewall and therefore will not respond to ping (ICMP) requests.
-
The administrator can now SSH into the appliance.
Note: Initial login has a default password of IBMplugin and requires the user to change the password before continuing.
Registering the vSphere Plugin into vCenterRegister the IBM Ceph Storage Virtualize Plugin for vSphere into your vSphere environment.
-
Log in to the vSphere plug-in appliance as root.
-
Use the ibm-plugin command to register the plug-in with vCenter(s).
ibm-plugin register -u vCenter_UserName -v IP_or_FQDN_of_vCenter
3. The registration command displays the thumbprint of the vSphere instance for verification. You will then be prompted to enter the vCenter password.
Note: The hostname specified for the vCenter instance must either be the Fully-Qualified Domain Name (FQDN) or IP address. Registering the plugin using a short hostname will cause errors when using the plugin.
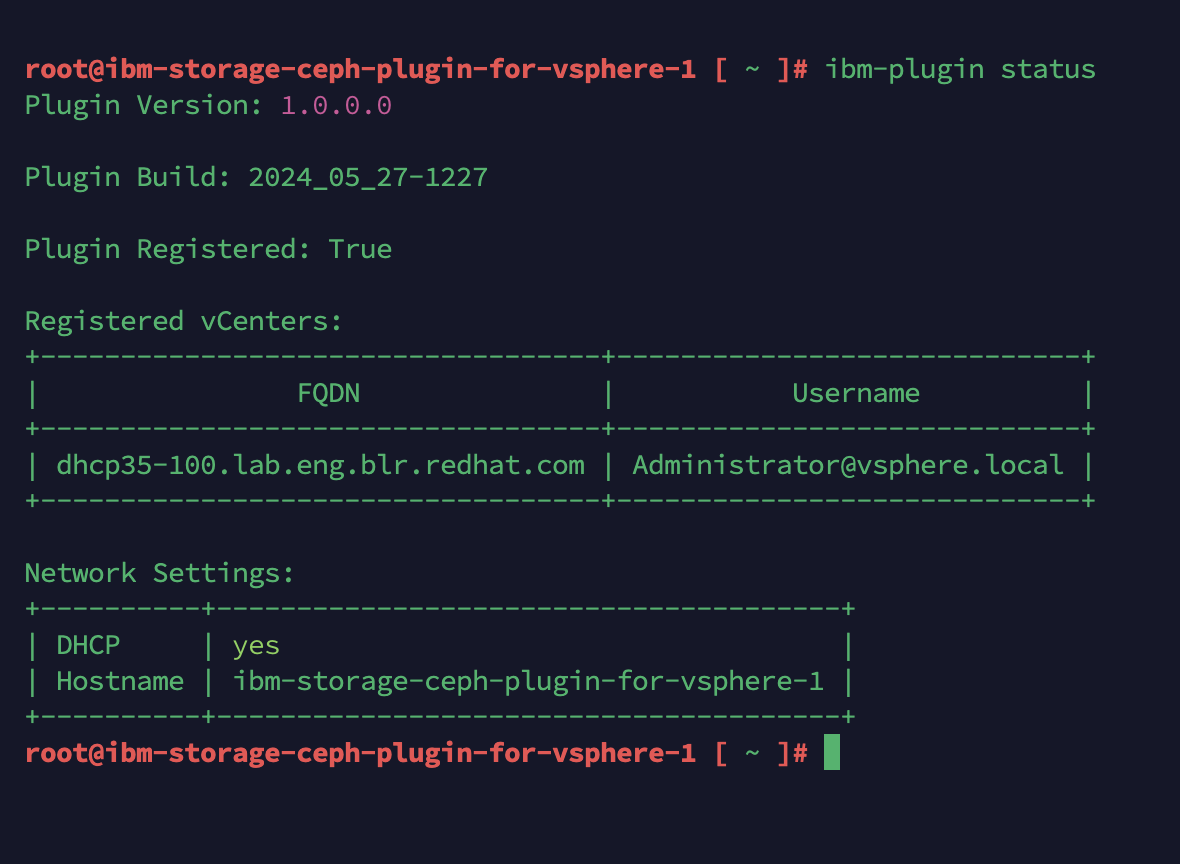
Checking the plugin statusCheck the plugin status to verify vCenter registration and version information.
Use the ibm-plugin command with the status parameter to check which vCenter(s) are registered to the appliance at any time. Using the ibm-plugin command also allows for display of the current version of the plug-in that is available in the appliance.
Unregistering the vSphere PluginUnregistering the IBM Ceph Storage Virtualize Plugin for vSphere removes the plug-in from vCenter and removes the vCenter registration from the plug-in appliance.
ibm-plugin unregister -u vCenter_UserName -v IP_or_FQDN_of_vCenter