This article describes how to configure Single Sign On (SSO) between IBM Content Navigator (ICN) and/or Content Services GraphQL (GQL) with Content Platform Engine (CPE) on WebSphere traditional application server (tWAS) using LTPA, OAuth, or OpenID Connect (OIDC) authentication token mechanisms.
Prior to CPE 5.5.5, the WebSphere Lightweight Third-Party Authentication (LTPA) mechanism was the primary way of propagating a user’s identity from ICN to CPE using the EJB transport. Starting with ICN 3.0.8 and CPE 5.5.5, the CPE Web Services Interface (WSI) transport can now be used to propagate a user’s identity using LTPA, OAuth 2.0, or OpenID Connect on WebSphere traditional 9.0.5.3 and later.
Update: As of July 2021, with the release of 5.5.7, CS GraphQL is also now supported on tWAS with CPE 5.5.7 and WebSphere traditional 9.0.5.x and later. Please refer to this document on installing CS GraphQL on tWAS prior to doing the SSO configuration described in this blog.
LTPA SSO
To configure ICN and GQL to use LTPA SSO over the WSI transport to the CPE server, perform the following steps.
1. Configure SSL Certificates
If using a self-signed certificate on the CPE server, export that certificate and import it into the ICN and GQL servers.
1.1. Export SSL certificate from CPE tWAS server keystore
- cd <app_server_root> /profiles/AppSrv01/config/cells/ESCPE1Node01Cell/nodes/ESCPE1Node01
- <app_server_root> /java/8.0/bin/keytool -export -alias default -keystore key.p12 -storetype pkcs12 -storepass WebAS -rfc -file cpe.pem
1.2. Import CPE SSL certificate into ICN/GQL tWAS server truststore
- cd <app_server_root> /profiles/AppSrv01/config/cells/ESICN1Node01Cell/nodes/ESICN1Node01
- <app_server_root> /java/8.0/bin/keytool -importcert -keystore trust.p12 -storetype pkcs12 -storepass WebAS -alias cpe -file cpe.pem
2. Set JVM Options
Set the following JVM options on the CPE and ICN tWAS servers
2.1. CPE JVM Options
- -Dcom.filenet.authentication.wsi.AutoDetectAuthToken=true
2.2. ICN JVM Options
- -Dcom.filenet.authentication.wsi.AutoDetectAuthToken=true
- -Dcom.filenet.repositoryconfig.allowWSIOnWAS=true
2.3. GQL JVM Options
- -Dcom.filenet.authentication.wsi.AutoDetectAuthToken=true
3. Enable LTPA on CPE, ICN, and GQL tWAS servers
- Navigate to: Security > Global security > Single sign-on
- Select all options shown below and fill in the DNS domain name for your ICN, GQL, and CPE servers
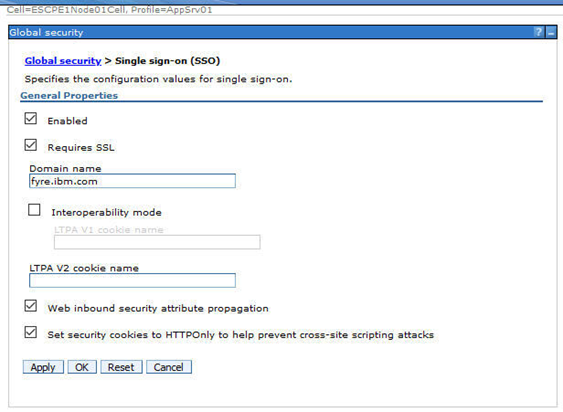
4. Ensure that the Realm name is the same on CPE, ICN, and GQL tWAS servers
- Security > Global security > Federated repositories > Realm Name (e.g. ldap_realm)
5. Export / Import LTPA Key
5.1. On CPE tWAS server, export the LTPA key
- Navigate to Security > Global security > LTPA
- Provide a password for the ltpa.keys file
- Provide a path for the ltpa file (e.g. /opt/IBM/WebSphere/AppServer/profiles/AppSrv01/ltpa.keys)
- Click export button
5.2. On ICN/GQL tWAS server, import the LTPA key
- Copy the ltpa.keys file from the CPE server
- Navigate to Security > Global security > LTPA
- Provide the same password used to export the keys on CPE WebSphere
- Provide the file path that you copied the ltpa file to (e.g. (e.g. /opt/IBM/WebSphere/AppServer/profiles/AppSrv01/ltpa.keys)
- Click the import button
6. Restart CPE, ICN, and GQL tWAS servers
7. Login to ICN admin desktop and create FileNet Content Manager repository
8. Login to ICN desktop and verify that you can browse a CPE objectstore
OAuth / OIDC SSO
Configuration of OAuth 2.0 or OpenID Connect with ICN, GQL, and CPE is basically the same. Any differences are pointed out explicitly in the descriptions in this section.
1. Register CPE, ICN, and GQL servers with OAuth/OIDC Identity Provider
The registration mechanism is dependent on the Identity Provider, but you will need to provide a redirect URL for CPE, ICN, and GQL servers of the form:
https://<host>:<port>/oidcclient/<IdpID>
where:
- <host> The hostname/IP address of your ICN/External Share/CPE instance
- <port> The port number for the <host>
- <IdpID> The identifier used in the RelyingParty Interceptor settings for your ICN/CPE instances. For example: provider_1.identifier = ExShareUms
Obtain clientId, clientSecret, and IdP SSL certs as part of this registration process
2. Deploy ICN with Options for SSO support
During deployment of ICN, update the step for Configure the IBM Content Navigator Web Application to use form-based authentication.
Select the Enable OAuth/OIDC Identity Provider support checkbox if an OAuth/OIDC Identity Provider will be used to authenticate users to ICN.
Select the Enable OAuth/OIDC SSO to Content Platform Engine checkbox if CPE will also be configured with OAuth/OIDC support. When this option is selected, OAuth/OIDC SSO will be used between ICN and CPE. Otherwise, LTPA SSO will be used between ICN and CPE.
Set the following Login page URL and Login error page URLs to allow the user to be presented with a login dialog that allows them to select which IdP they want to authenticate with, if multiple are configured.
- Login page URL: /idplogin.jsp
- Login error page URL: /loginError.jsp
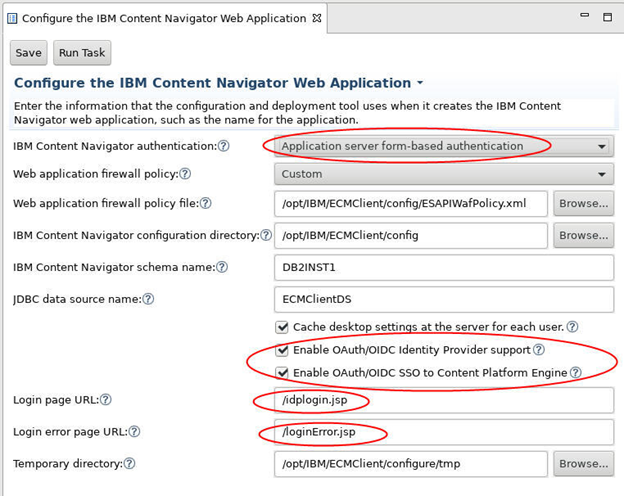
3. Install WebSphere OpenID Connect Application
- Install WebSphereOIDCRP.ear on CPE and ICN tWAS servers
cd <app_server_root>/bin (e.g. /opt/IBM/WebSphere/AppServer/bin)
./wsadmin.sh -profileName AppSrv01 -f installOIDCRP.py install nodeName serverName
-
- Install on cluster environment
./wsadmin.sh -f installOIDCRP.py install clusterName
where:
- AppSrv01 is the profile name of the target application server
- nodeName is the node name of the target application server.
- serverName is the server name of the target application server.
- clusterName is the name of the cluster on which OpenID Connect RP is to be installed.
4. Configure SSL Certificates
If using a self-signed certificate on the CPE server, export that certificate and import it into the ICN server.
- Export SSL certificate from CPE tWAS server keystore
- cd <app_server_root> /profiles/AppSrv01/config/cells/ESCPE1Node01Cell/nodes/ESCPE1Node01
- <app_server_root> /java/8.0/bin/keytool -export -alias default -keystore key.p12 -storetype pkcs12 -storepass WebAS -rfc -file cpe.pem
- Import CPE SSL certificate into ICN/GQL tWAS server truststores
- cd <app_server_root> /profiles/AppSrv01/config/cells/ESICN1Node01Cell/nodes/ESICN1Node01
- <app_server_root> /java/8.0/bin/keytool -importcert -keystore trust.p12 -storetype pkcs12 -storepass WebAS -alias cpe -file cpe.pem
- Import the Identity Provider SSL certificates you obtained when registering into CPE, ICN, and GQL tWAS servers truststore
5. Configure OIDC Trust Association Interceptor on CPE, ICN, and GQL tWAS servers
- Navigate to Security > Global security > Authentication > Web and SIP security > Trust association
- Select Enable trust association

- Click on Interceptors link, then click New … and enter Interceptor Class Name: com.ibm.ws.security.oidc.client.RelyingParty
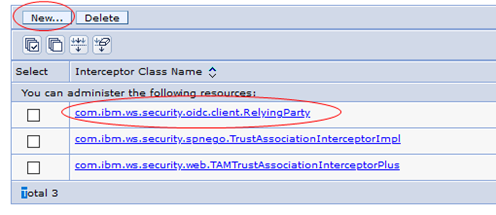
- Navigate to Security > Global security > Custom Properties
- Click New … and define the following custom properties
- Name: com.ibm.websphere.security.InvokeTAIbeforeSSO
- Value: com.ibm.ws.security.oidc.client.RelyingParty
Note: if property exists, add this to existing value, separated by a comma to create a list
-
- Name: com.ibm.websphere.security.performTAIForUnprotectedURI
- Value: true
6. Add Inbound Trusted Realms for Identity Provider(s) on CPE, ICN, and GQL tWAS servers
If you are using a single identity provider whose users match the ldap server configured in tWAS, then the tWAS realm name is already trusted, so you can skip this section.
If you are using one or more identity providers (e.g. for External Share or Managed Users), with users that are not in the ldap server(s) configured in tWAS then you need to add their realm names as trusted realms following the instructions in this section.
Navigate to Security > Global security > User account repository > Configure
- Under the Related Items section, click Trusted Authentication Realms - Inbound
- Select Trust realms as indicated below option
- Click Add External Realm… button, and enter realm identifier for each Identity Provider
- The realm identifier name should match the <IdpID> you used when you registered your CPE/ICN instances with the Identity Provider.
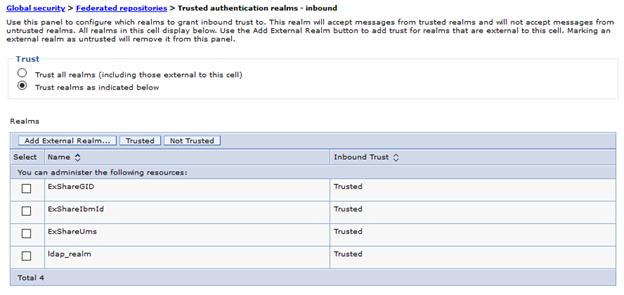
7. Update Security Role to Group mapping on CPE and GQL servers
Note that the ICN config manager updates the security role to group mapping for you, so this section only needs to be done for CPE and GQL servers.
- For CPE, navigate to Applications > WebSphere enterprise applications > FileNetEngine
- Select the Security role to user/group mappings option
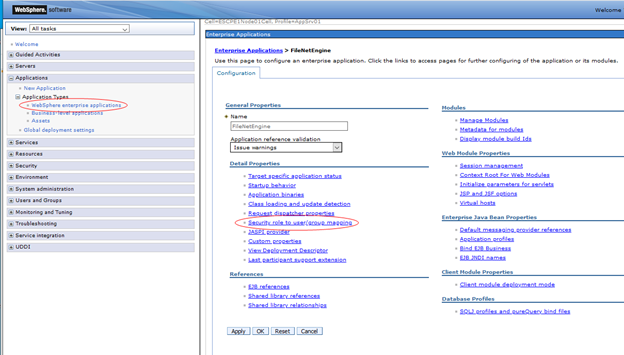
- Change the AllAuthenticated special subject to "All Authenticated in Trusted Realms”
- If you only have a single IdP with a single realm, then change the AllAuthenticated special subject to "All Authenticated in Application's Realm”

- Do the same for the content-graphql-api_war application on the GQL server
8. Configure Relying Party Interceptor settings on CPE, ICN, and GQL tWAS servers
- Navigate to Security > Global security > Trust association > Interceptors > com.ibm.ws.security.oidc.client.RelyingParty
- Enter properties for each Identity Provider. A full list of these properties can be found in
- Each distinct identity provider must follow the naming pattern of:
-
- provider_<n>, where <n> is a number starting at 1 and increments for each additional identity provider.
- All the properties specific to a given identity provider use the same provider_<n> prefix.
- A complete sample of three IdP configurations can be found in
-
- Obtain the set of OAuth/OIDC endpoints from IdP
- Note: Discovery endpoint is supported with WebSphere 9.0.5.4 and later. So if using an earlier version, set these URL properties.
- provider_1.authorizeEndpointUrl
- provider_1.tokenEndpointUrl
- provider_1.jwkEndpointUrl
-
- The <IdpID> used in the redirect URL registered with the IdP (e.g. https://cpe-host:9443/oidcclient/ExShareUms) corresponds to the identifier in IdP configuration
- provider_1.identifier = ExShareUms
-
- Use the clientId/clientSecret values obtained during registration with IdP
- provider_1.clientId
- provider_1.clientSecret
- If only a single IdP is going to be used, set these properties
-
- provider_1.useRealm (set for CPE, ICN, and GQL)
- Set to the Realm name under Security > Global security > User account repository
- e.g. provider_1.useRealm = ldap_realm
-
- provider_1.filter (set for CPE or GQL)
- Option 1: Set a filter so that all requests with Bearer token will be authenticated using this OAuth/OIDC configuration
- e.g. provider_1.filter = Authorization%=Bearer
- Option 2: Set filter to look for the auth-token-realm HTTP header. This header is set automatically when using the CE API to send requests to the CPE server over the WSI transport.
- provider_1.filter = auth-token-realm%=defaultWIMFileBasedRealm
-
- provider_1.interceptedPathFilter (set only for ICN)
- Set path filter to navigator application
- e.g. provider_1.interceptedPathFilter = /navigator.*
- If multiple IdPs are going to be used, set these properties
-
- provider_1.useRealm (set for CPE, ICN, and GQL)
- Set to the same value as identifier
- e.g. provider_1.useRealm = ExShareUms
-
- provider_1.filter
- For ICN, set filter to match a Cookie with IdP identifier name
- e.g. provider_1.filter = Cookie%=ExShareUms
- For CPE and GQL, set filter to match a http header with IdP identifier name
- e.g. provider_1.filter = auth-token-realm%=ExShareUms
- provider_1.interceptedPathFilter (set only for ICN)
- Set path filter to the same value as identifier
- e.g. provider_1.interceptedPathFilter = ExShareUms
- The following properties should be set depending on the type of authentication token being accepted or propagated
-
- provider_1.useJwtFromRequest (set for CPE, ICN, and GQL)
- For OAuth, set to no
- e.g. provider_1.useJwtFromRequest = no
- For OIDC, set to ifPresent
- e.g. provider_1.useJwtFromRequest = ifPresent
-
- provider_1.mapIdentityToRegistryUser (ICN and GQL)
- If using LTPA SSO from ICN/GQL to CPE, set this property to true
- e.g. provider_1.mapIdentityToRegistryUser = true
-
- provider_1.verifyIssuerInIat (CPE only, if required by IdP e.g. IbmId)
- For OAuth, set to false
- e.g. provider_1.verifyIssuerInIat = false
- For OIDC, set to true
- e.g. provider_1.verifyIssuerInIat = true
9. Configure General JVM Options on CPE, ICN, and GQL tWAS servers
- Remove JVM Options (if present for CPE, ICN, and GQL)
- -Dcom.filenet.authentication.token.userid=sso:ltpa
- -DFileNet.WSI.AutoDetectLTPAToken=true
- Add JVM Options (CPE, ICN, and GQL)
- -Dcom.filenet.authentication.wsi.AutoDetectAuthToken=true
- Add JVM Options (ICN only)
-
- -Dcom.filenet.repositoryconfig.allowWSIOnWAS=true
10. Configure JVM options used to control how users log on using an Identity Provider
- For a Single IdP, where the IdP contains the same set of users as the LDAP server used by CPE, no additional JVM options are required. Users will automatically be directed to IdP’s login dialog.
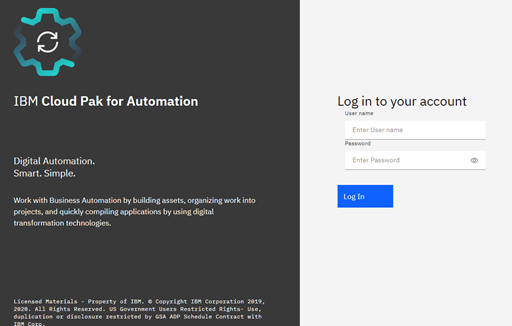
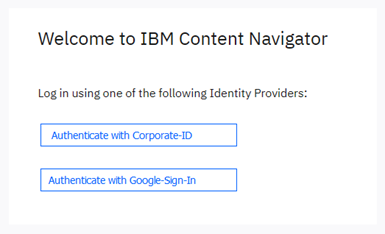
- For Multiple IdPs, use JVM options to create buttons on ICN login dialog for user to authenticate with
- If all users, both internal corporate users as well as external share users will sign in using an IdP, then the internal user IdP must contain the same set of users as the LDAP server used by CPE.
- Self Registered users are not supported on traditional WebSphere
- JVM values cannot contain spaces
- IdP JVM Options (ICN only)
- -Dcom.filenet.authentication.providers=UmsInternal,ExShareGID
- -Dcom.filenet.authentication.UmsInternal.displayname=Corporate-Id
- -Dcom.filenet.authentication.ExShareGID.displayname=Google-Sign-In
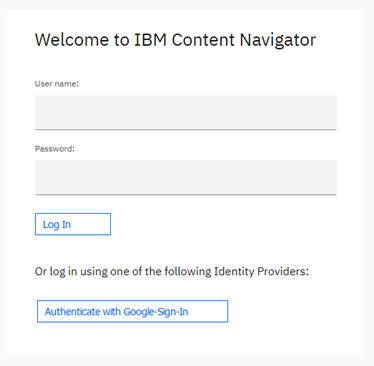
- To allow internal users to login using the ldap user registry and external users to login using an IdP, set these JVM Options (ICN only)
- -Dcom.filenet.authentication.displayLdapLoginControls=true
- -Dcom.filenet.authentication.providers=ExShareGID
- -Dcom.filenet.authentication.ExShareGID.displayname=Google-Sign-In
11. Configure JVM options used to control the authentication token propagated to CPE
The com.filenet.authentication.wsi.AuthTokenOrder JVM option specifies which authentication token to send to the CPE server if multiple are available. An LTPA token is always created by WebSphere, so it is always listed. Either an OAuth or an OIDC token may also be present, depending on the Relying Party Interceptor settings you specified in Step 8. If this JVM option is not specified, then the OAuth token is propagated.
You might want to change this for one of the following reasons:
- If you are not using the External Share feature, then LTPA is the simplest. If LTPA is used, then you do not require any of the OAuth/OIDC configuration on the CPE tWAS server described earlier. However, if you are using the External Share feature, then you must propagate either the OAuth token or OIDC token since LTPA requires that the user also exist in the LDAP server, which would not be the case for external users.
- If your IdP only supports either an OAuth or OIDC token, then you must choose between one of these if you are not using LTPA.
- OAuth tokens are smaller in size, so there is less data to transmit. However, OAuth tokens require a round trip to the IdP to validate it for each unique user
- OIDC tokens are signed. Signing key can be retrieved once from IdP and used to validate all OIDC tokens generated by that IdP w/o a separate round-trip for all users
- Remember that some of the Relying Party interceptor configuration settings depend on whether an OAuth or OIDC token is propagated. So if you change it here, remember to change it there as well.
To specify which authentication token is propagated from ICN to CPE, set these JVM options on your CPE client application (e.g. ICN or GQL).
- Propagate LTPA token for all IdPs
- -Dcom.filenet.authentication.wsi.AuthTokenOrder=ltpa,oauth or
- -Dcom.filenet.authentication.wsi.AuthTokenOrder=ltpa,oidc
- Propagate OIDC token for all IdPs
- -Dcom.filenet.authentication.wsi.AuthTokenOrder=oidc,ltpa
- Explicitly set the Propagation Token for each IdP by using the IdP Identifier as part of the JVM option
- -Dcom.filenet.authentication.ExShareGID.AuthTokenOrder=oidc,ltpa
- -Dcom.filenet.authentication.ExShareUms.AuthTokenOrder=oauth,ltpa
- -Dcom.filenet.authentication.UmsInternal.AuthTokenOrder=ltpa,oidc
References
How to Configure LTPA/OAuth/OIDC SSO with FileNet ICN, CS GraphQL, and CPE on WebSphere ND Application Server
Configuring external users with an Identity Provider for a traditional WebSphere Application Server environment
Content Platform Engine RelyingParty Interceptor settings
IBM Content Navigator RelyingParty Interceptor settings
Using SSO token propagation