Conversational skills are for enabling the conversation functionality for skills which are either OOTB (Out of the box) skills or custom skills - which includes skills authored from Skill studio. For instance, if end-users need to provide user information when they log in to an application, they can provide it in two ways - either by using a form that they fill in, or with the help of a chat bot that asks questions and gives answers in a conversational way. Similarly, with the help of Watson AI Assistant, each skill can be enabled with conversation which picks up the inputs and responds accordingly. Here, conversational capability will be brought up for input variables which are present in a skill thus enabling picking up Inputs in the way of conversation from IBM watsonx Assistant. In this document, we will see how conversational capabilities can be enabled for skills authored from Skill studio.
How can you add conversational functionality to a skill?
The conversational capability can be added to a skill with the help of slot logic. You can add slot logic after you publish your skill from skill studio to IBM watsonx Orchestrate. To add slot logic to a skill, click on the overflow menu for the skill and choose the Enhance this skill option. Since conversations are enabled for input variables, go to the input tab to see the Add slot logic flow option.
The following image shows the main Skill studio user interface, where you can click on the overflow menu to enhance a skill:

The following image shows the “Enhance this skill” page, where the Input tab has the Add slot logic flow option:

Introduction to response types
Slot logic flows use chat responses to configure different conversational behaviour. Currently, you can create four response types of responses which include:
-
Input Validation Response: This response type indicates that the input given by the user is invalid. You can configure a message that will be displayed to the user to explain why it is invalid. The user will be prompted to re-enter a value.
-
Choice List: Provides the user with a list of options.
-
Ignore: Tells the chat not to prompt for the slot.
-
Collect: If a slot was previously ignored, this tells the chat to prompt for the slot.

Introduction to slot logic flows
When you want to add a slot logic flow to a skill, go to the Skill studio page, find the skill, select the overflow menu and select the Enhance this skill option. Go to the Input tab, click Add slot logic flow, and then click Edit slot logic flow. This will take you to the builder page as below.

-
The Is initial call branch condition uses a built-in boolean variable named IsInitialCall. If this variable is set to true, it means that slot logic flow will be called first before attempting to retrieve any slots - which are inputs from end user. This flag is used to make sure that slot logic flow is run before having any interaction with end user.
-
After the Is initial call branch is complete, next is the Process inputsChanged branch which makes sure that there are value changes for slots. This uses a string list variable named inputsChanged[] which checks for the slot values which were changed by the end user.
-
In the Variables tab, you will see both variables:

- The Create variable button can be used to create the slots or input that will be prompted from the end user.
- The Refresh variables button can be used to get the changes reflected once any modifications done from Parent skill. Parent skill is the skill where this slot logic enhancement will be done.
Important tips for building slot logic:
-
Variables that are configured to be input variables in the original skill are automatically configured as output variables in the slot logic flow.
-
In slot logic flows, you can use both input variables (slots) and private variable for intermediate results and those variables can be used for building the flow.
-
Only input variables from the original skill are slots.
-
Whenever a skill with slot logic is called, slot logic will be executed first to fetch inputs from the end user, then other tasks from the original skill can be completed from task list.
Steps to add slot logic to skills - Decision / Workflow / Generative AI with examples
The following shows the input and decision nodes.

if Age is less than 19 or Age is 18
then
set decision to "Not eligible for voting";
else
set decision to "Eligible for voting";
The following image shows what the decision rule should look like:

-
To publish this decision to IBM watsonx Orchestrate, change the visibility of the decision component from private to public, share changes, create a version, and publish.
-
Go to the skills and apps page to find the published component.
-
Enhance the skill, go to the Inputs tab, click on Add Slot logic flow, and then click “Edit slot logic flows“. This will open the following template:

-
In the Variables tab, create separate slot variables for “Name” and “Age” variables. For example you can create a string variable named “NameSL” and a integer variable named “AgeSL”, and enable both variables as inputs.
-
Do not change the “Is Initial Call” branch condition. Edit the “Process InputChanged” branch condition by providing the slot variable name for. “Name”. The following image shows what the branch condition might look like:


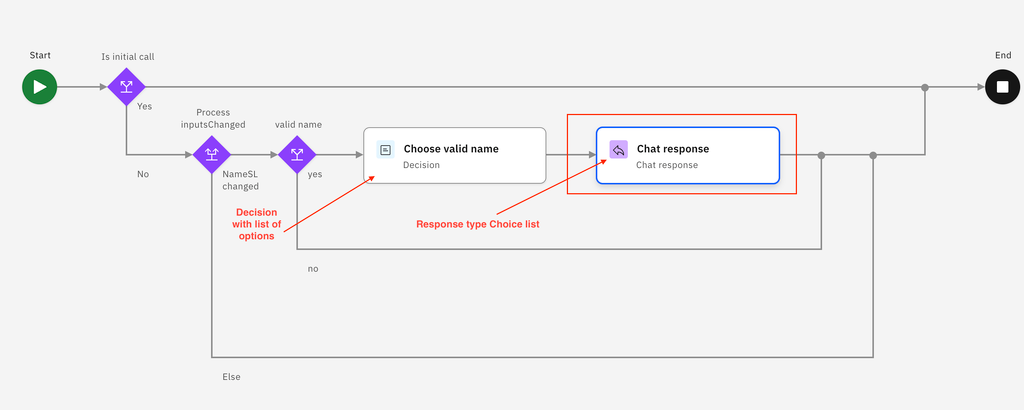
The following image shows example logic for checking for name validity:

-
Inside the “valid name” branch, you can create chat responses. In this case, Choice list can be used which gives options for a valid name. In order to provide options, a list must be created which holds these options for the “NameSL” variable. This can be achieved by creating a decision and providing a list of strings as outputs from the decision to the chat response choice list.
The following image shows how you can add a decision to the slot logic flow:

add "John" to decision ;
add "John Doe" to decision ;
add "John@ibm.com" to decision ;


-
From the InputLogicFlow build page, click on the decision component and go to Data mapping. For the input mapping, choose “NameSL'“ and for output mapping, click Create Variable (+) and create a variable. Then map that variables as output variable.
-
After the decision node, create a chat response and change the response type to Choice list.

- Configure data mapping for the choice list, input list and output list seen in the following image:

-
In order to preview this, click the Preview button, click New instance and put the following inputs with slot variable created and values. The “Initial Call” variable must be unchecked as slots must be taken first.

-
When the instance runs, since the input did not satisfy the condition, the slot logic flow goes to the branch with the choice list, and the output of the list is kept. The output can be seen during the playback as below by listing all options mentioned

-
When the playback is done, publish the slot logic flow, and then go back to the skill enhancement page and publish the skill. Publishing the skill is needed only when the input slots (variables) have been changed. You can now try the slot logic flow in Watson AI Assistant by using any assistant as a “Skill Based Action “. For more information about creating assistant and skill based actions, see Building AI assistants.
-
The final result from the Watson Assistant chat will look similar to the following image, when calling the skill with phrases:


Key points:
-
Slot logic flows can be created similarly to workflow and Generative AI skills.
-
In the case of workflows, successive tasks must be completed from the task list as per showing Action has been started from AI Assistant while invocation.
-
In slot logic flows, local workflows, local decisions, remote decisions and OOTB skills (box, Outlook etc.) can also be added. Note that only synchronous skills can be used. Local workflows will also be constrained to using synchronous skills.
Reference links:
Acknowledgement : My Sincere thanks to @Grant Taylor who helped me in adding more inputs, correcting me and Reviewing this blog.
#Spotlight