Introduction
OpenID Connect (OIDC) is an identity layer on top of the OAuth 2.0 protocol. A client application can verify the identity of an end user based on the authentication performed by an identity provider such as IBM w3id.
What is Keycloak
Keycloak is an open source Identity and Access Management (IAM) solution which allows applications to delegate authentication and manage authorization functions. It can federate multiple user registries such as LDAP and other OpenID Connect or SAML identity providers.
A key construct in Keycloak is a realm that provides logical separation of configuration. It is often referred to as multi-tenancy. Each realm has a set of users, roles, groups and set of federated user repositories and external ID providers that it manages. A default realm named Master is created automatically by Keycloak during installation.
Scenario Description
This article discusses how IBM Cloud Pak for Automation v 20.0.3 (henceforth referred to as ICP4A) can delegate authentication to Keycloak. The UMS component within ICP4A maintains the external SSO configuration for ICP4A. An application such as Business Automation Studio uses UMS for authenticating users. Once authenticated the user context is setup by referring to a corresponding user entry in the registered LDAP server.
The following diagram illustrates the scenario used in this exercise
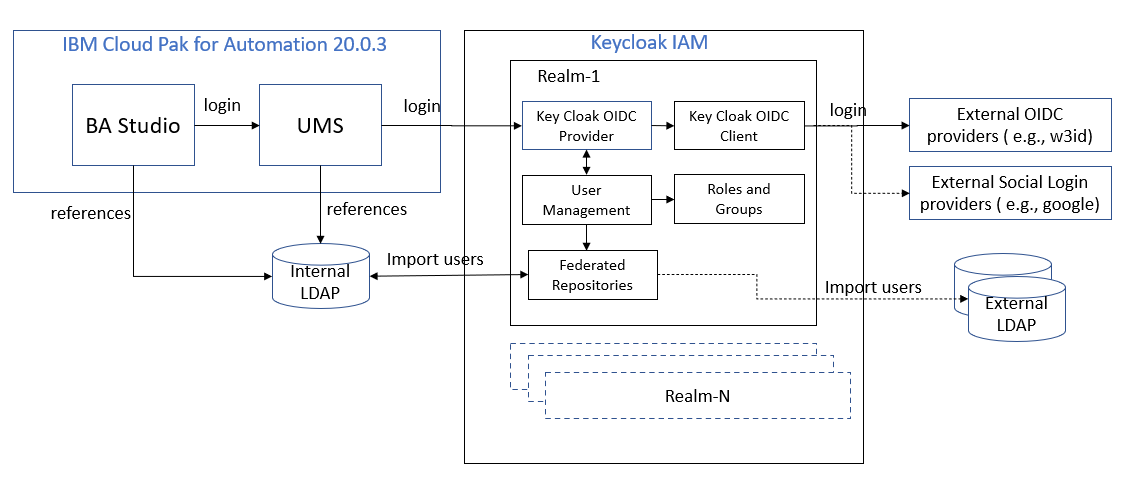
The above scenario shows an example that was implemented using Keycloak. The key steps highlighted are:
- A CP4A component such as BA Studio delegates authentication to UMS when a user tries to access a protected resource. The user is redirected to the UMS login page. Since UMS is configured with an external OIDC provider (in this case Keycloak) the user is redirected to the Keycloak login page. Do note that UMS can be configured to point to only one realm inside Keycloak.
- On the Keycloak login page, the user can login with the user-id and password (if it’s a federated LDAP user or an internal Keycloak managed user). Alternatively, the user can select one of the external OIDC providers that is configured in Keycloak. In our scenario the user selects the w3id OIDC provider that has been configured.
- The user is re-directed to the w3id login page. Here the user can login with their w3 credentials.
- Upon successfully logging in at w3, the user is redirected back to Keycloak.
- Keycloak performs OIDC authentication using the auth code provided by w3id. If this succeeds the user is then re-directed back to UMS.
- UMS performs OIDC authentication using the auth code provided by Keycloak. If this is successful the user is re-directed back to BA Studio.
- BA Studio performs OIDC authentication using the auth code provided by UMS. If this is successful the user is considered logged into BA Studio.
- BA Studio refers the user in the LDAP to create the user context in the session.
Scenario setup procedure
The scenario is setup using the procedure mentioned below. The setup of CP4A is not elaborated here as it assumes that a working instance of CP4A with an LDAP is already setup and running.
- A running instance of ICP4A is available and configured with LDAP. A user, such as umsadmin user can successfully login into BA Studio and work with Application Designer.
- Install Keycloak. Here we describe setup of a demo instance of Keycloak using standard install and an internal default database.
- Configure Keycloak realm and login page as needed.
- Register Keycloak as client application in w3id.
- Federate the LDAP used in the setup of ICP4A in Keycloak (This step is optional. It is used to demonstrate that Keycloak can work with LDAP based authentication as well)
- Register UMS as a client application in Keycloak.
- Import Keycloak server’s TLS certificate into ICP4A and add it to the list of trusted certifications.
- Configure UMS to delegate user authentication to Keycloak.
- Login to BA Studio by re-directing to Keycloak login page and in return being redirected to w3id login page.
Keycloak Installation
Keycloak installation is straight-forward. Please refer to the setup details here https://www.keycloak.org/docs/latest/getting_started/
There is one issue with this setup. Once the server comes up, it can listen to HTTP connections only on localhost. Hence you will not be able to able to access Keycloak from outside using the public IP. To remediate the following steps were followed.
- Open standalone.xml present in keycloak-12.0.4/standalone/configuration
- Replace all occurrences of localhost with your server’s FQ hostname. Ensure that this when you ping the server by the hostname it returns the public IP (9.xx.xx.xx) of the server.
- In the values of inet-address, provide the server’s FQ hostname instead of 127.0.0.1
- With the above procedure, the certificate generated for the Keycloak server will have the FQ hostname instead of localhost. This allows ICP4A to trust the certificate.
- There is a requirement that when you first launch Keycloak it must use the localhost URL to configure the administrator user.
- Launch Keycloak as ./standalone.sh -Djboss.bind.address=127.0.0.1 from the installation bin directory.
- Using a browser launched within the server, enter https://localhost:8443/auth and configure the Keycloak administrator user id and password.
- Stop the Keycloak server and start it normally, i.e. execute ./standalone.sh. You may want to run it in background mode.
- Now from a remote system, you can access Keycloak administrative console as https://<server-host>:8443/auth
- Login with the administrator credentials created in the previous step.
Keycloak SSO Configuration
To configure SSO as per the requirements of this exercise the following steps are followed.
- Create a new realm and give it a name, for e.g. Cloudpak. We will use this realm for the remaining configuration steps in the exercise.
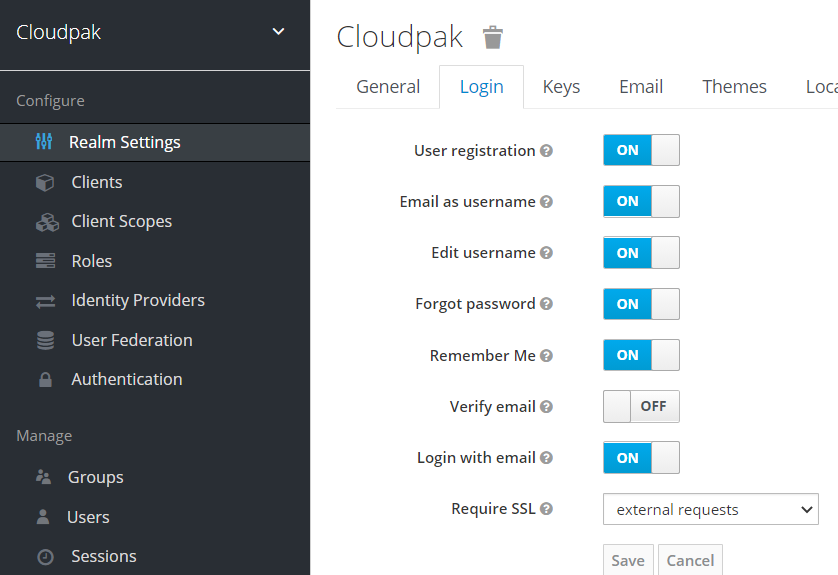
- In the Realm Settings, go to Login tab and select the options as shown below.
- In the Themes tab, select keycloak as the Login Theme.
- Go to the Clients tab and create a new client. This will be the UMS client. You can give any suitable name for the client. This will be the client-id that will be used by UMS later. Here the name cloudpak for chosen. In the settings tab provide the details as show. In the Valid Redirect URI you will need to provide the UMS hostname. Ensure that access type is selected confidential.
`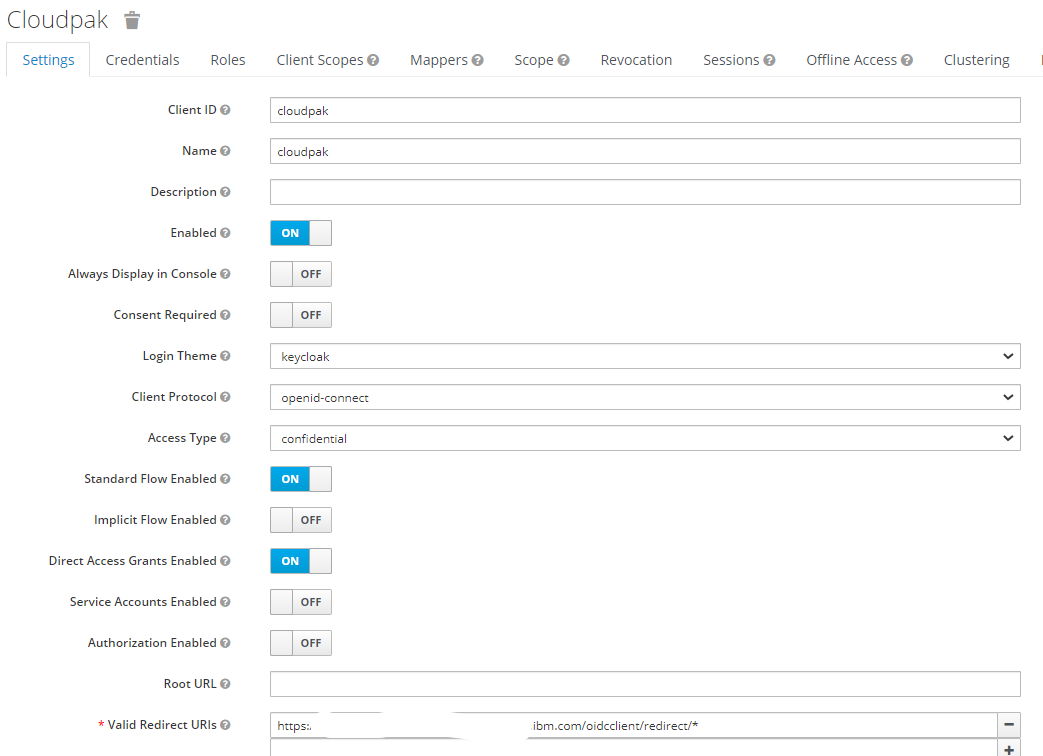
- In the credentials tab select Client Authenticator as Client Id and Secret. Make a note of the generated client secret. This will be required in UMS configuration.
- Go the Identity Providers tab. Here we will register w3id as an OIDC provider. Select create to create an OIDC identity provider and give it a name, for e.g. w3id.
- Configure the settings as shown below for w3id. The Redirect URI is automatically chosen by Keycloak and will need to be provided to w3id.
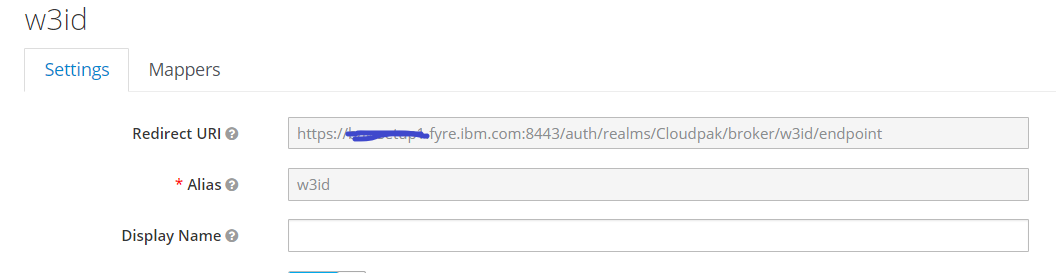
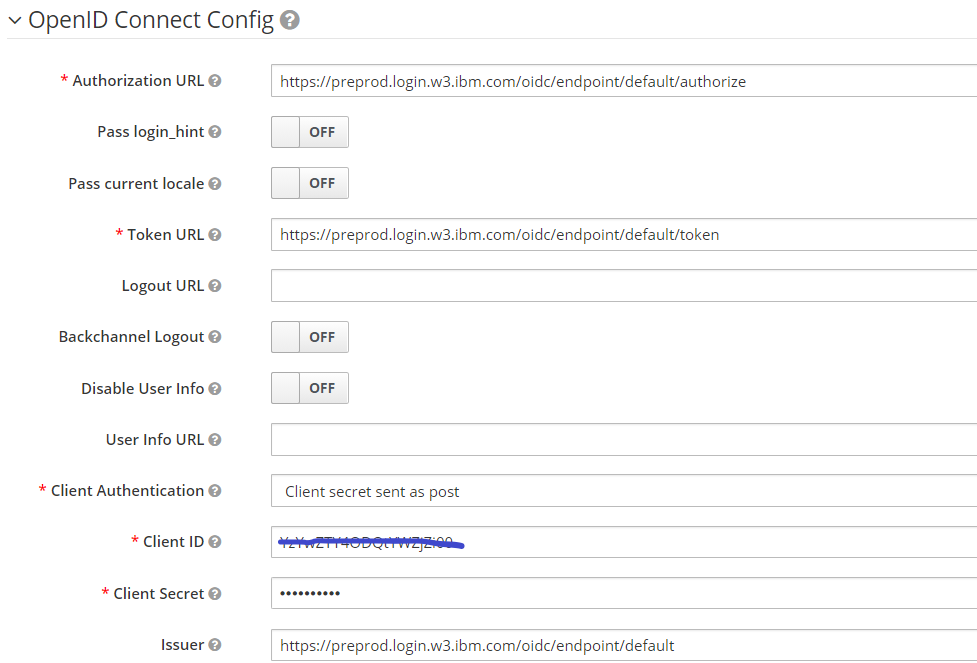
Here the client-id and client secret will be provided by w3id when registering an OIDC configuration.
- Now go to User Federation tab to optionally federate the LDAP into Keycloak
- Create an LDAP configuration and provide a suitable name. In the settings tab, enter the LDAP details as shown below.


- Perform Test Connection and Test Authentication to verify the connectivity settings.
- Save the configuration and select Synchronize all users button to synchronize the LDAP users. Please note that we’ve used a sample LDPAP for less than 10 entries. You may need to provide a suitable size setting when synchronizing with large LDAPs such as Bluepages.
- If the settings provided are accurate, the users in LDAP would be synchronized to Keycloak and available as users in Users tab. In addition to LDAP, you can create some local users in Keycloak.
- Now go back to the Realm settings. In the General tab, click on OpenID Endpoint Configuration to launch a page that displays the OIDC endpoints for this Keycloak realm. Make a note of them to be used in configuring UMS.
Creating a w3id configuration for a client application
We will only briefly mention this procedure since it is already documented here https://ibm.ent.box.com/s/asxizmc95kodf00x78en9bs8qgfp04h4. For those who are trying to use other OIDC providers, follow the steps required to register a client application within that OIDC provider. You may also use another Keycloak instance to function as the external OIDC provider for demo purposes.
Make a note of the client-id, client secret, the auth endpoint URL, the token endpoint URL, the issuer, the jwk endpoint URL and the signature algorithm used. In this example we’ve used RS256.
Ensure that the above end-point details are properly entered in the ID Provider settings in Keycloak. This is described in Step-7 of Keycloak SSO configuration.
Registering UMS as a client application with Keycloak
Finally, to tie-in the scenario to work end to end we configure UMS to delegate authentication to Keycloak. There are two main steps here, viz. importing Keycloak server’s signer certificate into ICP4A and updating UMS configuration with the end-point details of Keycloak
- From the browser, export Keycloak server’s certificate. This can be saved to a file in a standard base64 encoded format.
- Create a TLS secret named idp-tls using the above signer certificate and save it a file such as idp-tls.yaml. E.g. below
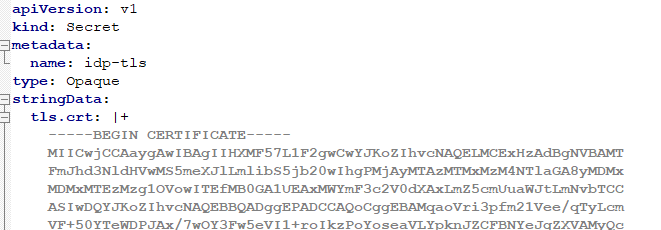
- Create the secret in OpenShift. oc create -f idp-tls.yaml
- In the CR file for the ICP4A instance, under shared_configuration provide the reference to the secret as show below.

- In the ums_configuration section, add the following configuration entry, i.e. custom_xml. Confirm that you have set userIdentifier to “email”. This is the critical component that maps the subject name UUID in Keycloak to an email id.

- Save and apply this new configuration such that the UMS pods are re-created with the changed configuration.
- Ensure that you have configured your LDAP such that the user id of the user is an email id. In other words, the w3id user id can be resolved in the LDAP server.
Testing the scenario
Finally, we test the scenario and the delegation of authentication across the chain. The first authentication component will be UMS, followed by Keycloak and finally w3id.
- Launch the BA Studio URL for our your ICP4A instance. For e.g. https://bas.cp4a.hostname/BAStudio/build/index.jsp?v=20.0.3#/
- UMS should redirect the user to the Keycloak login page as shown.

- Select w3id as the OIDC provider. The user is redirected to the login page for w3id
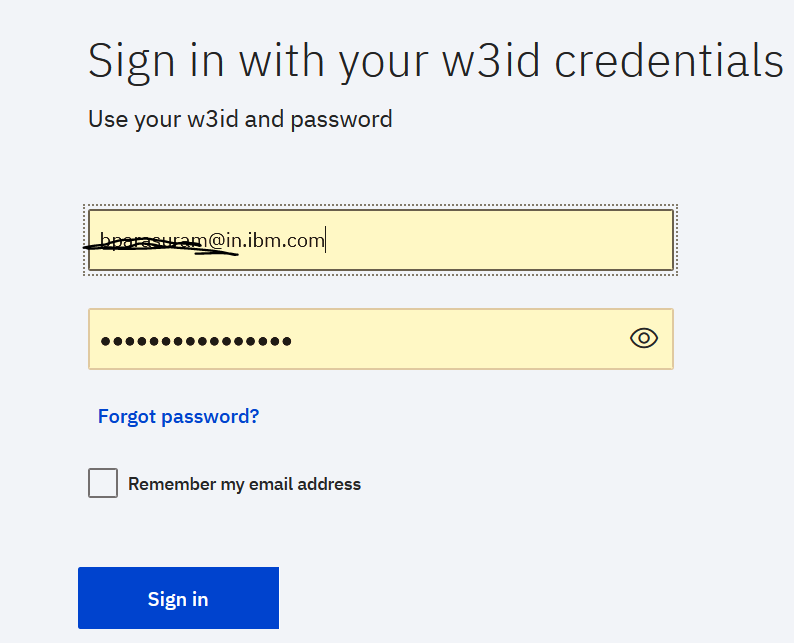
4. Once logged in w3id, the user is redirected back to Keycloak. Keycloak may prompt a user registration screen. If so, enter the email id. This pops only on logging in for the first time. This creates the user in Keycloak internal user repository.
5. The user is logged into BA Studio as shown below. You can see the email id of the user on the top right. Please do note that the user must pre-exist in the LDAP configured with Cloud Pak for Business Automation.

To summarize we have demonstrated how to configure an external OIDC provider such as Keycloak with IBM Cloud Pak for Business Automation 20.0.3. If you need to explore Keycloak in further detail, please visit their site at https://www.keycloak.org/documentation.
#whatsnew
#whatsnew