1. Introduction
To protect the environment from data loss and corruption, it is important to backup the environment, so that the environment could be rebuilt from the backup data if the primary environment failed to provide services when disaster happened.
This document describes sample steps to backup and restore Business Automation Workflow in IBM Cloud Pak for Business Automation 22.0.2 environment to a different openshift environment. More information could reference the IBM Knowledge center.
2. General idea to backup and restore BAW
For BAW (Business Automation Workflow), please consider to backup and restore following data:
- Necessary PVC definition
- Necessary Contents on PV
- Necessary Secrets
- Databases
- CR files
It won’t backup and restore following things, they need to be installed manually on the restore site:
- Openshit platform
- IAF and IBM common services
The deployment may be different in different user’s environment, so the backup and restore method for that environment maybe some different from others. In below section, it is using following configuration and method to backup and restore:
- Use Offline backup method. i.e. stop related pods before backup, so that there is no new data would be generated during backup, and the backup data could be in consistency state.
- The deployment is using NFS as storage, so the backup and restore method here based on the file system.
- The deployment is using dynamic provision.
- The deployment is BAW enterprise pattern for CP4BA 22.0.2 with Business Automation Workflow Capability and Content Platform Engine
- The deployment is using PostgreSQL single instance as database server, and there is not configured JDBC over SSL.
- In this blog, would backup BTS data to S3 compatible storage.
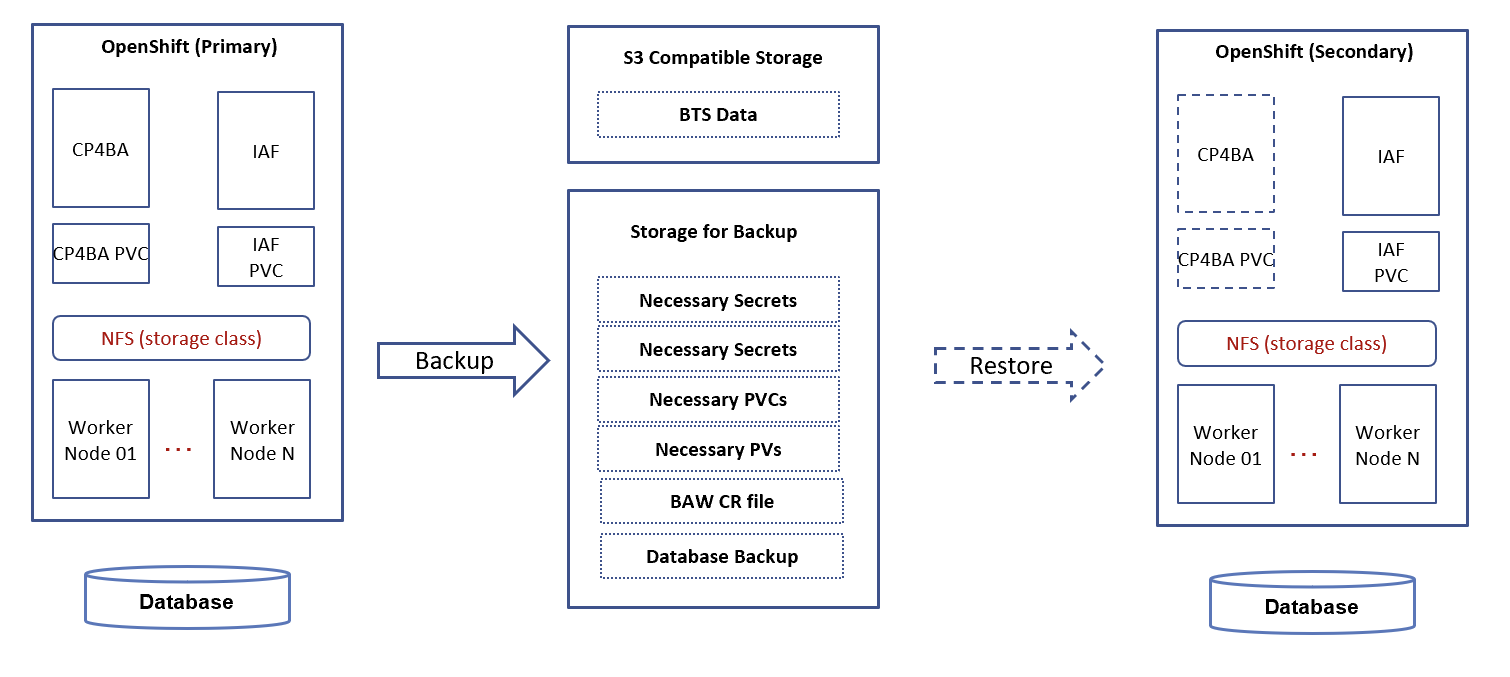
Below diagram demonstrates the general backup/restore procedure discussed in this blog:
3. Some discussion for backup & restore BAW
3.1. UID and namespace
While BAW pod writing and reading files in openshift, the file permission depends on uid, and the uid is associated to the BAW namespace. In general, different namespace may have different uid, the same namespace on different Openshift may have different uid too.
For example, the uid is 1000670000 for namespace “baw” on openshift A, but the uid is 1000640000 for the same namespace “baw” on openshift B. The file was backup with uid 1000670000 for namespace “baw” in openshift A, after restore to openshift B, this file cannot be read and written by namespace “baw” because of different uid.
There are two possible methods to handle such problem:
- After files were restored on openshift B, chown files from original uid 1000670000 to the required uid 1000640000. If the number of files is huge, the chown processing needs some time to complete. This blog would use this method.
- Copy the namespace definition from openshift A, then recreate the namespace with same definition on openshift B before deploying everything. There is no time consuming compared to option A, but some namespace may have same uid.
3.2. Backup and restore BTS
There are some possible methods to backup and restore BTS.
Blog Sample of Backup and Restore Business Automation Workflow Environment for CP4BA 21.0.3 on NFS Storage provides a method to backup BTS data with pg_dump.
This blog would use another different method, the BTS data would be backup to a S3 compatible storage, it could be a AWS S3 storage, a S3 storage provided by Ceph cluster or other compatible storage. For more information about BTS backup and restore, please check BTS document https://www.ibm.com/docs/en/cloud-paks/1.0?topic=service-backup-restore. Below are sample steps:
- To access a S3 storage account, create a secret that contains the Access Key ID and Access Secret, for example:
kubectl create secret generic s3-credentials \
  --from-literal=ACCESS_KEY_ID=<access key>\
  --from-literal=ACCESS_SECRET_KEY=<access secret key>
- Add bts backup section in source BAW CR. For example:
spec:
  ....
  bts_configuration:
    template:
      backup:
        barmanObjectStore:
          endpointURL: http://ceph:80/
          destinationPath: s3://ocp/
          s3Credentials:
            accessKeyId:
              key: ACCESS_KEY_ID
              name: s3-credentials
            secretAccessKey:
              key: ACCESS_SECRET_KEY
              name: s3-credentials
After BAW CR was deployed successfully, the BTS EDB postgresql cluster would included those backup information, the cluster name could be retrieved by command: oc get cluster , then you can check detail information for that.
- Trigger the backup action. After applied the backup yaml file, the backup action could be trigger. After the backup was completed, you could check the content on S3 storage. For example:
apiVersion: postgresql.k8s.enterprisedb.io/v1
kind: Backup
metadata:
  name: bts-bawent-backup
spec:
  cluster:
    name: ibm-bts-cnpg-bawent-cp4ba-bts

Note: ibm-bts-cnpg-bawent-cp4ba-bts is the BTS EDB postgresql cluster name, it could be retrieved from command ‘oc get cluster’.
- Before restore, add recovery section in BAW restore CR. For example:
spec:
  ...
  bts_configuration:
    template:
      recovery:
        barmanObjectStore:
          endpointURL: http://ceph:80/
          destinationPath: s3://ocp/
          s3Credentials:
            accessKeyId:
              key: ACCESS_KEY_ID
              name: s3-credentials
            secretAccessKey:
              key: ACCESS_SECRET_KEY
             name: s3-credentials
- After CR was deployed successfully on target openshift, the BTS data would be restored automatically.
4. Backup on the primary environment
Assumed the BAW enterprise pattern has been setup and configured correctly on primary site. Please reference below steps to backup the primary environment.
- The Cloud Pak custom resource (CR) file used to deploy the environment.
- The secret definition that associated with the CR file. For example, the database username and password etc.
- Backup the uid definition for the primary environment. For example, execute below commands and the output may be a string like 1000670000.
oc describe project $NS | grep uid-range | cut -d"=" -f2 | cut -d"/" -f1
Note: $NS: it is the namespace that deployed the BAW environment.
- For the necessary IAM data, backup the secret demo-cpe-oidc-secret. This step gets simpler compared to version 21.0.3 (see blog Sample of Backup and Restore Business Automation Workflow Environment for CP4BA 21.0.3 on NFS Storage for detail).
echo "  backup secret $ICP4ACLUSTER_NAME-cpe-oidc-secret ..."
kubectl get secret "$ICP4ACLUSTER_NAME-cpe-oidc-secret" -o yaml \
      | yq eval 'del(.metadata.creationTimestamp, .metadata.ownerReferences, .metadata.resourceVersion, .metadata.uid)' -  > "$BACKUP_DATA/src_cpe-oidc-secret.yaml"
- Backup the secret admin-user-details. For example, using below commands to backup.
echo "  backup secret admin-user-details ..."
kubectl get secret admin-user-details -o yaml \
      | yq eval 'del(.metadata.annotations, .metadata.creationTimestamp, .metadata.ownerReferences, .metadata.resourceVersion, .metadata.uid)' -    > admin-user-details.yaml
- Backup the secret for BTS .
echo "  backup secret ibm-bts-cnpg-$NS-cp4ba-bts-app ..."
kubectl get secret "ibm-bts-cnpg-$NS-cp4ba-bts-app" -o yaml \
      | yq eval 'del(.metadata.annotations, .metadata.creationTimestamp, .metadata.ownerReferences, .metadata.resourceVersion, .metadata.uid)' -  >  "$BACKUP_DATA/ibm-bts-cnpg-$NS-cp4ba-bts-app.yaml"
- Stop the environment before backup runtime data. See below commands for example, please note, the “demo” in commands is the ICP4ACluster name that defined in the CR file.
oc scale deploy ibm-cp4a-operator --replicas=0
for i in `oc get deploy -o name |grep demo`; oc scale $i --replicas=0; done
for i in `oc get sts -o name |grep demo`; oc scale $i --replicas=0; done
oc scale sts  zen-metastoredb --replicas=0
- Backup PVC definition for following PVC:
-
- cpe-filestore
- icn-cfgstore
- datadir-zen-metastoredb-0
- datadir-zen-metastoredb-1
- datadir-zen-metastoredb-2
- demo-instance1-baw-jms-data-vc-demo-instance1-baw-jms-0
- demo-instance1-baw-file-storage-pvc. Note: if some customization were uploaded to the /opt/ibm/bawfile path for BAW server, this PVC/PV need to be backup, otherwise, skip it.
For static PV, you owned every PVC definition, so you can keep a copy of it directly. For dynamic provision, PVC/PV definition would be created by operator automatically, below commands give an example on how to retrieve the pvc definition for above PVC:
pvc_file="pvc.yaml"

oc get pvc -n $NS --no-headers=true | while read each
do
    pvc=`echo $each | awk '{ print $1 }'`
    pvc_backup=false

    case $pvc in
        *"cpe-filestore"*)  pvc_backup=true ;;
        *"datadir-zen-metastoredb-"*)  pvc_backup=true ;;
        *"icn-cfgstore"*)  pvc_backup=true ;;
        *"baw-jms-data-"*)  pvc_backup=true ;;
        *"jms-pvc-"*)  pvc_backup=true ;;
        *) continue ;;
    esac

    if [ "$pvc_backup" = true ] ; then
        echo "  backup pvc yaml for $pvc"
        kubectl get pvc $pvc -o yaml \
          | yq eval 'del(.status, .metadata.finalizers, .metadata.resourceVersion, .metadata.uid, .metadata.annotations, .metadata.creationTimestamp, .metadata.selfLink, .metadata.managedFields, .metadata.ownerReferences, .spec.volumeMode, .spec.volumeName)' -  >> $BACKUP_DATA/$pvc_file
        echo "---" >> $BACKUP_DATA/$pvc_file
    fi
done
- Backup content for PV.
For dynamic PV, it is not a static name for the generated directory, for example, the directory name may be “bawent-cmis-cfgstore-pvc-ctnrs-pvc-e5241e0c-3811-4c0d-8d0f-cb66dd67f672”, the directory name would be different for different deployment. Here is to use a “mapping” directory to backup the content.
You could retrieve and backup each PV directory manually. Please note, it’s better to preserve permissions for all content during backup.
Below is a sample script to create a backup. It would backup content for all PVC/PV, and it would restore the necessary PVs only during restore procedure.
oc get pvc -n $NS --no-headers=true | while read each
do
    pvc=`echo $each | awk '{ print $1 }'`
    pv=`echo $each | awk '{ print $3 }'`

    if [  -d "$SOURCE_PV_DIR/$NS-$pvc-$pv" ]
    then
        echo "  backup pv $pv for pvc $pvc"
        mkdir -p “$BACKUP_DIR/pvfiles/$pvc”
        cp  -r  -a $SOURCE_PV_DIR/$NS-$pvc-$pv/.  “$BACKUP_DIR/pvfiles/$pvc”
    else
        echo "  NOT FOUND for $pvc !"
    fi
done

cd
echo -e "\n  compress the PV backup files  into $BACKUP_DIR/pv.tgz ..."
cd $BACKUP_DIR
tar cpzf /$BACKUP_DIR/pv.tgz  ./pvfiles/*

Please note, in above scripts, for the variable:
• $NS: it is the namespace that deployed the BAW environment.
• $SOURCE_PV_DIR: the location where the NFS mounted directory.
• $BACKUP_DIR: the location used to save the backup files and data.
- Backup BTS. Apply the backup yaml file mentioned above, BTS backup data into S3 compatible storage.
apiVersion: postgresql.k8s.enterprisedb.io/v1
kind: Backup
metadata:
  name: bts-bawent-backup
spec:
  cluster:
    name: ibm-bts-cnpg-bawent-cp4ba-bts

Note: ibm-bts-cnpg-bawent-cp4ba-bts is the BTS EDB postgresql cluster name, it could be retrieved from command ‘oc get cluster’.
- Backup Databases, this could be done with database commands.
- Copy all above backup files and data to the remote storage.
5. Restore on the different environment
Prerequisite before restore:
- IAF/common services should be installed.
- Create a openshift project with exactly the same name as the primary environment.
Please reference below steps to restore the environment on the secondary openshift server.
- Restore all the databases from the backup images.
- Restore PVC, apply the generated pvc.yaml.
- Restore content of PV.
- Extract the pv.tgz with preserved file permissions.
tar cpzf pv.tgz ./pvfiles/*
- Check the uid used for the primary environment and secondary environment. For example, execute below commands on both environments.
oc describe project $NS | grep uid-range | cut -d"=" -f2 | cut -d"/" -f1
The output maybe :
For primary environment, the uid is 1000670000
For secondary environment, the uid is 1000640000
- For the exacted files, modify file permissions to associate with secondary environment. E.g. , modify uid to
100064000 for the files whose uid is 100067000:
find ./ -uid 1000670000 -exec chown 1000640000:root {} \;
- Restore the PV content for following PVC:
- cpe-filestore-pvc-ctnrs
- icn-cfgstore-ctnrs
- datadir-zen-metastoredb-0
- datadir-zen-metastoredb-1
- datadir-zen-metastoredb-2
- demo-instance1-baw-jms-data-vc-demo-instance1-baw-jms-0
Copy all corresponding files for above PVs with same permission. For example, Below is a sample script to restore content for the necessary PV.
NS=bawent
BACKUP_DIR=/home/backup
BACKUP_PV_DIR=$BACKUP_DIR/pvfiles
TARGET_PV_DIR=/home/pv/2103

if [ ! -d $BACKUP_PV_DIR ] ; then
    echo "Not found backup files! "
    exit
fi

oc get pvc -n $NS --no-headers=true | while read each
do
    pvc=`echo $each | awk '{ print $1 }'`
    pv=`echo $each | awk '{ print $3 }'`
    # echo "$pvc : $pv "

    case $pvc in
        *"cpe-filestore"*)  echo "restore $pvc" ;;
        *"datadir-zen-metastoredb-"*)  echo "restore $pvc" ;;
        *"icn-cfgstore"*)  echo "restore $pvc" ;;
        *"baw-jms-data-"*)  echo "restore $pvc" ;;
        *"jms-pvc-"*)  echo "restore $pvc" ;;
        *) continue ;;
    esac
    if [  -d "$BACKUP_PV_DIR/$pvc" ]
    then
        echo "  cp -r -a $BACKUP_PV_DIR/$pvc/.  $TARGET_PV_DIR/$NS-$pvc-$pv/ "
        cp -r -a $BACKUP_PV_DIR/$pvc/*  $TARGET_PV_DIR/$NS-$pvc-$pv/
    else
        echo "NOT FOUND for $pvc"
    fi
done
- Restore secrets. Create the secure from the backup secure definition. To restore BTS, recreate the secret s3-credentials.
- Prepare the CR definition for the secondary environment.
- The hostname might be different between the source environment and secondary environment. If they are different, you can change the hostname in the CR files to match the hostname of the secondary environment.
- If initialization has been done in original deployment, set “
shared_configuration.sc_content_initialization: false” and “shared_configuration.sc_content_verification: false”to avoid redo initialization and verification to break existing data in database.
- If BAI is enabled, please remove
initialize_configuration section in CR.
- Add the BTS recovery section if necessary.
- Apply the CR to deploy the BAW environment.
- Check the environment after deployment was done.
Note: For above manual steps, the blog Sample of Backup and Restore Business Automation Workflow Environment for CP4BA 22.0.2 on NFS Storage with Automation provides a group of scripts to automate them.
6. Reference
[1] IBM Cloud Pak for Business Automation 22.0.2 - Backing up your environments
[2] IBM Cloud Pak for Business Automation 22.0.2 - Restoring your environments
[3] Business Teams Service - Backing up and restoring