 Applies to: Apptio TBM Studio v.12.0 and later
In this article:
Introduction
This article is intended for TBMAs or other users who configure Apptio platform products, such as Cost Transparency. This article provides some background on the limits of workspace performance, and Apptio's recommended best practices to achieve the best possible performance within the workspace.
When a user works in a workspace, they leverage a workspace node. Think of the workspace node as a server. Any user who modifies the configuration of Apptio platform projects uses resources (CPU, memory, and so on) on the workspace node. Workspace nodes host multiple user workspaces. Therefore, the actions of one user can impact the experience of other users on the same workspace node.
Recommended best practices
Apptio recommends the following best practices to be most effective.
Anticipate load and consider what is required to accomplish the goal
When you are about to make changes to a table, model, or report, first consider the possible results of any edits you perform. For example, if you make a change to a table and then view a report that shows a 12-month trend of the data on that table, you are requesting that Apptio calculate that table—and any dependencies on that table—for 12 periods.
Unless you are specifically checking final numbers in a report, you don't need for the system to calculate everything. Use these methods in this document to limit the impact and allow you to proceed faster.
Also, the following may be of use:
Toggle Auto Calculate when appropriate
The Auto Calculate button in the Studio Ribbon defaults to being on. This is intentional and in most situations it is appropriate. However, when you are working with complex config that includes large tables, or if you have many tables checked out, it may be advantageous to turn it off.
The system defaults to keeping everything in your workspace updated. What this means is that if you have ten documents (tables, metrics, reports) checked out, and you make a change in one, the system will do everything necessary to update the other nine. If there are no dependencies between the tables then this usually isn't a problem. However, it's rare for a TBMA to be working on totally unrelated documents. Also, the size and complexity of the relationships between the documents can have a significant impact.
When you toggle Auto Calculate off, then both the "Update Document" and "Update Workspace" buttons will be on: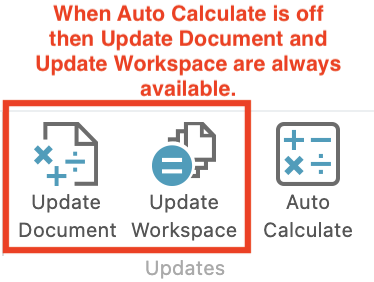
If you turn off Auto Calculate there are a few things to bear in mind:
- Don't forget to turn it back on when you are done. Sometimes folks forget, come back a day later, and think Studio is broken. It's best to always turn it on when you walk away.
- Only documents you have checked out will be updated. If you navigate to a document which isn't checked out don't expect to see changes, even if there are dependencies between that document and the documents you are actively working on.
- When you make a change to a document, then navigate to another document you have checked out, you will need to click either the Update Document button, or the Update Workspace button to see changes reflected.
- With Auto Calculate off the Update Workspace button does double duty. Normally you would use the Update Workspace button to incorporate changes others have checked-in after they have calculated. When Auto Calculate it off this button also serves to refresh all the documents you have checked out at once.
Use the Task Manager to Stop All Tasks
When you do hit a report after changing something the system will do all it can to render that report for you. If the report has reports with backwards looking trends, year to date time aggregates etc., then it may start recalculating the entire model.
If you navigate to a report and you see what you need to see, before leaving the report check the Task Manager to see if there are running threads you may wish to terminate.
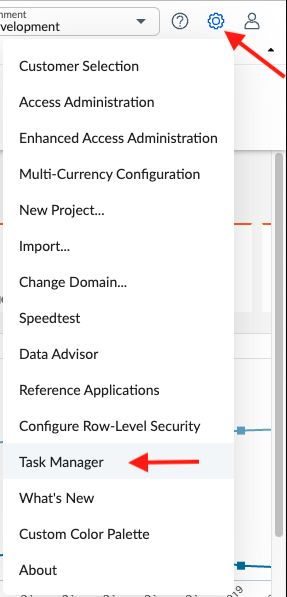
If you do see threads in the Task Manager they are yours and yours alone. You can click the "Stop All Tasks" button and have no fear of impacting anybody else working in the system:

Bear in mind that it may take a little time for the threads tasks to terminate. So do not be concerned if they linger for a while. If they linger for a long time (e.g. 60+ minutes) then you should contact Support as that could be indicative of underlying configuration issues.
Limit time (especially in branches)
In a Branch:
If you are working in a branch with other users, you want to make the branch as lightweight as possible. The two main reasons for that are:
- A branch should typically be used temporarily to either configure something new or test certain changes or ideas. As such, any calculations should only cater to the specific needs of the task being done on that branch and provide the quickest possible turnaround.
- Check-ins in a branch share the stage builds queue with check-ins in Trunk. As such, we should try to minimize the impact and not hold up concurrent check-ins that may be taking place in Trunk.
So, it is highly recommended to limit the time periods for the entire branch. This benefits performance for the workspace of everyone on the branch.
When the users collectively finish making changes on the branch and are ready to merge to the trunk, the time settings can be restored to support validation prior to merge.
Note that when merging the branch to the trunk, you select which check-in(s) to merge, and you would typically not want to merge that time limitation which you had set in the branch. So, it is recommended to start the branch with limiting time and checking in that change alone, to minimize the risk of accidentally merging it back to Trunk.
Any trended table or report will affect calculation times when the relevant periods are open. Unless you are working on a trended table or chart, there is no need to have multiple time periods open. If you are working on a trend, consider if you require 12 or more periods, or if fewer periods (for example, three periods) will be enough. Reducing the number of time periods also reduces the time required to calculate multi-period trends when browsing reports. Remember, a multi-period trend means that one or more models must calculate for all those periods to display the data.
For more information on branches best practice in general, see Best practices: Branching projects.
In Trunk:
If possible, limit the time periods in your workspace (see Configure project time settings ) and discard the settings change when you finish the work.
Note that currently, only one user can have time settings checked out at a time. If you attempt to change time settings and it doesn't work, it is likely that another user has the time settings checked out.
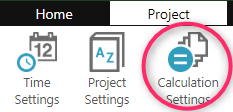
Another best practice, which typically has big impact on calculation times, is limiting the time periods for reports pre-calculation using the Calculation Periods button on the Project tab:
Reports for periods outside the selected range may still be accessible, but will be calculated in real-time, which may be time consuming. The selected range should reflect the periods which are actually required for reporting on a regular basis by your organization.
You can leverage Apptio Usage to analyze which reports may not be used much for certain periods to facilitate making the decision. You can find more information on this here: Monitor engagement with Apptio Usage reportsMonitor engagement with Apptio Usage reports
Finally, if you can eliminate certain periods from Apptio altogether, making them totally inaccessible in the project, you can do it by eliminating them from the Start of Project setting in Time Settings.
This may be useful when the first periods/year(s) of the project are no longer needed on a regular basis, and any important reports from those periods can be archived elsewhere or simply purged.
Use periods with little data to your advantage
If you know what you need to do, but you are struggling to get a table to load, you may be able to change to a time period in which there is little or no data loaded to make your edits. If every period has data loaded then you may be able to do the following:
-
Edit the project's time settings in your workspace to open a new time period. This will appear as a change to the "Project Settings" should you attempt to check-in or discard. Later in this process you will discard this change.
-
Navigate to the table you wish to edit in the newly opened period.
NOTE: If there is data in the table, you may have an issue with the way the Data Refresh Cycles are configured. See the Make sure Data Refresh Cycles are appropriate section of the Optimizing pipeline and formula performance for large data document for more information.
-
Check-out the table and make your changes.
-
Optionally navigate back to a time period with data to validate the changes.
NOTE: If you do this you must endure the time it takes to load, but if you really need to validate that's the only way. If you attempt to do this, and decide it is taking too long, then do not just walk away. Use the Task Manager to Stop All Tasks so the system doesn't waste resources processing something you no longer care about.
-
Discard the change to the Project Settings so you don't commit the opening of the new period.
-
Check-in the other changes as appropriate.
Limit rows
Unless you are validating numbers after making configuration changes, it is rarely necessary to have numbers be accurate. For example, if there is a need to add or change columns in a table on a report that shows aspects of the relationship between Applications to Cost Pools (see How To: Use show full data path in the Studio 11 Knowledge Base for information on how to know what your report is doing) you can temporarily apply a filter on Cost Source or Cost Source Master Data to limit rows (for example, filter to just labor or an appropriate subset of records). This action will reduce what Apptio needs to calculate to display the report in your workspace, and it also reduces the load on the workspace node and allows you to move faster while editing.
The same action also applies to work on models (for example, allocations) or large tables (see Optimizing pipeline and formula performance for large data for more information on what can make transforms slow).
Look at pipeline efficiency and dependencies
If you work on a project with massive tables, you may encounter slowness due to the efficiency of the pipeline configuration of those tables--and it may not necessarily be the table you are working on. For example, let's say you are working on Table B that performs a lookup to Table A, so you have both tables checked out and you are making changes to both. However, consider that another lookup in Table B might go to Table C, which has a dependency on Table A as well, as in this example:
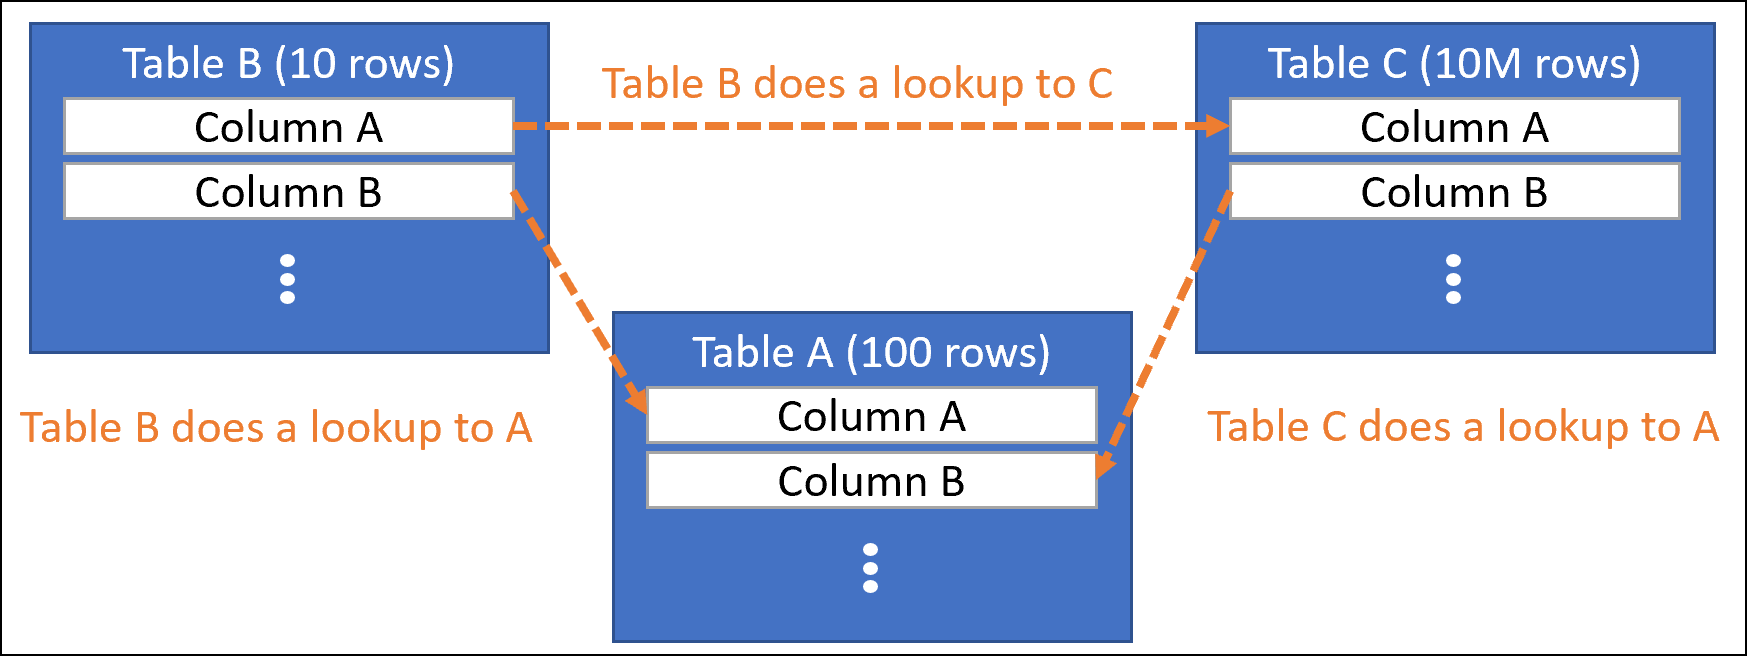
(Click to enlarge)
In this case, every time you change something in Table A, you might notice that it takes a long time for Apptio to calculate Table B. (It is only 10 rows and Table A is only 100.) In this example, the calculation of Table C, which is 10,000,000 rows, is taking greater time. This is a simple example—sometimes the dependencies may be several tables apart.
If you work with massive data sets, then become familiar with the Optimizing pipeline and formula performance for large data article. Also, if you find you have a dependency on a massive table and you either want to optimize it or you want to work on related tables, you can put a temporary filter on the table. This will reduce the row count of the table in your workspace so that you can move faster. Remove the filter on the table when you are done to validate the output.
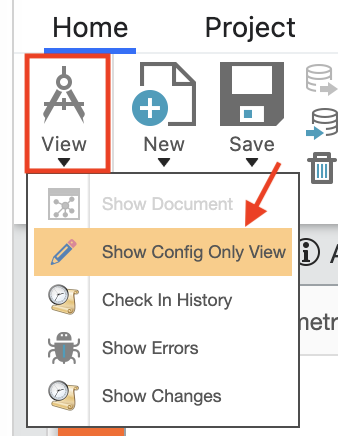
Use the "Show Config Only" view while modeling
If you are editing a table which is modeled, you can use the "Config Only" view to make things snappier. This allows you to more rapidly edit the config without as many delays related to the system updating views. Bear in mind this is toggled on a per-object basis.
Config Only mode is accessible via the "View" drop down menu in the ribbon as follows:
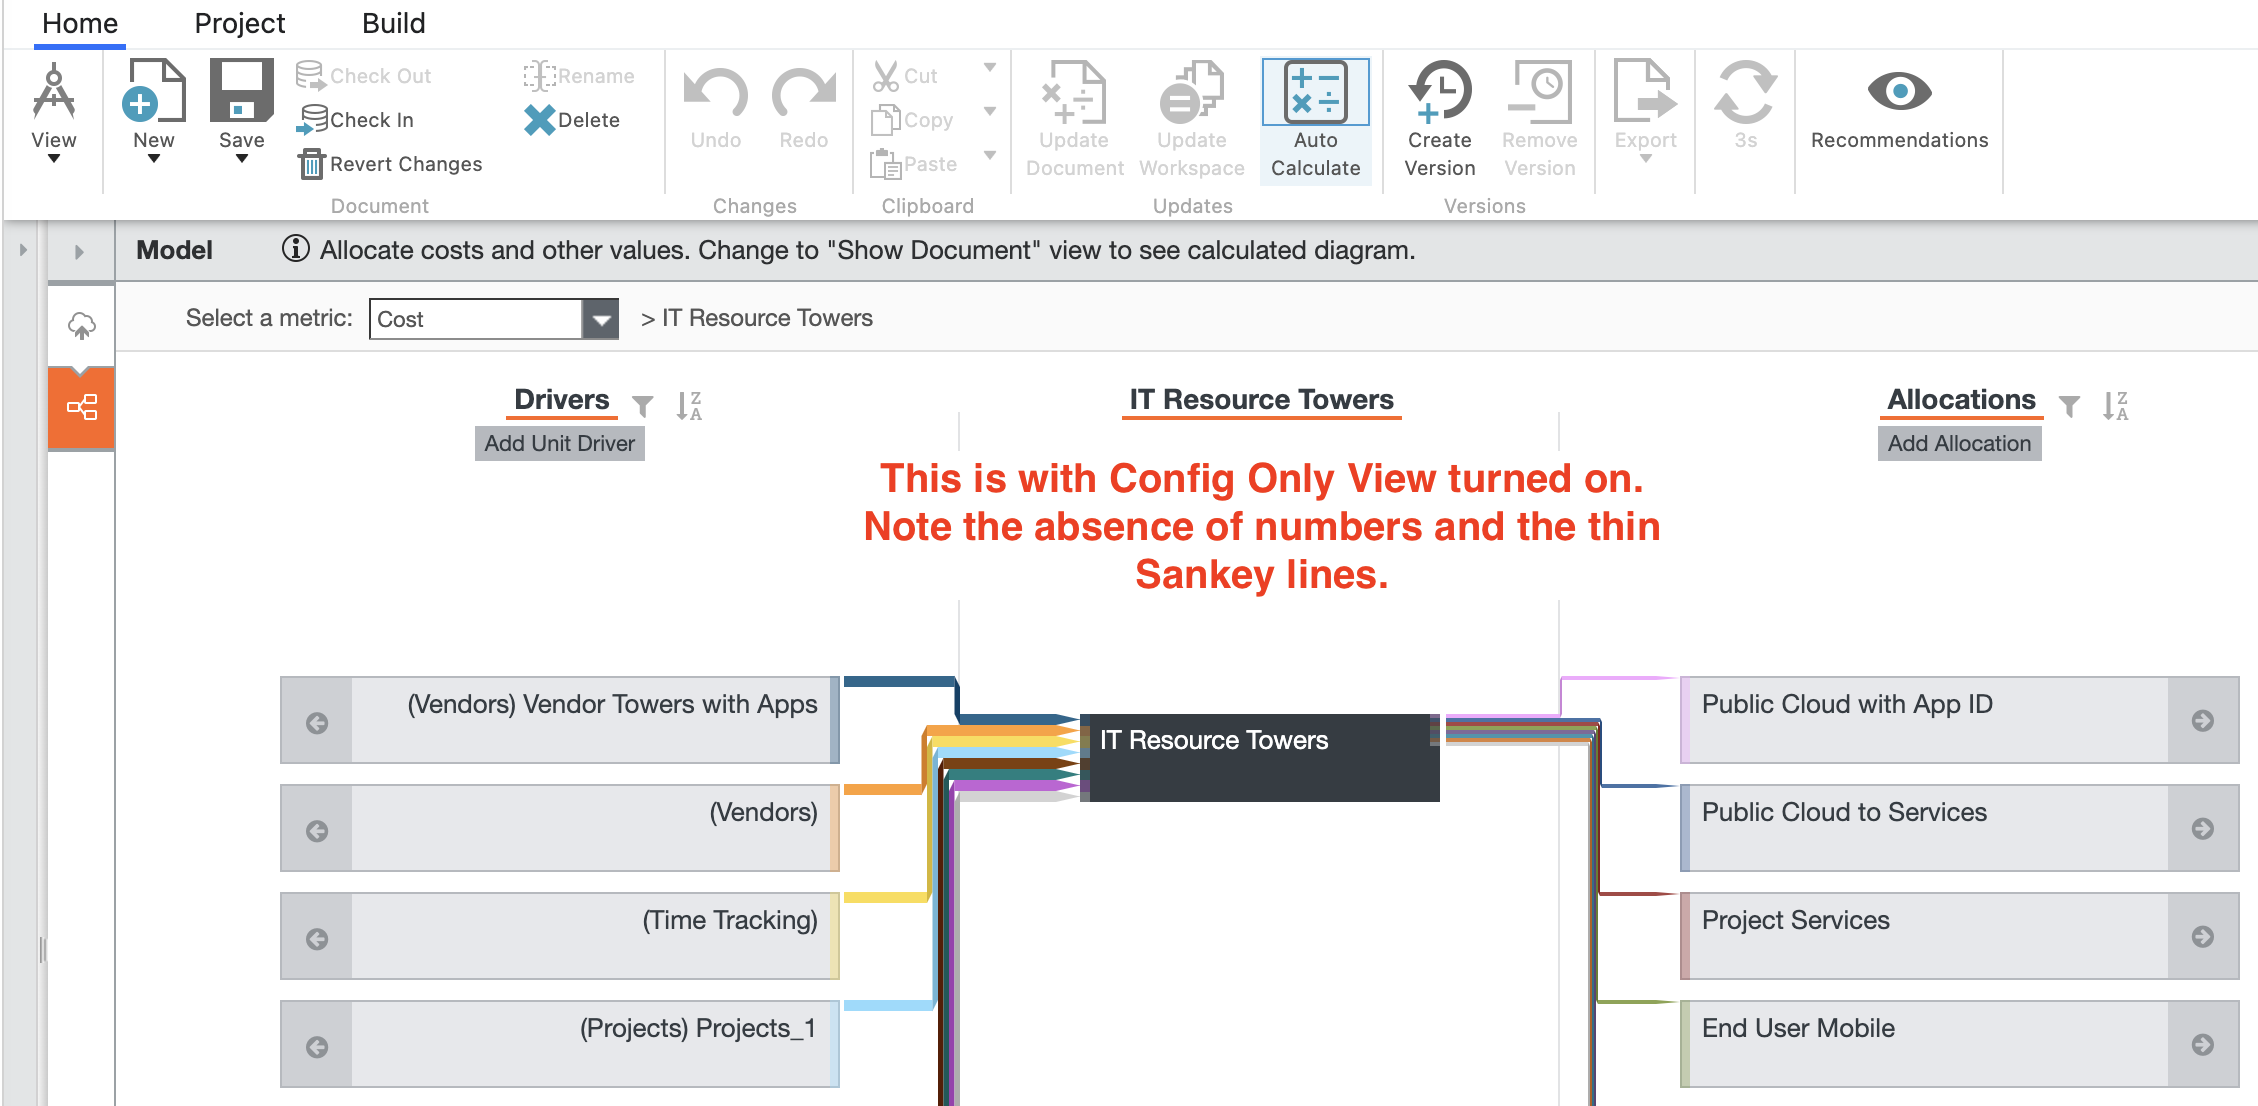
When this is turned on you will not see numbers in the model view:
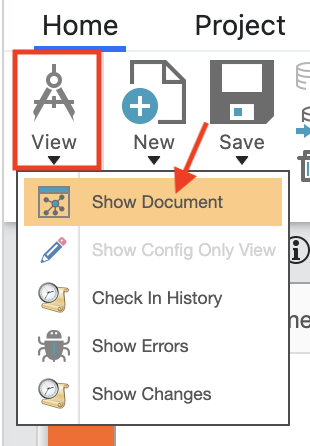
To turn off Config Only View select "Show Document" in the same drop down:
(Back to top)
This article is open for your feedback. At the bottom of this page, click Add a comment.