In this blog post, we will show you how to get started with deploying Turbonomic-optimized OpenShift on IBM Cloud. This tutorial shows the setup steps for getting your application up and running in minutes using a few simple steps in the web console for IBM Cloud and OpenShift.
You'll also learn how to instrument your environment to assure application performance using Turbonomic, which is key when it comes to managing your applications' workloads across hybrid clouds and cloud-native infrastructure.
On-Demand and Easy-to-Deploy - What's Needed?
You are going to get the ground-up deployment which will include three easy steps to get a fully functional OpenShift environment on IBM Cloud including the Turbonomic ARM (Application Resource Management) platform targeting to enable continuous optimization for assuring application performance on your OpenShift environment.
The process begins by heading over to https://cloud.ibm.com and either logging in or setting up a new account for you to run. There are some nominal costs to running the lab infrastructure I use in my demo environments so please note that as you plan to run your own deployment using the on-demand resources from IBM Cloud and the integrated Red Hat OpenShift platform.
We've also assumed that you have a running Turbonomic instance. For cases where you want to run Turbonomic right in your Kubernetes cluster we will also share a walkthrough of how to do that by following a great code pattern we have worked on with our friends in the IBM Developer Advocacy team.
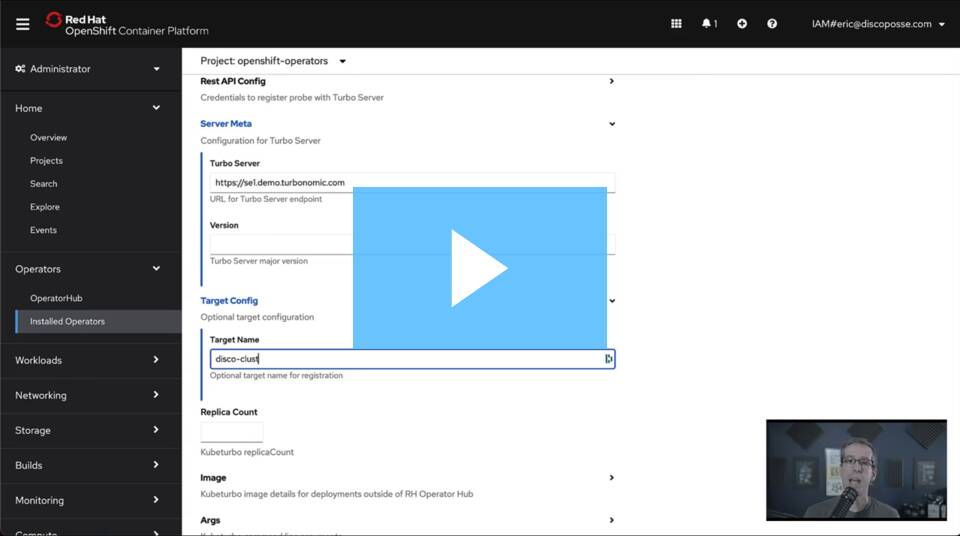
The Video Fast Forward - Only 5 Minutes of Configuration!
If you like visual learning, check out the entire process in just 5 minutes!
Setting up OpenShift on IBM Cloud
Our goal is to be able to have a multi-node OpenShift environment that is deployed in the cloud and that we can instrument with Turbonomic to assure application performance.
The tools used in this tutorial are as follows:
- IBM Cloud account, either on demand or an existing one you have already configured for running your applications.
- Red Hat OpenShift platform - built right into the IBM Cloud using the easy deployment wizard
- Turbonomic targeting using KubeTurbo Operator - a simple one-click deployment from the OperatorHub
Now is the time to go ahead and create your IBM Cloud account. If you already have one, please log in now or set up a new account for yourself. You will not need much more than an email address, password, billing information (optional) and a credit card number if you want to use on-demand services.
Once you're in, head over to the dashboard and you'll see the option to create an OpenShift environment:

You don't have very many configuration settings needed. You just want to pick your infrastructure style (Classic, VPC, Satellite in your data center). We use classic in this example and once you're set there you just scroll down and select the resilience pattern.
This example uses a single-zone, 2-node design for limited resiliency but with scaling as an option if we keep growing the environment.

Click on Create and you are on the way. There is about a 20-30 minute build process that happens for you and then you will be on to the OpenShift environment right from the button in the top of your IBM Cloud cluster dashboard.
Logging into OpenShift and Configuring KubeTurbo
You are already up and running with OpenShift without any other configuration needs. Thank you, IBM and Red Hat on-demand goodness! Click down in the Operators section and you'll open up the search area for the OperatorHub to find the official Turbonomic operator.

The only options you have available should be fine as the default so that Turbonomic will have full visibility and access to all the existing (and future) namespaces.

Click the install button and the deployment should take just a couple of minutes. What's going on behind the scenes is a massive time saver because you're getting the latest code right from the OperatorHub so that you have no YAML to deal with, no Helm charts, no dials, no knobs, no worries. Operators make your administrative life nice and easy.

Next up is your configuration of the KubeTurbo to connect it up to your running Turbonomic ARM instance. All you will need is your username and password. An excellent configuration pattern is to create a specific service account on your Turbonomic instance for this environment in the case you have to roll over the credentials.
There are also options to use secret management which we can cover in a longer form blog in future.

Your URL for the Turbonomic ARM instance is needed. This will have to be available via the network to your KubeTurbo deployment. I've created a secure internet-facing endpoint behind a load balancer for mine for safety and ease of access from anywhere I need it.

The final setting you need is your cluster name. This can be a meaningful name using whatever naming convention you want to assign. If you don't specify a name then the default is Cluster_name which is what will show up in Turbonomic. This is why it's ideal to give it a meaningful name to make it quick to identify for your team.

Now we are submitted and ready for the next Turbonomic ARM discovery cycle to pull in all the analytics and dependency information from your real-time environment.

What you've just done with less than 5 minutes of actual task work elapsed over less than an hour of overall wait time is pretty amazing if you think about it.
You've done this without the need for anything but billing info and internet access:
- Created an IBM Cloud account
- Launched a multi-node Kubernetes cluster powered by OpenShift
- Deployed a Turbonomic KubeTurbo instance from OperatorHub with one click
- Instrumented your K8s cluster using Turbonomic ARM
Now you can deploy your apps as easy as a few clicks or a CLI and you'll see the power of where going from code to active deployment now also connects right to your Turbonomic environment. Click here to see the full walkthrough of that process that I blogged a full walkthrough of: https://blog.turbonomic.com/code-commit-deploy-an-openshift-primer
If only everything in IT life was this easy!