IBM Turbonomic is an Application Resource management solution that ensures continuous application performance, while optimizing the cost and assuring the compliance at the same time across on-prem and public cloud environments.
Turbonomic platform can be deployed on a Virtual Machine (as VMware OVA image or Microsoft Hyper-V image) or onto any x86 Linux-based Kubernetes cluster or Red Hat OpenShift platform.
In this blog, we will explain how you can deploy Turbonomic on EKS cluster on AWS, secure it using a certificate issued by AWS-ACM, terminate Transport Layer Security (TLS) at the Network Load Balancer (NLB) and access Turbonomic Console through a custom domain registered / defined in Route 53.
Prerequisites
- EKS Cluster with at least three worker nodes
- Each worker node with a minimum configuration of 4 vCPU and 16 GB RAM
- Block or File storage class configured on the cluster
Turbonomic on AWS EKS – Deployment Architecture
This architecture diagram depicts our deployment architecture for Turbonomic on EKS cluster.

Deployment Steps
We shall follow the steps given below at a broad level, to deploy Turbonomic on AWS EKS Cluster:
Step 1: Deploy Elastic Block Storage (EBS) CSI Driver
Step 2: Reserve a Domain name
Step 3: Request the Transport Layer Security (TLS) certificate
Step 4: Deploy Turbonomic
Step 5: Configure Network Load Balancer (NLB)
Step 6: Create routing entry in hosted zone
Step 7: Access Turbonomic Console from browser
Step 1: Deploy EBS CSI Driver
When an EKS cluster is deployed, a default storage class with the name ‘gp2’, which is backed by EBS, is pre-configured. Turbonomic supports both block and file type of storage for its data persistence requirements. Here let us make use of this pre-configured storage class.
Configure an IAM policy with appropriate permissions to allow worker nodes to create and modify Amazon EBS volumes. After that, deploy EBS CSI driver by following the steps mentioned in this AWS Blog:
https://aws.amazon.com/premiumsupport/knowledge-center/eks-persistent-storage/
Under ‘Resources’ tab in AWS EKS dashboard, you can see the installed EBS CSI driver:

Step 2: Reserve the Domain name
If you do not have a custom domain already, reserve a domain through AWS Route53 service (or any other Domain Registrar). For example, if I want to have my Turbonomic URL to be like ‘turbo.ibmgsilab.com’, I can register for the domain ‘ibmgsilab.com’.
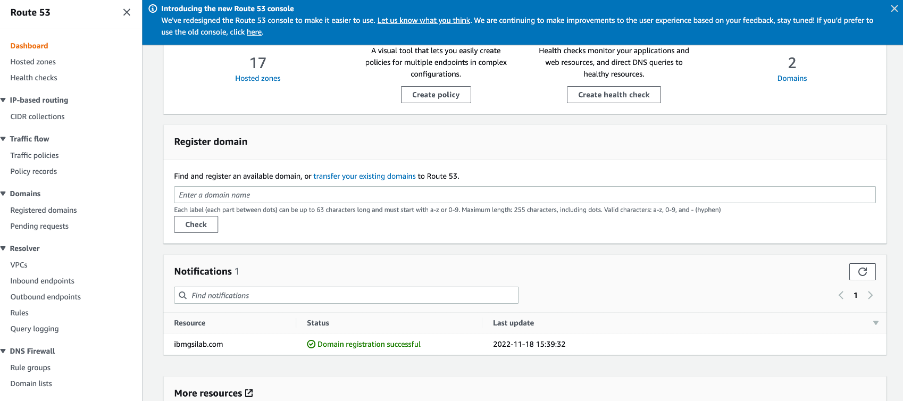
You can follow the steps in the link given below to register your domain with Route53 service:
https://docs.aws.amazon.com/Route53/latest/DeveloperGuide/domain-register.html
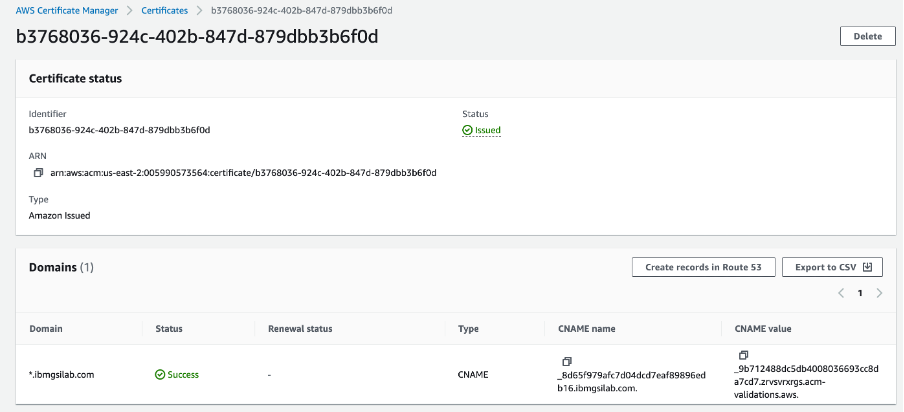
Step 3: Request the TLS certificate
Now request a public certificate that will be enforced at the NLB. You can request certificate for a fully qualified domain name or with wildcard. In this example, we request a wildcard certificate for our domain ‘ibmgsilab.com’.

You can follow the steps give at the link below to create a TLS certificate using AWS-ACM service:
https://docs.aws.amazon.com/acm/latest/userguide/gs-acm-request-public.html
Step 4: Deploy Turbonomic
Turbonomic provides operator-based installation for easy deployment and lifecycle management of Turbonomic platform. The detailed steps can be found at below GitHub location:
https://github.com/turbonomic/t8c-install/wiki
In our case, we will follow the steps for multi-node deployment.
Step 4.1: Create a namespace
Create a new namespace. As an example, we created ‘turbonomic’ namespace, where the turbonomic software would be deployed.
kubectl create ns turbonomic

Step 4.2: Create the Custom Resource Definition (CRD)
Create the custom resource definition to allow the Turbonomic Operator to deploy all the necessary resources.
For Kubernetes version 1.22 and higher, run below command.
kubectl create -f https://raw.githubusercontent.com/turbonomic/t8c-install/master/operator/config/crd/bases/charts.helm.k8s.io_xls.yaml

If your cluster is on earlier version of Kubernetes, you need to run below command to create the CRD:
kubectl create -f https://raw.githubusercontent.com/turbonomic/t8c-install/master/operator/deploy/crds/charts_v1alpha1_xl_crd.yaml
Step 4.3: Deploy Turbonomic Operator
In this step we create credentials and also a custom resource definition to deploy the operator. These resources are namespaced and you only need to be the admin of your namespace / project.
We will enable Turbonomic to manage this EKS cluster also, which needs deployment of KubeTurbo on this cluster. This requires us to create ClusterRole and ClusterRoleBinding resources.
- Create the operator service account.
kubectl create -f https://raw.githubusercontent.com/turbonomic/t8c-install/master/operator/deploy/service_account.yaml -n turbonomic
- Create the cluster role.
kubectl create -f https://raw.githubusercontent.com/turbonomic/t8c-install/master/operator/deploy/cluster_role.yaml -n turbonomic
- Create the cluster role binding.
kubectl create -f https://raw.githubusercontent.com/turbonomic/t8c-install/master/operator/deploy/cluster_role_binding.yaml -n turbonomic
Now launch the Turbonomic Operator pod.
kubectl create -f https://raw.githubusercontent.com/turbonomic/t8c-install/master/operator/deploy/operator.yaml -n turbonomic
Wait for the operator to become available (status = running with ready column indicating 1/1).
Check the status using: kubectl get pods -n turbonomic

Step 4.4: Create Turbonomic Instance through Custom Resource (CR)
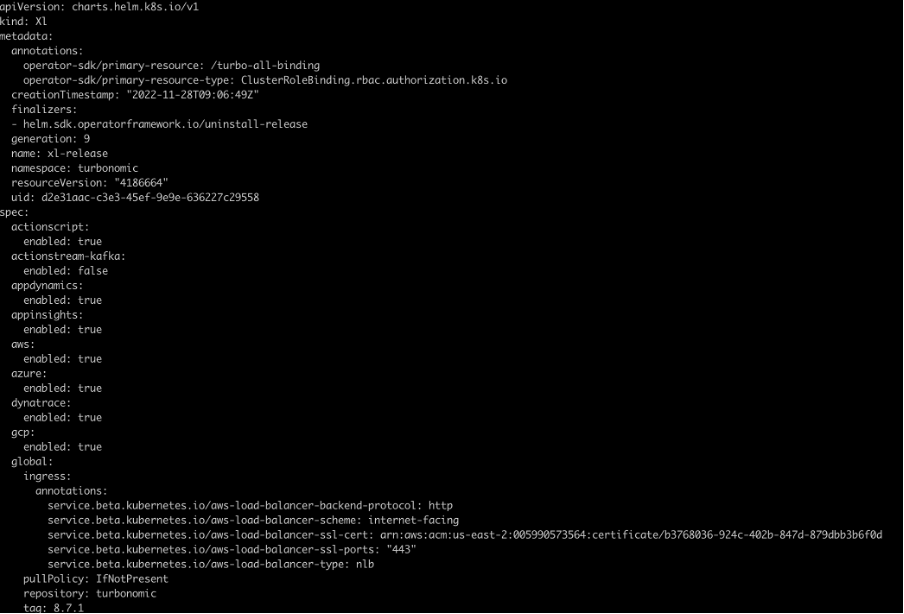
In this step we deploy Turbonomic by using a Custom Resource where we specify few deployment configurations. Turbonomic provides a base deployment configuration file, which can be modified to suit our requirements. The CR resource is namespaced, and you only need to be the admin of your namespace / project to create an instance of the Turbonomic platform.
Download the CR sample deployment configuration from the link given below:
https://raw.githubusercontent.com/turbonomic/t8c-install/master/operator/deploy/crds/charts_v1alpha1_xl_cr.yaml.
Make the modifications required for your environment. You can enable appropriate probes for your environments. Here we have two important configurations to be done to provision an NLB with TLS termination at the load balancer.
First get the ARN of the public certificate that you have created using AWS ACM.
In the CR YAML file downloaded, add following annotations under the spec --> global --> ingress --> annotations:
global:
ingress:
annotations:
service.beta.kubernetes.io/aws-load-balancer-backend-protocol: http
service.beta.kubernetes.io/aws-load-balancer-scheme: internet-facing
service.beta.kubernetes.io/aws-load-balancer-ssl-cert: arn:aws:acm:us-east-2:005990573564:certificate/b3768036-924c-402b-847d-879dbb3b6f0d
service.beta.kubernetes.io/aws-load-balancer-ssl-ports: "443"
service.beta.kubernetes.io/aws-load-balancer-type: nlb
Here replace the certificate ARN with the one you have created.
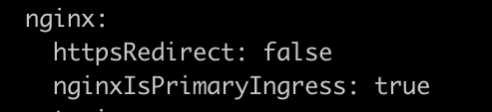
Also disable httpsRedirect and make nginxIsPrimaryIngress as true under spec --> nginx
Now create the Turbonomic instance using this updated CR YAML file:
kubectl apply –f {path_to_modified_CR_file.yaml} -n turbonomic

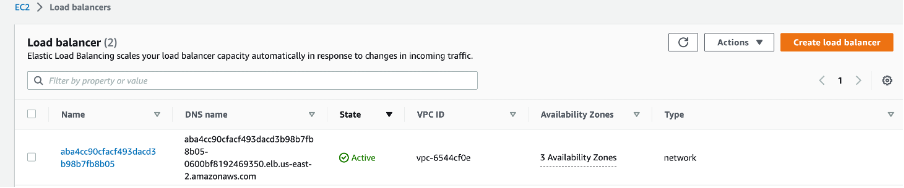
Wait for few minutes for all the pods to come into ready state. You can check the status of the created NLB.
kubectl get svc -n turbonomic | grep nginx
It may take couple of minutes for the NLB to come into ‘Active’ state.
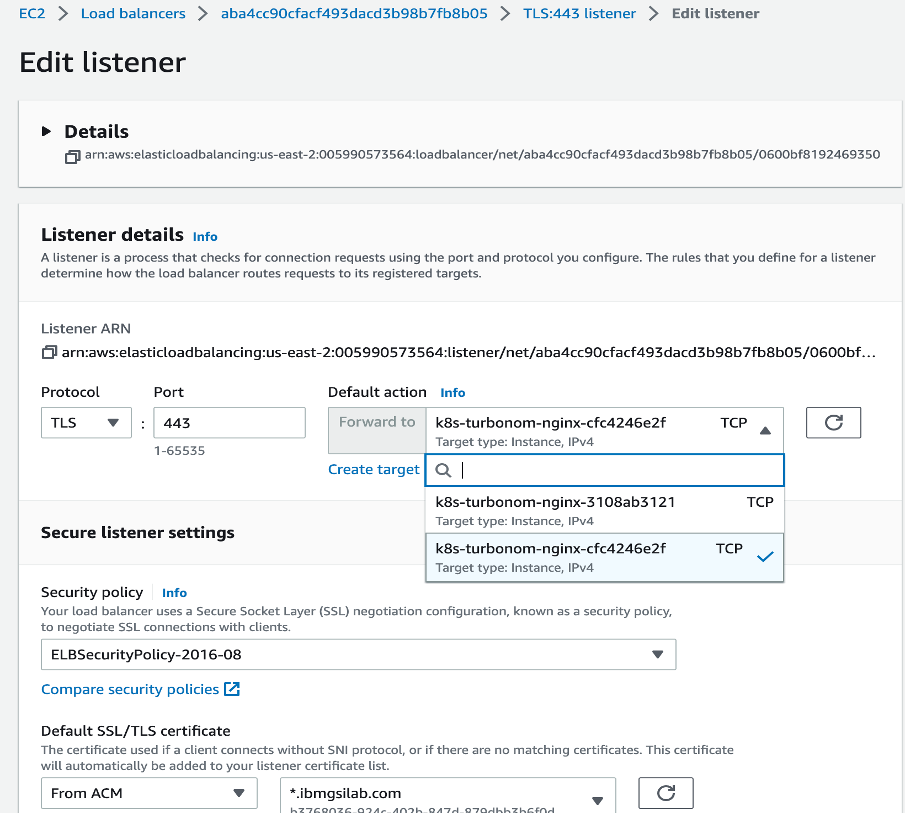
Step 5: Configure NLB
Since the TLS termination is happening at the NLB, we need to change the default backend to non-TLS port on the nginx.
Select the listener ‘TLS:443’ and click on ‘Edit Listener’ in ‘Actions’ drop down.
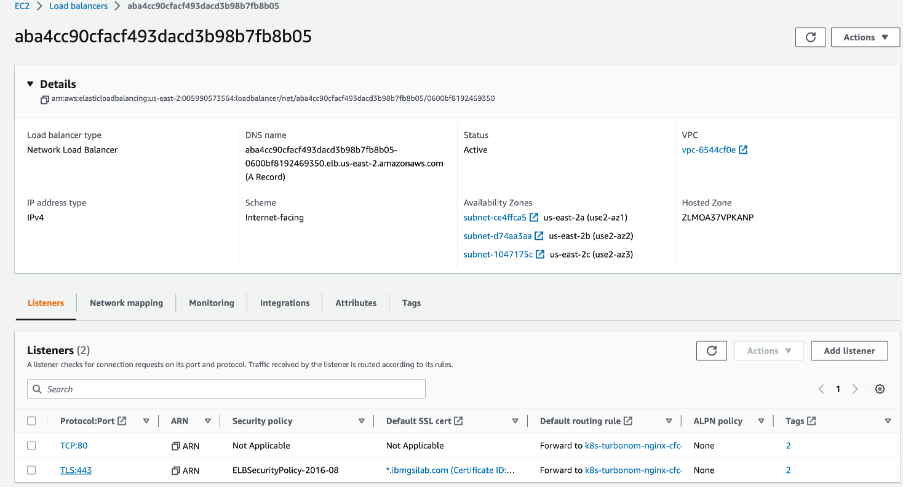
Change the default forward rule to non-TLS port and save the changes.
If you wish, you can delete the insecure listener ‘TCP:80’ of NLB.
Step 6: Create routing entry in hosted zone
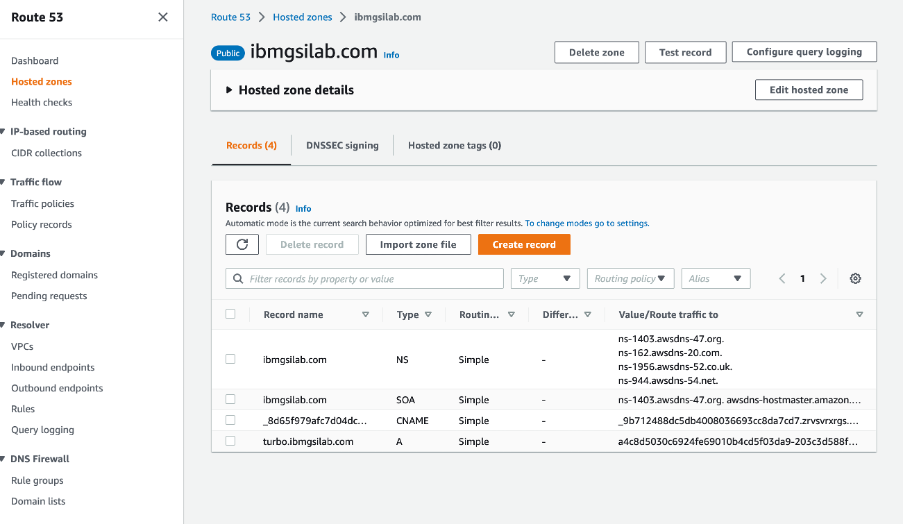
Go to the hosted zone for your domain and create an A-record.
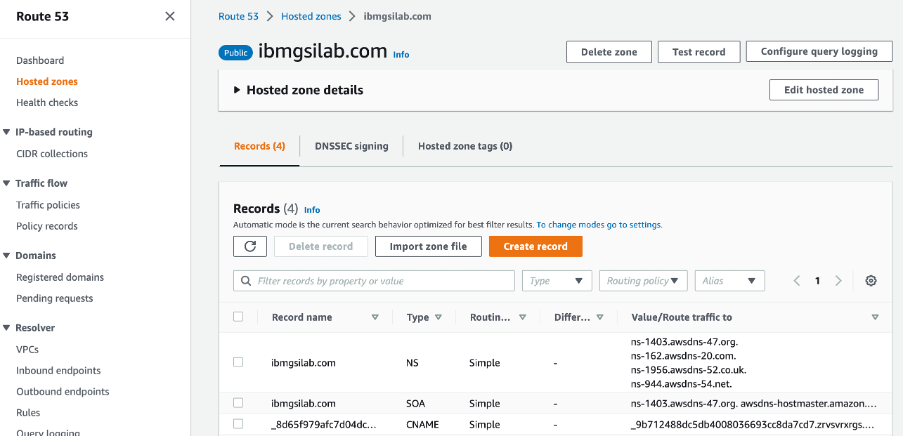
Create an A-record and route traffic to NLB with appropriate routing policy.
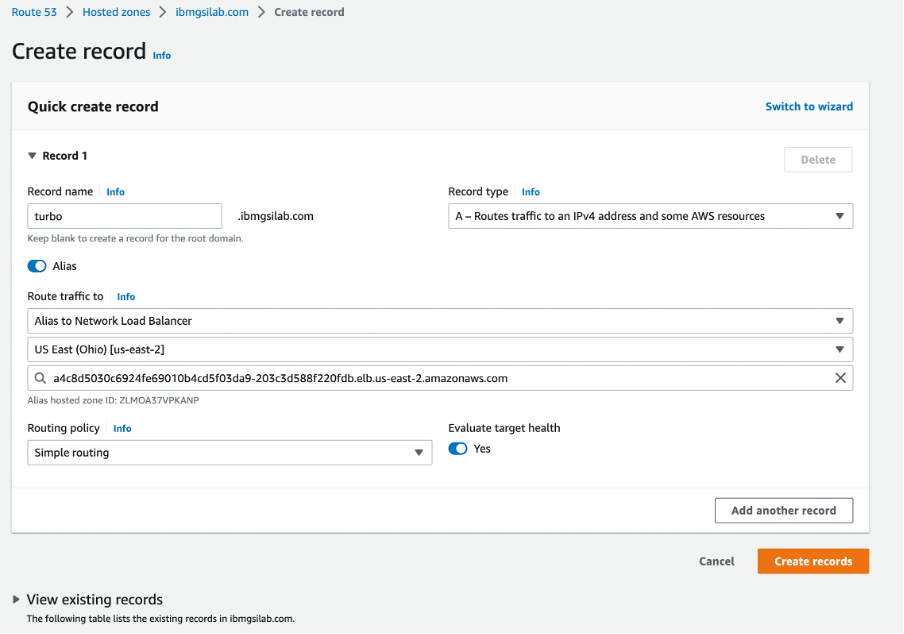
After you complete this step, you will see an A-record created in your hosted zone.
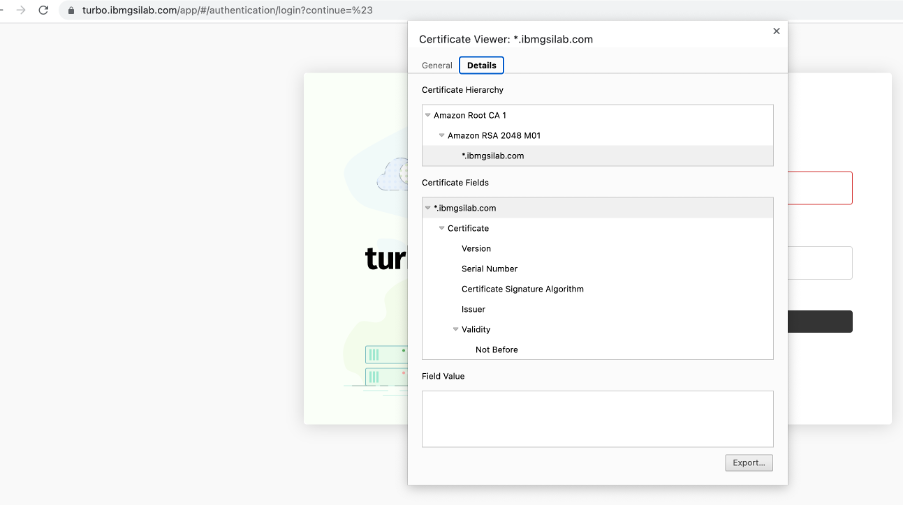
Step 7: Access Turbonomic Console from browser
Now you can access your Turbonomic instance through web console. You can verify the enforced TLS certificate.
Set the appropriate password for the ‘administrator’ user and import a valid Turbonomic license. This would complete the setup of Turbonomic on EKS Cluster. You can then proceed with configuration of target environments in Turbonomic and benefit from the automation of continuous application performance.
Troubleshooting
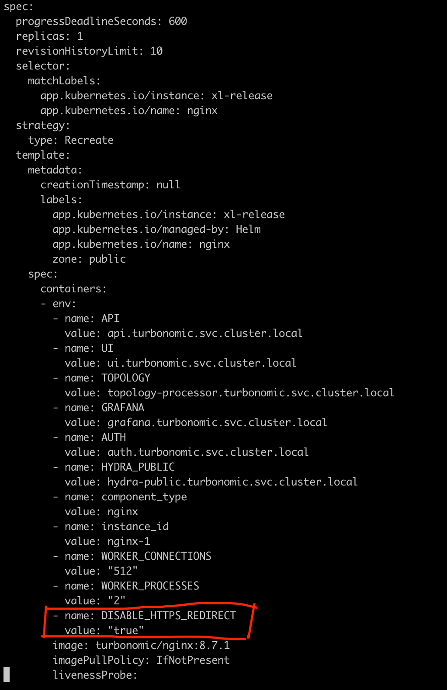
If you face https redirection error while accessing the Turbonomic URL, inject the following environment variable into nginx deployment:
DISABLE_HTTPS_REDIRECT: true
kubectl edit deployment nginx -n turbonomic
#Turbonomic
#AmazonEKS