By Daniela Balaniuc on July/2021.
Web Chat with Watson assistant.
Did you know that most companies spend millions in monthly conversations to help consumers been routed in the right path?
In an economy that the average of most companies is spending millions in monthly conversations to help consumers been routed in the right path. It is very important to get in hand the best way to have an economy more favorable to the companies when in treating the consumer. So, if you want to have the right information at an easy access for the clients’ questions, or if you are knowing in programming or don’t know anything yet about programming, and want to learn how to get in the programming business, this is the one of the best ways to start to learn. I will show you how to path the IBM Watson Assistant, which is one of the most popular virtual system for information for website, easy and without a cost.
Therefore, the conversational intelligence (AI) is increasingly mainstream capability with which consumers interact daily in their homes, workplaces, and on the go. The Watson Assistant is IBM’s chatbot that allows users to interact with business systems using natural language. The purpose of this article is to inform you about how to get the Watson Assistant, and the potential financial impact of Watson Assistant in organizations. The Watson Assistant can be used to serve customer self-service, employee self-service, and agent assist. Without the Watson Assistant these services are provided by human-serviced chat, email, and call services. These methods are slow, and costly. There are a lot of companies out in the market that are in needed for help, it is true that these companies spent millions in monthly conversations to help consumers been routed in the right path, I’ve myself have been working in customer service helping consumers been routed in the right path. With Watson Assistant you will be able to use the assistant for free in your website’s company, so first step to take is to go to the IBM Cloud then open a Lite account, once you signed up for a free IBM Cloud account you click create, then you will click Launch Watson Assistant an assistant, and then create a dialog skill.
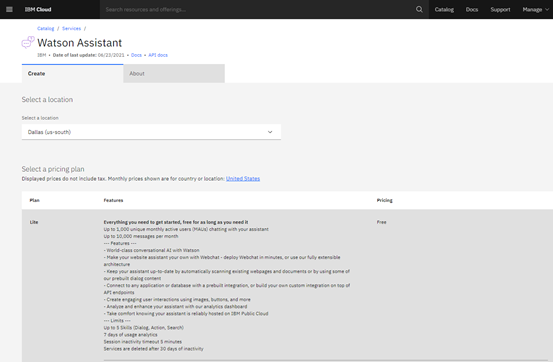
As you can see, the Lite will give you the option to work with certain time for free, and of course after that certain time you will have to start make some payments, but believe me if you are not using for a million times, the time available on the Lite will never been removed from your account, but of course only when is expired you will have some time out, and then, after that certain time, you can return to your work for free, but you will have enough time to do your work with small and medium companies, and let me explain better, I am talking about the time that is for your work, not for the use on your website, so if you are fast enough, the Lite time will be enough, thus, is why I am here doing the best I can to work, and to help you to save time by explaining the tutorial and prompts in a fast way, so you can work in fast pace which is important to save time.
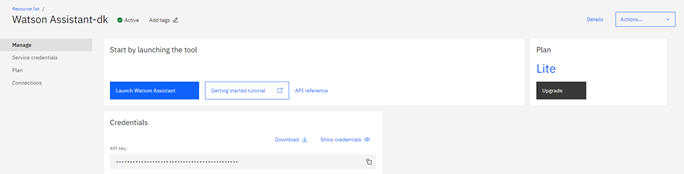
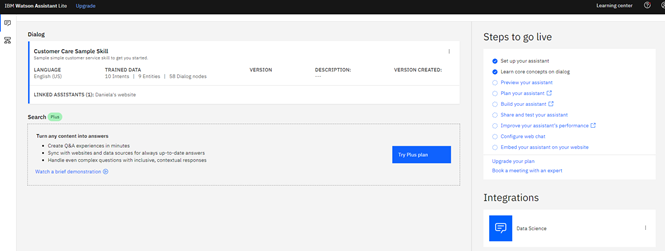
Now that you have created your Watson Assistant Lite account, you can take your first step which is to Launch Watson Assistant, you can see the blue icon to click on.
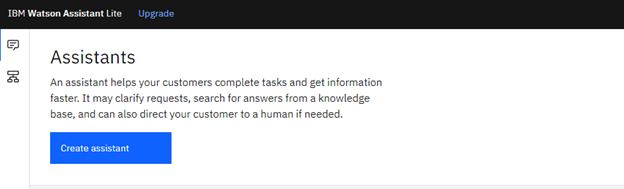
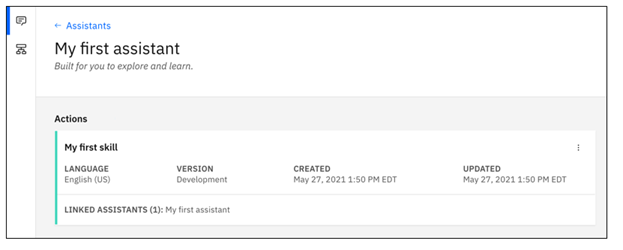
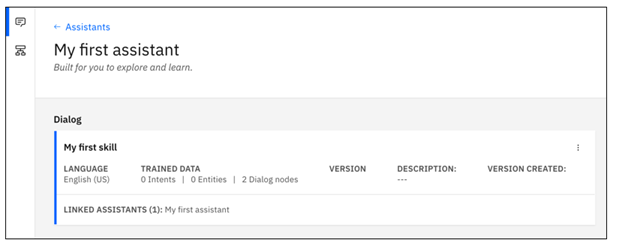
Then click on the blue icon Create assistant, which you will be able to see My first assistant for actions and dialog skills. Skills are the brain of the Watson assistant, where you will be able to create a dialog using natural language.
To get started, the highest-level concept Watson assistant is the assistant layer. The assistants affect the face of the entire virtual assistant. This is the piece that is integrated into message channels like slack or Facebook, so you can put on your web page with a host and web chat.
As you can see now, the skills have actions, and dialog, also you can create on the integrations and webchat, which is where I want to show you the codes so you can copy to add to your website.
Now you can click on the icon. My first assistant to create an Action, so by creating an action it means that you will be building your first conversation, where you can use the skills that contain actions that represent the tasks you want your assistant to help your customers with. Thus, each action contains a series of steps that represent individual exchanges with a customer. In each action step, you define the user goal that the action will satisfy. So, to recognize when a customer is just saying hello, you can add some examples of ways in which a person might do so.
Now you can click on the icon My first assistant to create a dialog for an assistant that helps users with inquiries about your business. You will be able to plan a dialog, define custom intents, add dialog nodes that can handle your intents, add entities to make your responses more specific, add pattern entity, and use it in the dialog to find patterns in user input, and set reference context variables. These objectives tutorial can take 2 to 3 hours to complete, and of course it will be worth it, but as I mention before I am here to show you how to save time by using the web chat which will be faster by copying the codes that are ready for you for add to your webchat.
As you can see on the dialog skill, on the right side there is an icon called integrations for the web chat, so first on the three dots create your web chat integration, then click on the blue icon that you have created, so now you can see your Style, Home Screen, Live Agent, Suggestions, Security, and Embed.

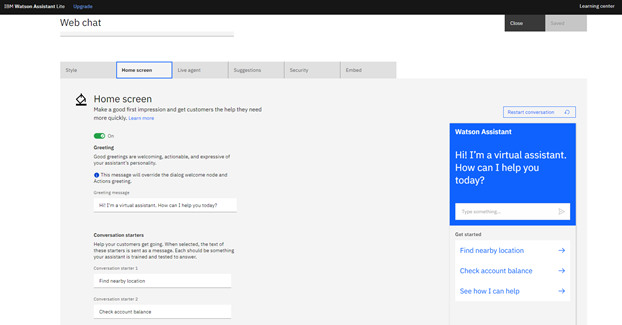
As you can see on the web chat there are several icons called the Style, Home Screen, Live Agent, Suggestions, Security, and Embed. In here you can give a name for your customized chat, then you can move to Home Screen.
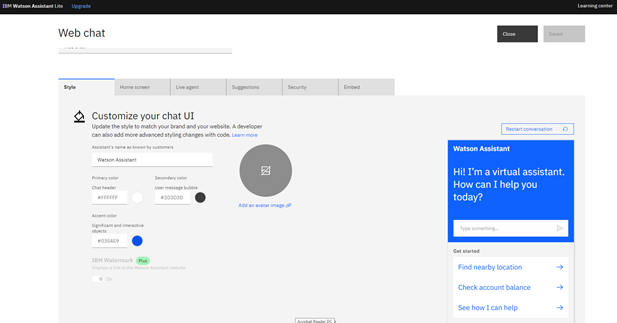
In the Home Screen you will be able to customize your Watson Assistant by introducing you assistant and also writing some options of actions where you think your customer will be looking for information about your product and company.
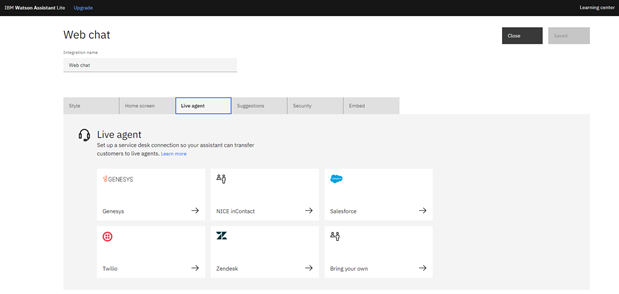
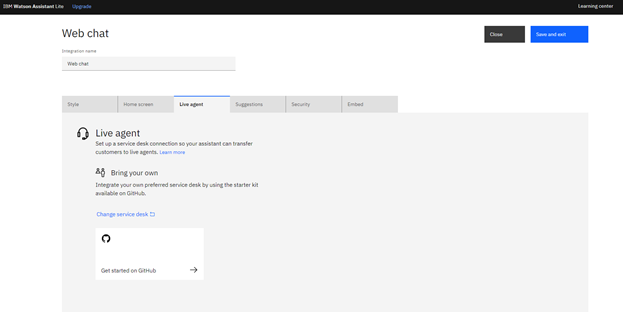
In the Live Agent you have several channels to choose, I personally have used the bring your own where you can try the git hub where you can create your codes to use, which is what I will be using also with the web chat.
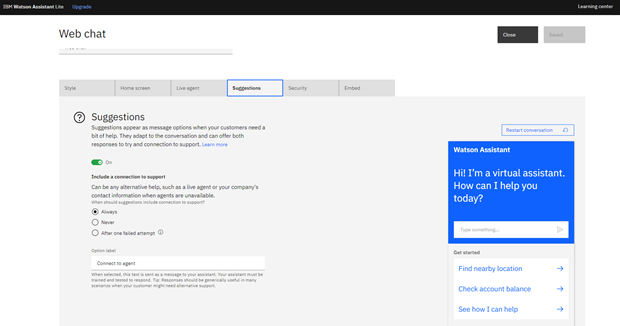
In the Suggestions you can give your customers a way to try something else when the current exchange with the assistant isn’t delivering what they expect. A question mark icon ? is displayed in the web chat that customers can click at any time to see other topics that might be of interest or, if configured, to request support. Also, customers can click a suggested topic to submit it as input or click the X icon to close the suggestions list.
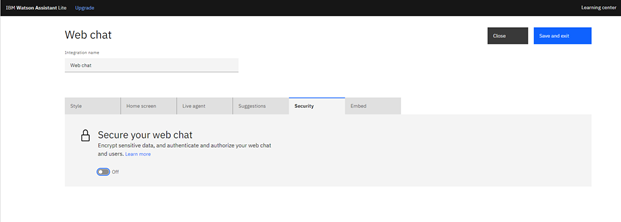
In the Security all messages that are sent from the web chat re encrypted. When you enable security, your assistant takes an additional step to verify that messages originate from the web chat is embedded in your website only. Also, you can implement the following security measures; ensure that messages sent from the web chat to your assistant come from your customers only, send private data from the web chat to your assistant.
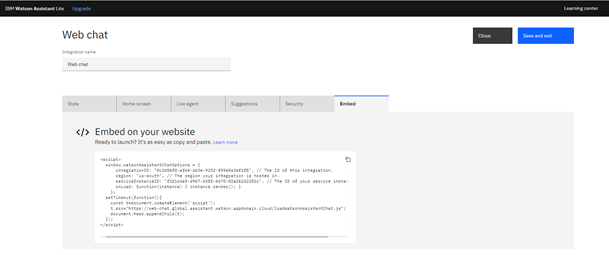
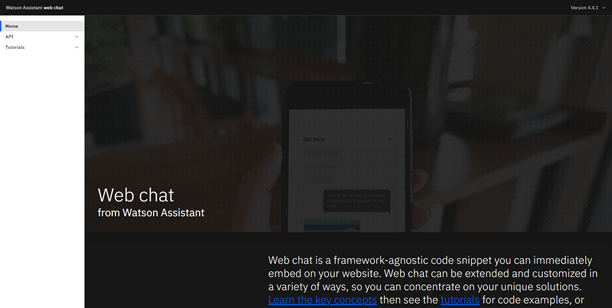
In the Embed is when you create a web chat integration, the Watson Assistant UI gives you a small embed code to add to your website, as in this example. Including are the web chat configuration options that are defined by the parameters for watsonAssistantChatOptions. By default, the embed code provided by Watson Assistant configures only the integrationID, serviceInstanceID, and the region parameters (premium also include subscriptionID). These options also include a onLoad callback that will be called when the web chat code has been loaded and a new instance has been created. You will need to call render on that instance to actually display widget. You can modify watsonAssistantChatOptions with additional parameters that control immutable behavior of your web chat instance. But no worries, you can use this code for free. Now by knowing this you can copy and paste this embed code in your website, and by clicking on the blue icon Learn more, you will get inside the Watson Assistant web chat configuration, where you will see this script and the configuration options object, and you will be able to navigate on the icons on the left side, where you can see the tutorials for Getting started, Setting context, Custom Launcher, Custom element, Custom response types Custom response with React and Session History for you to get more code to add to your website.
Now let’s get into the fast-paced web chat by following the prompt to the ready code. If you have never code with HTML before, you don’t have to worry, these are ready codes, all you have to do is copy and pate in your website, but if you are interested in starting coding, here is a good tip it’s called git hub which is free you can open an account, to start your coding projects. As you can see on the Live agent you can bring your own agent by creating an account with git hub for free and also to create your webpage. By adding service desk support, the Web chat integration has limits, the usage is measured differently depending on the type of the plan type. For Lite plans, sage is measured by the numbers of /message calls (API) are sent to the assistant from the web chat integration. Lite plan has 10,000 API (approximately 1,000 MAU).
In the Integrations you add the web chat to your website, add your assistant to your company website as a web chat widget that can help your customers with common questions and tasks, and can transfer customers to human agents. When you create a web chat integration, code is generated that calls a script that is written in JavaScript. The script instantiates a unique instance of your assistant. You can then copy and paste the HTML script element into any page or pages n your website where you want users to be able to ask assistant to help.
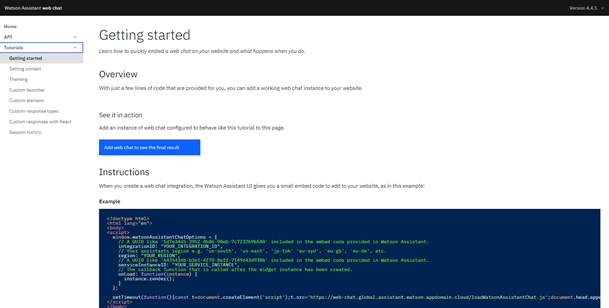
By navigating on the icons on the left side, you can see the tutorials, click on the tutorials you will see Getting started, Setting context, Custom Launcher, Custom element, Custom response types Custom response with React and Session History for you to get more code to add to your website.
In Getting Started you can see the same first script you saw on embed at the skills, and if you click at the blue icon, it will show you the prompted Watson Assistant.
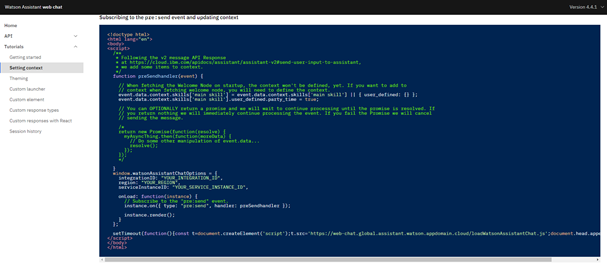
In the Setting context you can find a basic embed code, and the code below is the pre: send event and updating context. This tutorial uses an example dialog skill that uses a context variable to determine its responses. This skill looks for the boolean context party time; when you ask “Is it party time?”, the skill responds in the negative or affirmative depending on the value of the context variable.
In the Theming you can use Carbon themes to quickly change the whole look of your we chat. First create an instance of web chat to get the basic embed code.

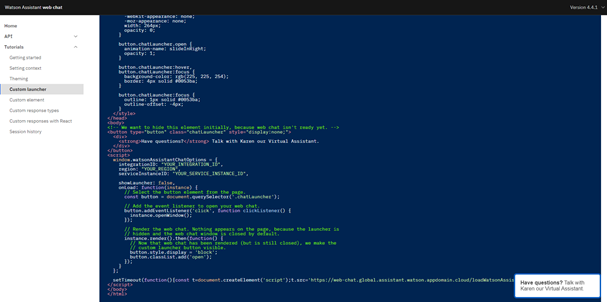
In the Custom Launcher use your own method of opening the web chat on your page. First create an instance of web chat to get the basic embed code.
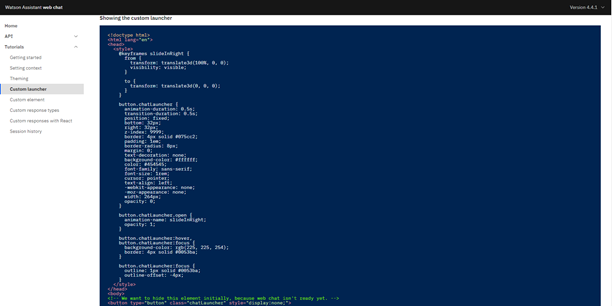
To integrate with other methods, contact, or to better match your brand, you might want to replace the default web chat launcher icon with your ow mechanism for opening the web chat window.
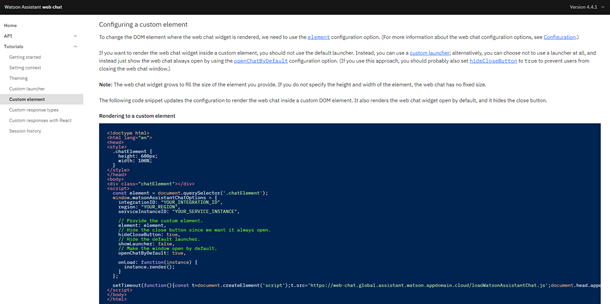
In the Custom element is to render the web chat widget within your own custom element on the page. Depending on your website design, you might want not want to render the web chat widget in the default DOM element on the page. For example, you might want to render the web chat in a different location, or at a different size; you might want to show the web chat already open, or embed it more deeply in your content.
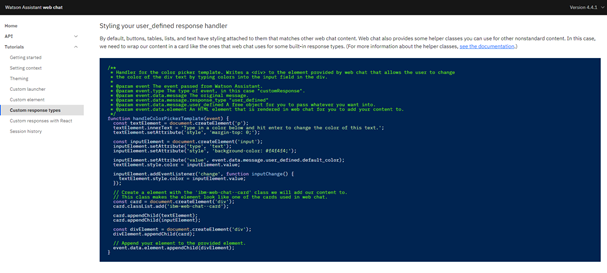
In the Custom response types is to use user-defined templates to render your own custom response types in your web chat. In this tutorial you will see an example of dialog skill that responds with a user defined response type, a basic embed code, a handling the customResponse event, a writing your user defined response handler, and a Styling your user defined response handler.
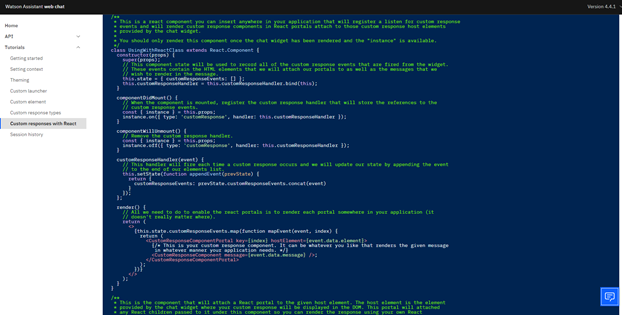
In the Custom response types with React portals, you can use React portals to render your custom response types as part of your application.
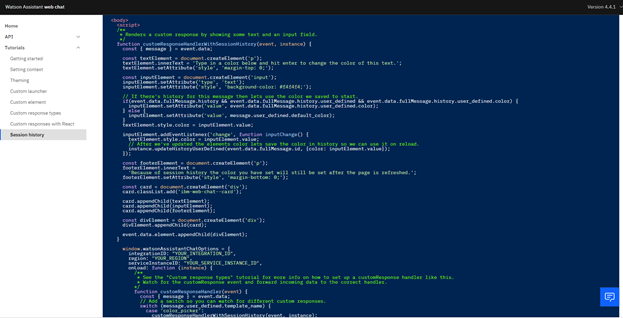
In the Session history your user’s conversations will continue seamlessly across page changes and reloads. Session history allows your web chats to maintain conversation history and context when customers refresh the page or change to a different page on the same website.
Finally, you’ve got into the IBM Watson Assistant which is one of the most popular virtual system for information for website, at an easy and without a cost. The Watson Assistant can be used to serve customer self-service, employee self-service, and agent assist. Without the Watson Assistant these services were provided by human-serviced chat, email, and call services. So now after following the prompts, you can have in hand in a fast-paced work the Watson assistant web chat by using these steps to get all the codes that are available for you to add into your webpage to run your Watson Assistant.
#Featured-area-3-home#GlobalAIandDataScience#GlobalDataScience#Hands-on-feature#Highlights-home#News-DS