IBM Business Automation Application Designer is a low-code tool in IBM Business Automation Studio that enables business users to build user interfaces, called applications, that integrate the capabilities from the platform. To allow business users to quickly and easily build an application, in 21.0.3 December 2021 release, we have also added capabilities, for example, to access selected items from the lists for data mapping; to allow users to easily call automation services on page load; and to configure data validation on application pages.
In this previous blog (URL below), we provided a tutorial to show how you can build an application that leverages our capabilities to configure calling automation services on page load and configure data validation on pages. In this blog, we would like to build on top of the previous tutorial and describe how you can build an application that leverages the capability to access selected items from the lists for data mapping.
https://community.ibm.com/community/user/automation/blogs/walfrey-ng1/2021/12/17/calling-automatiion-services-on-page-load
Here are the high-level scenarios that we will go through in this tutorial:
- This tutorial builds on top of the previous tutorial (URL above): By going through the previous tutorial, you will create a Workflow Automation Service called LoanApproval with 2 operations (requestLoanApproval and assessLoanRisk) that will be used by the application.
- Scenario A: Create a Loan Approval Request page in the Application with the necessary input fields required by LoanApproval Automation Service (Operation requestLoanApproval), and create a Confirmation page also
- Scenario B: Configure data validation for the input fields on the Loan Approval Request page and define how validation errors are handled.
- Scenario C: Update the Confirmation Page to display the confirmation information
- Scenario D: Configure to call LoanApproval Automation Service (Operation assessLoanRisk) on page load so that the confirmation page can also display the assessment whether the request is high risk or not.
- Pre-requisite for this tutorial: Update the Workflow Automation Service called LoanApproval in the previous tutorial by (1) adding a 3rd operation called getLoanTerms and (2) updating the existing operation to take loanTerm and interestRate as input.
- Scenario 1: Update the Loan Approval Request page above in the previous tutorial to call getLoanTerms operation on page load and to list all the available Loan Terms so that the user can select a Loan Term when requesting Loan Approval.
- Scenario 2: Update the Confirmation page above in the previous tutorial to display the selected Loan Term and its Interest Rate.
Pre-requisite: Update the Workflow Automation Service called LoanApproval
After you login into IBM Cloud Pak for Automation, go to “Business Automations” by using the Hamburger menu at the top left hand side of the header (see screen shot below) and then select “Workflow”. To update the Workflow Automation created in the previous tutorial, select “Workflow automation” (see screen shot below) and hover over the project you created in the previous tutorial (e.g. LoanApproval-WF) and the “Open” button will then be displayed for you to click (see screen shot below).
To update the Workflow Automation Service, complete these steps below:
- Once the project is opened, on the left-hand side menu, select “Exposed Automation Services” and then click on the “LoanApproval” Service that you created in the previous tutorial.
- Under the “Operations” section, click on the “+” sign next to “Operations” and enter “getLoanTerms” as the Operation name (see screen shot below)
- Click “New” for the Implementation
- In the New Service Flow pop-up dialog, enter “getLoanTerms” as the Name of the Service Flow.
- Go to the “Variables” Tab. Under the “Variables” section, click on the “+” sign next to “Input”
- Under the “Details” section, enter “loanTermList” as the Name of the Variable and click “New” for the Variable type.
- In the New Business Object dialog, enter “LoanTerm” as the new Variable type (see screen shot below).
- Under the “Behavior” section, ensure that the Definition type is “Complex type”. Under the “Parameters” section, click the “+” sign next to Parameters and enter “term” as the Name under the “Parameter Properties” section (see screen shot below). Ensure the Variable Type is “String”.
- Repeat step 8 to create another Parameter. Under the “Parameters” section, click the “+” sign next to Parameters again and enter “interestRate” as the Name under the “Parameter Properties” section (see screen shot below). Ensure the Variable Type is “String”.
- Add a simple logic to the Operation “getLoanTerms” for this tutorial by going to the “Diagram” tab. From the palette on the right-hand side, click on the drop down next to the Activity component and drag and drop the “Script Task” to the Diagram and link it to the flow (see screen shot below).
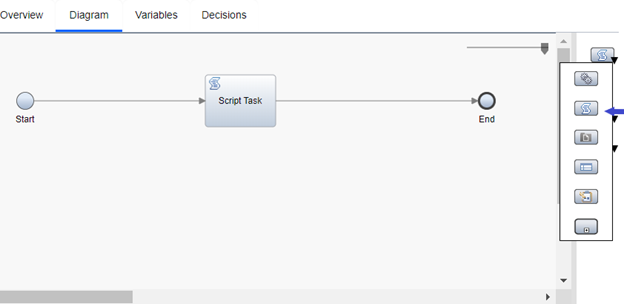
- For the details of the “Script Task”, under the Script tab, enter the following script with the simple logic to populate the list of Loan Terms to return (see screen shot below).
tw.local.loanTermList = new tw.object.listOf.LoanTerm();
tw.local.loanTermList.insertIntoList(0, new tw.object.LoanTerm() );
tw.local.loanTermList[0].term = "5 Years Variable";
tw.local.loanTermList[0].interestRate = "2.5%";
tw.local.loanTermList.insertIntoList(1, new tw.object.LoanTerm() );
tw.local.loanTermList[1].term = "1 Year Fixed";
tw.local.loanTermList[1].interestRate = "3.5%";
tw.local.loanTermList.insertIntoList(2, new tw.object.LoanTerm() );
tw.local.loanTermList[2].term = "2 Years Fixed";
tw.local.loanTermList[2].interestRate = "3.7%";
- Now, let’s update the existing operation requestLoanApproval to add loanTerm and interestRate as inputs by first returning to the “LoanApproval” Automation Service.
- Under the “Operations” section, select “requestLoanApproval”. Under Operation Detail, click “requestLoanApproval” next to the Implementation (see screen shot below).
- Go to the “Variables” Tab. Under the “Variables” section, click on the “+” sign next to “Input”
- Under the “Details” section, enter “loanTerm” as the Name of the Variable and ensure “String” is the Variable type (see screen shot below).
- Repeat step 15 to create another input variable and enter “interestRate” as the Name of the Variable, and ensure that “String” is the Variable type (see screen shot above).
- Click the Snapshot icon at the top right-hand corner to create a snapshot (see screen show below)
To publish the newly updated Workflow Automation Service to Studio for reuse, complete these steps below:
- Click “Business Automation” at the top left-hand corner above the name of the Workflow Automation to go back to the Business Automation Studio (see screen shot below).
- In Business Automation Studio, for the newly updated Workflow Automation, go to the Automation services tab (see screen shot below).
- Click “Publish” to publish the snapshot you saved so that the automation service can be reused by other designers.
- After the automation service is successfully published, the “Published automation services” section should have the “LoanApproval” automation service in the catalog (see screen shot below).
Scenario 1: Update the Loan Approval Request page to call getLoanTerms operation on page load and to list all the available Loan Terms
Let’s say we would like to update the Loan Approval App that we created in the previous tutorial (URL above) so that the Loan Approval Request page will list all the available Loan Terms to allow the user to select a Loan Term when requesting Loan Approval. To achieve that, we will update the Loan Approval Request page so that the Operation getLoanTerms will be called on page loads to get all the available Loan Terms. When mapping data for automation service calls, the capability to allow us to access lists and the selected item will allow us to pass the selected Loan Term to the Operation requestLoanApproval.
To update the “Loan Approval Request” page so that the Operation getLoanTerms will be called on page loads, complete these steps:
- Go to “Business Applications” by using the Hamburger menu at the top left-hand side of the header.
- On the right hand side, select the Loan Approval App that we created in the previous tutorial (e.g. “LoanApproval-app” ) and click “Open” (see screen shot below).
- Go to the palette in the right hand side, and select “Automation service” from the drop down under “Drag a component to your page” (see screen shot below).
- Find the LoanApproval automation service and click on the 3 dots at the top left of the tile, and then click “Edit” (see screen shot above).
- In the pop-up dialog, ensure the latest version of the LoanApproval automation service is selected; ensure that the newly created Operation “getLoanTerms” is checked; and click Add so that your Application can use the latest LoanApproval automation service updated in the pre-requisite steps above.
- Drag and drop “LoanApproval” Automation Service to the page.
- In the pop-up dialog, select Operation “getLoanTerms”. For the section “Call this automation service when”, ensure that “The page loads” is selected. Under Variable options, ensure new variable is selected. Under Variable names, use the default name “loanTermList”. Under Create field, ensure that “Create field on page” is checked so that it will create a list showing all the available Loan Terms (see screen shot below).
- After that, you will notice that, at the bottom of the page, a new component is added to list the available Loan Terms retrieved from the Operation “getLoanTerms” (see screen shot below).
- Drag and Drop this Loan Term List component from the bottom to the top of the “Submit” button.
- The screen shot below shows the Loan Approval Request page with the Loan Term List component.
- Click on the pencil icon next to “Page: Loan Approval Request” at the top of the page view (see screen shot below) to open the right-hand side slide-out for editing page. Note: This step is just to inspect the operation that will be called on page load and no update is needed in the Edit page slide-out.
- In the Edit page slide-out on the right-hand side, under the Load settings section, you will see that the getLoanTerms operation is called when this page loads. If you want the operation to be called only once per application session, you can select the checkbox. For this tutorial scenario, we will call Operation getLoanTerms every time the page is loaded to retrieve the list of available Loan Terms. So, we will not check the checkbox. (Note: in case you need to remove calling the operation later, you can hover over “Call getLoanTerms”, click on the three dots on the right-hand side and select “Delete”.) Since no update is needed, you can click the “Cancel” button to exit.
- To configure the Loan Term List to be a single select component to allow user to select Loan Term to pass to the Operation “requestLoanApproval”, click the “Properties” icon (see screen shot below) and the Properties panel will slide out on the right hand side.
- In the Properties panel, select the Configuration” tab and expand the “Behavior” section (see screen shot below).
- Select “Single” next to “Selection mode” since we only want to allow user to select 1 Loan Term instead of multiple.
- Uncheck the checkbox next to “Show Delete button” since we do not want to allow user to delete the Loan Term from the list.
- Uncheck the checkbox next to “Show Add button” since we do not want to allow user to add additional Loan Term to the list.
- To update the Submit button to pass the selected Loan Term to the Operation “requestLoanApproval”, click the “Next Step” icon (see screen shot below) and the Next Step panel will slide out on the right hand side.
- In the Next Step panel, you will see the 2 new inputs (loanTerm and interestRate) for the Operation requestLoanApproval which are added through the pre-requisite steps earlier. To map the selected Term to the loanTerm input, you can click “Select” on the left of the loanTerm input and it will then show the list of Data available (see screen shot below). With the new capability to access the selected item from the list, when you expand loanTermList, there is now a “listSelected” as shown in the screen shot below. Selecting term under listSelected will pass the selected term (i.e. loanTermList.listSelected.term) to the loanTerm input of the Operation requestLoanApproval.
- Similarly, to map the selected Interest Rate (i.e. loanTermList.listSelected.interestRate) to the interestRate input, you can click “Select” on the left of the interestRate input. In the list of Data available, expand loanTermList and select interestRate under listSelected (see screen shot below).
- Click Next to go to the “Page flow”; ensure that “Go to Confirmation” is selected and then click “Done” (see screen shot below).
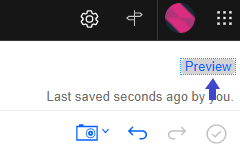
- Click the “Preview” button at the top right hand side to Preview the page.
- Here is the screen shot of the Loan Approval Request page in Preview showing the list of available Loan Terms retrieved from the Operation getLoanTerms. User can select one of the Loan Terms; and the selected Term and InterestRate will be represented by loanTermList.listSelected.term and loanTermList.listSelected.interestRate that are used in the mapping in the Next Step dialog above.
Scenario 2: Update the Confirmation page to display the selected Loan Term and its Interest Rate.
To update the Confirmation page we created in the previous tutorial (URL above) so that the Confirmation page will also display the selected Loan Term and its Interest Rate, complete these steps:
- Switch to the “Confirmation” page by going to the Page drop down at the top of the page view and select “Confirmation” (see screen shot below)
- In the right-hand side palette, search for Display and drag the Display text component to the page below Yearly Income Display text.
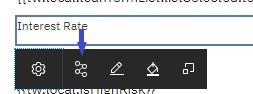
- Change the Display Text from “This is placeholder text” to “Loan Term”, and click the Data Association icon (see screen shot below) and you will then see the right-hand side slide out that allows you to associate data.
- Click on “Select existing” and, in the Select Data drop down list, expand loanTermList and select term under listSelected to associate the Loan Term Display text to display the value of loanTermList.listSelected.term.
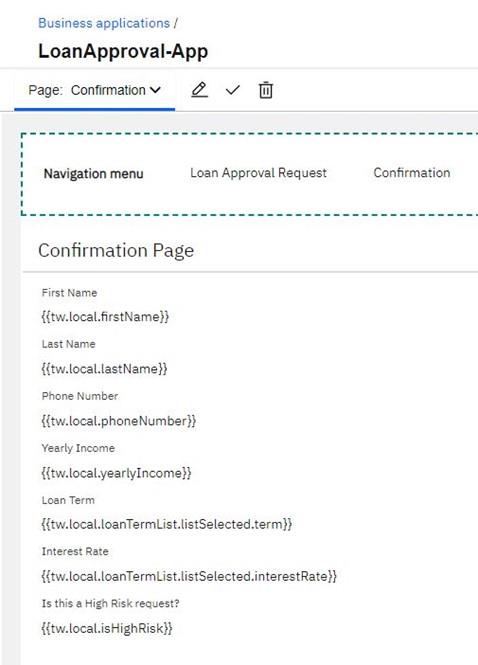
- Repeat step 2 to step 4 to create the Display Text for Interest Rate and associate it to display the value of loanTermList.listSelected.interestRate (see screen shot below).
- The screen shot below shows the Confirmation page with Display text showing the selected Loan Term and Display text showing the selected Interest Rate.
- Click the “Preview” button at the top right hand side to Preview the page.
- Below is the screen shot for the Loan Approval Request page and screen shot for the Confirmation page during Preview. By filling in the form using the values on the 1st screen shot below, you will see the confirmation page similar to the 2nd screen shot below.
Optional
With the new capability to access selected items from the lists, when you expand loanTermList, besides “listSelected”, there is also “listAllSelected”. When the list is configured to allow user to select only a single option, the selected option is represented by “loanTermList.listSelected”. When the list is configured to allow user to select multiple options, all the selected options are represented by “loanTermList.listAllSelected”. To try “listAllSelected”, complete these steps below:
- To change the Loan Term List from a single select component to a multiple select component, click the “Properties” icon for the Loan Term List (see screen shot below) and the Properties panel will slide out on the right hand side.
- In the Properties panel, select the Configuration” tab and expand the “Behavior” section (see screen shot below).
- Change “Single” to Multiple next to “Selection mode” since we now want to allow user to select multiple Loan Terms.
- In the right-hand side palette, select Variable to show the list of Data variables available. Expand loanTermList and drag and drop “listAllSelected” to the page below the “Submit” button.
- The screen shot below shows the Loan Approval Request page with the “listAllSelected” at the bottom of the page.
- Click the “Preview” button at the top right hand side to Preview the page.
- Below is the screen shot of the Loan Approval Request page during Preview. For all the Loan Terms you selected in the multiple selection Loan Term list, you will see the selections displaying in the “listAllSelected” below the Submit button. The example below show that “5 Years Variable” and “1 Year Fixed” are selected and they are displayed in the “listAllSelected” section below the Submit button.