Introduction
Uniform clusters are a specific pattern of an IBM MQ cluster that provides a highly available and horizontally scaled small collection of queue managers. These queue managers are configured almost identically, so that an application can interact with them as a single group. This makes it easier to ensure each queue manager in the cluster is being used, by automatically ensuring application instances are spread evenly across the queue managers.
In this blog we will:
- · Create a uniform cluster with 3 queue managers on machine 1
- · Setup a JMS Queue Destination on the two machines that has WAS installed
- · Setup JMS activation specification to access uniform cluster on two machines that have WebSphere Application Server (WAS) installed
- · Create a simple JMS message-driven bean (MDB) application
- · Install the JMS MDB application on two machines that has WAS installed
- · Test the application balancing
Here is a diagram showing the configuration we will be setting up:


Create a uniform cluster with 3 queue managers
We will be creating our uniform cluster using automatic configuration and automatic clustering support.
To use automatic clustering support, add AutoCluster section to qm.ini with :
- · "Type” set to as “Uniform”
- · “ClusterName” set to the name of the cluster.
We can write this in separate file “MyAutoCluster.ini” and provide the path to the file, while creating the queue managers that form the cluster, by automatic configuration parameter (-ii).
We also need to define a cluster receiver channel on the queue manager for it to join the uniform cluster when using AutoCluster. We can once again use Automatic configuration parameter (-ic) to pass in a path to an mqsc file (MyUniCluster.mqsc) while creating the queue manager.
All the queue managers that are part of the cluster should be configured identically so we can use the same mqsc file (MyUniCluster.mqsc) to define our destination local queue(Q1) and SVRCONN channel(MY.SVRCONN)
As with any MQ Cluster we need 2 full repositories. We will use queue manager QMF1 as our first full repository and queue manager QMF2 as our second full repository.
The third queue manger QMP which is part of the cluster will be a partial repository.
Based on the topology described:
- · MyAutoCluster.ini file will have the following information.
   AutoCluster:
      Type=Uniform
      Repository1Name=QMF1
      Repository1Conname=uniformcluster.fyre.ibm.com(1401)
      Repository2Name=QMF2
      Repository2Conname=uniformcluster.fyre.ibm.com(1402)
      ClusterName= MYUNICLUST
- · MyUniCluster.mqsc file will have the following information.
ALTER QMGR CHLAUTH(DISABLED) CONNAUTH(' ')
REFRESH SECURITY TYPE(CONNAUTH)

DEFINE CHANNEL(MYUNICLUST.+QMNAME+) CHLTYPE(CLUSRCVR) CLUSTER(+AUTOCL+) CONNAME(+CONNAME+) SHORTRTY(120) SHORTTMR(5)

DEFINE CHANNEL(MY.SVRCONN) CHLTYPE(SVRCONN)
DEFINE QLOCAL(Q1) CLUSTER(UNICLUSTER) DEFPSIST(YES) DEFBIND(NOTFIXED)
NOTE: We have disabled the channel and connection authentication to reduce complexity.
Using the above configuration, we create the queue managers that form the uniform cluster (MYUNICLUST) by running these commands:
  crtmqm -ii /tmp/MyAutoCluster.ini -ic /tmp/MyUniCluster.mqsc -iv CONNAME="uniformcluster.fyre.ibm.com(1401)" -p 1401 QMF1

  crtmqm -ii /tmp/MyAutoCluster.ini -ic /tmp/MyUniCluster.mqsc -iv CONNAME="uniformcluster.fyre.ibm.com(1402)" -p 1402 QMF2

  crtmqm -ii /tmp/MyAutoCluster.ini -ic /tmp/MyUniCluster.mqsc -iv CONNAME="uniformcluster.fyre.ibm.com(1403)" -p 1403 QMP
Setup JMS Destination Queue
In order to create a queue resource, do the following steps on both the T-WAS installations:
- · Navigate to “Resources->JMS->Queues”
- · Click “New” button and select “WebSphere MQ messaging provider”
- · Enter the following details
Name: UniClusterQ
JNDI name: jms/q1
Queue name: Q1

- · Click “Apply” and then click “save”
Setup JMS activation specification to access Uniform Cluster
Perform the below steps on both the machines (was1.fyre.ibm.com , was2.fyre.ibm.com) which has WAS installed.
Update IBM MQ Resource Adaptor
We will be using JSON CCDT to setup activation specification in WAS.
We could use WAS 9 Fix Pack 9.0.5.20 which has included MQ Resource Adaptor(RA) 9.3.0.16 which supports JSON CCDT.
If you are using older version of WAS 9 we will have to update the IBM MQ RA to a version that supports JSON CCDT. JSON CCDT support was added to IBM MQ from LTS version 9.2 and CD version 9.1.2.
Steps to update RA are as shown below:
- · Login to WAS and navigate to “Resources->JMS->JMS provider”
- · Click on “WebSphere MQ messaging provider”
- · Click the button “Update resource adapter” and browse and select “wmq.jmsra.rar”
- · Click next and complete the steps
- · Restart the server
Create the JSON format CCDT
Create a new JSON file called “MYCCDT.JSON” which contain connection details to individual queue mangers that are part of the cluster and clientConnection that includes connection to ANY_CLUSTER_QM as shown below:
{
    "channel": [{
        "name": "MY.SVRCONN",
        "clientConnection": {
          "connection": [{
            "host": "uniformcluster.fyre.ibm.com",
            "port": 1401
           },{
            "host": "uniformcluster.fyre.ibm.com",
            "port": 1402
           },{
            "host": "uniformcluster.fyre.ibm.com",
            "port": 1403
            }],
          "queueManager": "ANY_CLUSTER_QM"
        },
        "type": "clientConnection"
        },
        {
            "name": "MY.SVRCONN",
            "clientConnection":
            {
                "connection":
                [
                    {
                        "host": "uniformcluster.fyre.ibm.com",
                        "port": 1401
                    }
                ],
                "queueManager": "QMF1"
            },
            "type": "clientConnection"
        },
        {
            "name": "MY.SVRCONN",
            "clientConnection":
            {
                "connection":
                [
                    {
                        "host": "uniformcluster.fyre.ibm.com",
                        "port": 1402
                    }
                ],
                "queueManager": "QMF2"
            },
            "type": "clientConnection"
        },
        {
            "name": "MY.SVRCONN",
            "clientConnection":
            {
                "connection":
                [
                    {
                        "host": "uniformcluster.fyre.ibm.com",
                        "port": 1403
                    }
                ],
                "queueManager": "QMP"
            },
            "type": "clientConnection"
        }
   ]
}
Create the Activation Specification
In order to create a new Activation Specification, do the following:
- · Navigate to “Resources->JMS->Activation specifications”
- · Click button “New”
- · Select “WebSphere MQ messaging provider”
- · Enter the details as below:
Name: MyUCActSpec
JNDI name : jms/myucactspec

- · Click “Next” and enter the following for MDB destination data
Destination JNDI name: jms/q1 (NOTE: We will create this resource next)
Destination type: Queue

- · Click “Next”
- · Select “Use a client channel definition table”

- · Click “Next” and enter the following about CCDT:
Client channel definition table URL: file:///tmp/MYCCDT.JSON
Queue manager: *ANY_CLUSTER_QM

- · Click “Next” and Click “Test connection” button to make sure all is working
- · Click “Next” and “Finish”
Add Custom Properties to the Activation Specification
Uniform cluster requires following two properties to be set on the activation specification in order to dynamically rebalance it:
1. dynamicallyBalanced = true
2. applicationName = SriMDB1EAR
To add these custom properties, follow the below steps:
Add dynamicallyBalanced custom property
- · Navigate to "Resources->JMS->Activation specifications"
- · Click "MyUCActSpec"
- · On "Additional Properties" Click "Custom properties"
- · Click "New" button
- · Enter the following details for "General Properties"
Name: dynamicallyBalanced
Value: true
Type: java.lang.Boolean
- · Click "Apply" and "Save"
Add applicationName custom property
- · Navigate to "Resources->JMS->Activation specifications"
- · Click "MyUCActSpec"
- · On "Additional Properties" Click "Custom properties"
- · Click "New" button
- · Enter the following details for "General Properties"
Name: applicationName
Value: SriMDB1EAR
Type: java.lang.String
- · Click "Apply" and "Save"
You should now be able to see the newly added custom properties on the activation specification "MyUCActSpec"
- · Navigate to "Resources->JMS->Activation specifications"
- · Click "MyUCActSpec"
- · On "Additional Properties" click "Custom properties" and check the table. It should have the following entries:

Create a simple JMS MDB application
We will be using Eclipse IDE for Java Developers (Version 2019-09 R) to create a new MDB application.
- · Open Eclipse and navigate to “File->New->EJB project”
- · Enter Project Name: SriMDB1
- · Click "Next" and "Finish". This creates "SriMDB1" folder on "Project Explorer"
- · Expand "SriMDB1" in "Project Explorer"
- · Right-click on "ejbModule" and navigate to "New->Message Driven Bean"
- · Enter the following:
Java package: com.sri
Class name: STestMDB
Tick: JMS
Destination type: Queue
- · Click "Next" and "Finish"
NOTE: If there are errors on “javax.ejb” package then we need to include the j2ee jars.
To do this we need to:
- · Right-click on project "SriMDB1"
- · navigate to "Build path -> Configure build path"
- · Click "Add External JARs"
- · Browse and select "j2ee.jar"
NOTE: I have used the “j2ee.jar” available in the WAS installation location (/opt/IBM/WebSphere/AppServer/lib)
Uniform cluster currently does not support transactions; hence we must make sure that the application does not use any transactions by adding the following annotation.
@TransactionAttribute(TransactionAttributeType.NOT_SUPPORTED)
We have also added some debug log messages inside onMessage() which can be seen in systemout.log when the application runs. Overall the STestMDB class should look as below:
package com.sri;

import javax.ejb.ActivationConfigProperty;
import javax.ejb.MessageDriven;
import javax.ejb.TransactionAttribute;
import javax.ejb.TransactionAttributeType;
import javax.jms.JMSException;
import javax.jms.Message;
import javax.jms.MessageListener;
import javax.jms.TextMessage;

/**
 * Message-Driven Bean implementation class for: STestMDB
 */
@MessageDriven(
		activationConfig = { @ActivationConfigProperty(
				propertyName = "destinationType", propertyValue = "javax.jms.Queue")
		})
@TransactionAttribute(TransactionAttributeType.NOT_SUPPORTED)
public class STestMDB implements MessageListener {

    /**
     * Default constructor.
     */
    public STestMDB() {
        // TODO Auto-generated constructor stub
    }

	/**
     * @see MessageListener#onMessage(Message)
     */
    public void onMessage(Message message) {
         System.out.println("STestMDB.onMessage()");
         try {
             System.out.println("STestMDB.onMessage() : Message received: " + ((TextMessage) message).getText());
         } catch (JMSException e) {
             System.out.println("STestMDB.onMessage() : JMS Exception");
             e.printStackTrace();
         }

    }

}
We must export the application in an EAR file. To do this
- · Right-click on project "SriMDB1"
- · Navigate to "Export -> Export" and select "EAR file"
- · Enter the following:
EAR project: SriMDB1EAR (leave it as default)
Destination: (select a location where you want to save the EAR file)
Install the JMS MDB application
In order to deploy our application (SriMDB1EAR.ear) on both the T-WAS machines, follow the below steps:
- · Navigate to "Applications->New Application"
- · Click "Enterprise Applications"
- · Select "Local file system" and Click "Browse" button and select the EAR application exported before (SriMDB1EAR.ear).

- · Keep clicking "Next" button and stop at "Bind listeners for message-driven beans”
- · On "Listener Bindings" ,
o Select "Activation Specification"
o Enter "Target Resource JNDI Name" as jms/myucactspec
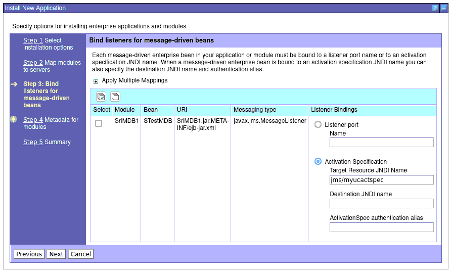
- · Keep clicking "Next" and click "Finish"
- · Click "Save"
To start the application:
- · Navigate to "Applications->Application Types->WebSphere enterprise applications"
- · Select our application SriMDB1EAR and click the "Start" button
- · If the application was successfully started, the "Application Status" column will have a green arrow as shown below:

Test the application balancing
In order to test the setup do the following steps:
- · Start all queue managers (QMF1 , QMF2 and QMP)
- · Start WAS on was1.fyre.ibm.com
- · Start WAS on was2.fyre.ibm.com
- · Stop the application SriMDB1EAR running on was2.fyre.ibm.com
- · Check the application status
dis apstatus('SriMDB1EAR') type(qmgr)
     1 : dis apstatus('SriMDB1EAR') type(qmgr)
AMQ8932I: Display application status details.
   APPLNAME(SriMDB1EAR)                    ACTIVE(YES)
   COUNT(0)                                MOVCOUNT(0)
   BALSTATE(LOW)                           LMSGDATE(2024-07-04)
   LMSGTIME(06.44.46)                      QMNAME(QMP)
   QMID(QMP_2024-07-03_17.00.01)           TYPE(QMGR)
AMQ8932I: Display application status details.
   APPLNAME(SriMDB1EAR)                    ACTIVE(YES)
   COUNT(0)                                MOVCOUNT(0)
   BALSTATE(LOW)                           LMSGDATE(2024-07-04)
   LMSGTIME(06.44.38)                      QMNAME(QMF2)
   QMID(QMF2_2024-07-03_16.59.42)          TYPE(QMGR)
AMQ8932I: Display application status details.
   APPLNAME(SriMDB1EAR)                    ACTIVE(YES)
   COUNT(1)                                MOVCOUNT(1)
   BALSTATE(OK)                            LMSGDATE(2024-07-04)
   LMSGTIME(06.44.32)                      QMNAME(QMF1)
   QMID(QMF1_2024-07-03_16.59.29)          TYPE(QMGR)
We see the following properties:
QMNAME: Shows the Queue Manger Names
ACTIVE: Indicates that the queue managers are active.
COUNT: We see that QMF2 and QMP have count of 0 which indicates no application instance is connected to those queue managers, where as QMF1 indicates count of 1 which indicates 1 application instance is connected to QMF1.
Now we stop QMF1. If you are using MQExplorer to stop the queue manager make sure you tick “Instruct reconnectable clients to reconnect”.
Now when we run the application status again we expect the single application instance running on QMF1 to move to any of the other available queue managers in the uniform cluster.
dis apstatus('SriMDB1EAR') type(qmgr)
     5 : dis apstatus('SriMDB1EAR') type(qmgr)
AMQ8932I: Display application status details.
   APPLNAME(SriMDB1EAR)                    ACTIVE(YES)
   COUNT(0)                                MOVCOUNT(0)
   BALSTATE(LOW)                           LMSGDATE(2024-07-04)
   LMSGTIME(06.47.34)                      QMNAME(QMP)
   QMID(QMP_2024-07-03_17.00.01)           TYPE(QMGR)
AMQ8932I: Display application status details.
   APPLNAME(SriMDB1EAR)                    ACTIVE(YES)
   COUNT(1)                                MOVCOUNT(1)
   BALSTATE(OK)                            LMSGDATE(2024-07-04)
   LMSGTIME(06.46.38)                      QMNAME(QMF2)
   QMID(QMF2_2024-07-03_16.59.42)          TYPE(QMGR)
AMQ8932I: Display application status details.
   APPLNAME(SriMDB1EAR)                    ACTIVE(NO)
   COUNT(0)                                MOVCOUNT(0)
   BALSTATE(NOTAPPLIC)                     LMSGDATE(2024-07-04)
   LMSGTIME(06.44.32)                      QMNAME(QMF1)
   QMID(QMF1_2024-07-03_16.59.29)          TYPE(QMGR)
As expected we see that queue manger QMF1 has ACTIVE(NO) and COUNT(0). Application instance is now moved to QMF2.
As the uniform cluster no longer receive any status messages from QMF1, its BALSTATE indicate NOTAPPLIC.