RBD provides great support for debugging an application. It visualizes step-by-step execution and helps to uncover bugs. RBD 9.6.1 handled the EGL Debugger issue while executing continue clause. In this blog, we will see how it supports the execution of the continue clause in forEach loop.
Continue Keyword:
The continue keyword can be used in any of the loop control structures. It causes the loop to jump to the next iteration of the loop immediately.
For example:
- In a for loop, the continue keyword immediately causes control to jump to the update statement.
- In a while loop or do/while loop, control immediately jumps to the Boolean expression.
The syntax of continue is a single statement inside any loop – continue;
Steps to create and run EGL Program using EGL Debugger support
Step 1: Create a General Project with Java as runtime
Follow the below steps to create a General Project:
1. Navigate to File->New->EGL project.

2. EGL Project window will appear.
3. Enter the Project name.
4. Select the General Project option and click Next.

5. Select Java in the Target runtime Platform.

6. Click Finish.
General Java Project has been successfully created as shown below.

Step 2: Add Derby License Jar into the Project Build Path
Follow the below steps to add the Derby license Jar to the project build path:
1. Go to Project Explorer.
2. Under the Project Explorer, navigate to TestContinue.
3. Right-click the TestContinue.
4. Go to Properties.
5. Properties for the TestContinue window will appear.
6. Select Java Build Path.
7. Go to the Libraries tab.
8. Click on Add External JARs…
9. Browse and select the required License in the JAR path.
10. Click Apply and then OK.

Step 3: Create a Program with Record definition and fetch the record data using a forEach loop
Follow the below steps to create a program with a record definition and fetch the record data with the help of a for-each loop:
1. Go to Project Explorer.
2. Under the Project Explorer, navigate to TestContinue->EGLSource.
3. Right-click the EGLSource.
4. Go to New->Program.

5. A new EGL Program window will appear.
6. Enter the Package name and EGL source file name (Testcontinue).

7. Click Finish.
Testcontinue. egl file has been created as shown below.

Step 4: Create an SQL script file in the Project folder
Follow the below steps to create an SQL file under the Project folder:
1. Go to Project Explorer.
2. Under the Project Explorer, navigate to TestContinue.
3. Right-click on the TestContinue.
4. Go to New->Other…

5. Select a wizard window will appear.
6. Type SQL in Wizards path.
7. Select SQL or XQuery Script.
8. Click Next.

9. A new SQL or XQuery Script window will appear.
10. Enter the file name (Script1) in the Name field.
11. Click Finish.

The SQL Script file has been created successfully as shown below.

Step 5: Connecting to Derby Database
Follow the below steps to connect to the Derby Database:
1. Launch RBD.
2. Navigate to WindowàPreferences.
3. Preferences window will appear.
4. Go to EGL->SQL Database Connections.
5. Select Derby Sample Connection in Connection details.
6. Click Apply and then OK.

7. Navigate to Window->Open Perspective.
8. Open Perspective window will appear.
9. Go to Others...
10. Select Data.

11. Click OK.
12. Go to Data Source Explorer.
13. Under the Data Source Explorer, navigate to Derby Sample Connection.
14. Right-click the Derby Sample Connection and select Connect.

15. Properties for the Derby Sample Connection window will appear.
16. Go to JDBC Connection Properties.
17. Click on Test Connection and then OK.

Step 6: Add a Record in the Derby DataBase
Follow the below steps to create a record in the Derby database:
1. Go to Project Explorer.
2. Under the Project Explorer, navigate to TestContinue.
3. Expand the TestContinue.
4. Open Script1 file.
5. In Script1 file write a query to create a Record and insert data, select data to Record.

6. Select and right-click on the create query.
7. Select Run SQL.

8. Select Connection Profile window will appear.
9. Select Derby Sample Connection in the Connections.

10. Click Finish.
11. Repeat the same steps for Insert and Select Query.

All the Records will be added to the Database and the below screenshot shows the records inside the database.

.
Step 7: Fetch data from the Database using a Program file
Open TestContinue.egl file and write the code below. In the program, we defined the table in record format and fetched record data using the forEach loop. When the control reaches the given condition (i.e., EMPNO ==5002), that iteration will skip, and that employee's name will not be printed on the console output.
Source code:
program TestContinue type BasicProgram {}
const constantName string = "literalString";
baroneProvaRec SqlBaroneProva;
function main()
open baroneProvaRs for baroneProvaRec with
#sql{
select
EMPNO, EMPNAME
from POORNAC.PROVA
where
EMPNO >= 5000 and EMPNO <= 5010
};
forEach(baroneProvaRec)
SysLib.writeStdout("*** forEach Block****");
if(baroneProvaRec.EMPNO == 5002)
SysLib.writeStdout("*** continue Statement****");
continue;
end
SysLib.writeStdout(baroneProvaRec.EMPNAME);
end
end
end
record SqlBaroneProva type SQLRecord{ tableNames = [["POORNAC.PROVA"]], fieldsMatchColumns = yes,
keyItems=[EMPNO]}
EMPNO INT {column="EMPNO"};
EMPNAME STRING {column="EMPNAME", isSqlNullable=yes, maxLen=10};
end
Program Screenshot:


Step 8: Configure the Database inside the Build Descriptor
Follow the below steps to configure the database inside the build descriptor:
1. Go to Project Explorer.
2. Under the Project Explorer, navigate to TestContinue->EGLSource->TestContinue.eglbld
3. Double-click on the TestContinue.eglbld.
4. Go to Outline.
5. Navigate to TestContinue.eglbld->TestContinueJavaBuildOptions.
6. Go to TestContinue.eglbld tab.
7. Select Derby sample Connection in Load DB options using Connection.
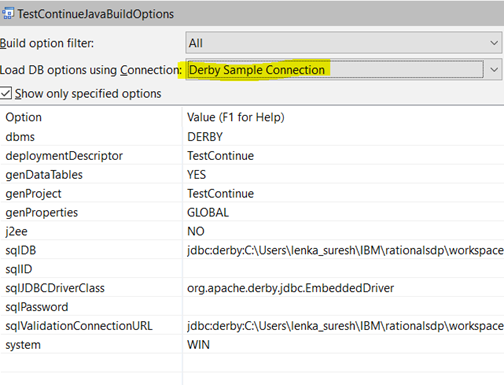
8. Repeat the above steps for TestContinueDebugBuildOptions
Step 9: Now disconnect the Derby Database and add a Breakpoint at forEach block of Testcontinue.egl Program
Follow the below steps to disconnect the Derby database:
1. Repeat the steps in Step 5 till the 13th point to navigate to the Database.
2. Right-click the Derby Sample Connection and select Disconnect.
3. Save the TestContinue Project.
Step 10: Generate the Program
Follow the below steps to generate the TestContinue project.
1. Right-click TestContinue.
2. click Generate.

3. TestContinue project will be generated.
Step 11: Debug the EGL Program
Follow the below steps to debug the EGL program:
1. Go to Project Explorer.
2. Under the Project Explorer, navigate to TestContinue->EGLSource->TestContinue.egl.
3. Right-click the TestContinue.egl.
4. Select Debug as and then EGL Program.
5. A popup will appear. Click OK.

6. Confirm Perspective Switch window will appear.
7. Click Yes.
8. Debugger perspective window will appear.

From the above screenshot, we can observe that the Continue statement was executed when the given condition reached (EMPNO=5002). It skipped that iteration, so we didn’t see the EmpName: TEST02 in the output debugger console.
With the EGL debugger support, the program has been executed successfully. The debugger will be very helpful for developers and testers to identify the issues in the code.
Lenka Suresh
QA Engineer – RBD