By Madhura Damare and Mrigank Mittal
IBM® Security Identity Governance and Intelligence (IGI) uses OpenID connect authentication server. It supports two types of OIDC servers; one is internal and another is external. Internal OpenID Connect authentication server is used to administer the login to the virtual appliance local management interface, the Administration Console, and the Service Center. External OIDC is used to access only Service Center. One can configure one or more than one OpenID providers. However, only one provider can be used to access the Service Center at any one time.
The internal OpenID Connect authentication server is enabled by default after you setup the initial virtual appliance, following the fresh install of the product. After the setup is complete, external Open ID Connect authentication can be enabled by disabling internal one.
In this document, we will see how IBM Security Access Manager (ISAM) can be configured as an OpenID connect provider and how it can be configured with IGI. ISAM OIDC functionality is available from version 9.0.4 onwards. This document refers to ISAM version 9.0.6.
Here are the steps to achieve the same:
Reverse proxy configuration:
- Login to ISAM appliance UI as admin.
- Click on ‘Secure Web Settings’ -> ‘Reverse Proxy’ under Manage heading.
- Click on ‘New’ and provide instance name e.g. ‘rproxy’ , hostname of ISAM appliance e.g. isamva.com, listening port e.g. keep default value as 7235 and IP address of primary interface as 9.xx.xx.xx and click Next.
- Under IBM Security Access Manager tab, provide administrator name. Its default name is ‘sec_master’ & provide its password and domain.
- Under Transport tab, either enable HTTP or HTTPS and click on Finish. In this example, I enabled HTTPS.
Configuring a reverse proxy for OAuth and an OIDC Connect provider:
- From ISAM appliance UI, click on ‘Secure Web Settings’ -> ‘Reverse Proxy’ under Manage heading.
- Select the reverse proxy configured in above steps and click on Manage->AAC and Federation Configuration->OAuth and OpenIDConnect Provider Configuration.
- Under Main tab, select OAuth Modes as per need - browser based flow or API based flow. For resource or password credentials flow, no need to select any flow and click Next. In this example, I have not selected any mode option.
- Under AAC runtime tab, specify hostname for runtime e.g. localhost, port (default is 443), runtime server’s username (default is easuser), its password and junction name e.g. ‘/abc’ (default is /mga). Click Next.
- Under Reuse Options tab, select Reuse Certificate and ACL options to use already saved one. If it’s not selected, existing certificate and ACL will be replaced with new one. In this example, I have selected both options. Click Finish and deploy pending changes. After this restart reverse proxy by selecting proxy name whose configuration is just changed and click on Restart button.
OAuth2.0 API protection:
- Login to ISAM appliance UI as admin and click on ‘Secure Access Control’. Click on ‘OpenID Connect and API Protection’ under Policy heading.
- Click on icon to create new definition.
- Provide definition name e.g. ‘isam’.
- Select Grant Type as per the oidc client configuration. Default option is ‘Authorization Code’. ODIC client e.g. IGI will get authorization code from ISAM which can be used to exchange tokens between IGI and ISAM without exposing them to browser.
- Under ‘Token Management’ subsection, ensure that the option to issue refresh token is selected, alter the token length and validity time period as required.
- Under subsection ‘Trusted Clients and Consent’ select consent. Consent option will be shown to end user when any access is made. e.g. select ‘Prompt once and remember’.
- Under subsection ‘OpenID Connect Provider’, select checkbox to enable openID connect. Provide issuer identifier e.g. https://<ISAM App interface hostname>. Provide point of contact prefix as https://<ISAM App interface hostname>:<port>/<reverse proxy junction name>. Fields configured during setp 4 under ‘Configuring a reverse proxy for OAuth and an OIDC Connect provider’ section are used here. e.g. https://<ISAM-App-interface-hostname>:443/mga
- Provide id token lifetime and signing algorithm value. Note signing algorithm value as it will be used in IGI configuration later. Select option for ‘Enable client registration’ and ‘Issue client secret’ as shown below and click Save.
- Under same menu of ‘OpenID Connect and API Protection’ select ‘Resources’ menu and click on New icon. Select type as ‘Reverse Proxy’ and proxy instance will be shown as <ISAM Applicance Hostname>-<proxy name>. This proxy name was configured in step3 under proxy configuration. Select Browse button against Protected Path and select junction name i.e. /mga which was configured in step4 under Configuring proxy for OAuth section of this document.
- Deploy and publish changes.
- Under same ‘OpenID Connect and API Protection’ menu, select ‘Clients’ menu to register OAuth protection for OIDC client. All OIDC clients need to be registered here. Only registered clients will grant OAuth access and refresh tokens. Click on new icon for new client. Provide Client name e.g. IGI, select API definition which was configured in step 3 under section OAuth2.0 API protection of this document. E.g. isam. Select checkbox against Confidential. Either specify Client ID and Client secret manually or use auto generated ones by clicking on Generate button. Click on New icon against Redirect URI and specific URI as https://igi-app-interface-hostname:9343/oidcclient/redirect/isam. Default value of IGI port is 9343. Finally click on OK to save changes. Multiple IGI instances can be registered here.
- Under same ‘OpenID Connect and API Protection’ menu, select ‘Mapping Rules menu and ensure Pre and PostTokenGeneration rules are listed. If it’s not present, download sample rule by navigating to Manage System Settings > Secure Settings > File Downloads. Expand access_control->examples->mapping rules. Download oauth pre and post mappings java script files. These files can be customized. After modification, deploy the changes.
- Restart reverse proxy once to apply all changes.
Import ISAM Certificates in IGI :
- Login to ISAM appliance UI as admin and click on ‘Manage System Settings’. Click on ‘SSL Certificates’ under ‘Secure Settings’. Select certificate database name as ‘pdsrv’, click on Manage and select ‘Edit SSL Certificate Database’.
- Click on ‘Personal Certificates’ tab and export an existing certificate or create a new one. Save this certificate locally.
- Open ISAM application URL in browser and export the certificate and save it locally.
- Login to IGI appliance UI as admin. Click on Configure ->Certificates under ‘Manage server settings’.
- Select ‘IBM Security Identity Governance and Intelligence key store’ database and click on ‘Edit’.
- Select ‘Signer’ tab and click on Upload button. Upload certificate by clicking on Browse button. Upload both ISAM appliance and app interface certificates which were exported in earlier step.
- Navigate to IGI appliance dashboard and restart IGI server.
- Click on Manager system settings -> Restart or Shut down under ‘System Settings’ and click on ‘Restart LMI’ button.
Configure external OIDC in IGI:
- Login to IGI appliance UI as admin. Click on Configure ->OpenID Connect Configuration under ‘Manage External Entities.
- Click on New icon. Provide name e.g. ‘isam’, authorization url, token url, scope as openid, issuer identifier as https://<isam-app-interface-hostname. Specify signature algorithm which was specified in step 7 under section OAuth2.0 API protection of this document. Specify Client ID and secret which was specified in step 10 under section OAuth2.0 API protection of this document. Select the checkbox for Service Center against domains and click to save changes.
URL Syntax:
Authorization URL: https://<hostname:port>/<junction>/sps/oauth/oauth20
e.g. : https://<isam-app-interface-hostbname:port>/mga/sps/oauth/oauth20
Token URL: https://server.oauth.com/<junction>/sps/oauth/oauth20/token
e.g. https://<isam-app-interface-hostbname:port>/mga/sps/oauth/oauth20/token
- Navigate to IGI appliance dashboard and restart IGI server.
- Click on Manage -> system settings -> Restart or Shut down under ‘System Settings’ heading and click on ‘Restart LMI’ button.
Test the configuration:
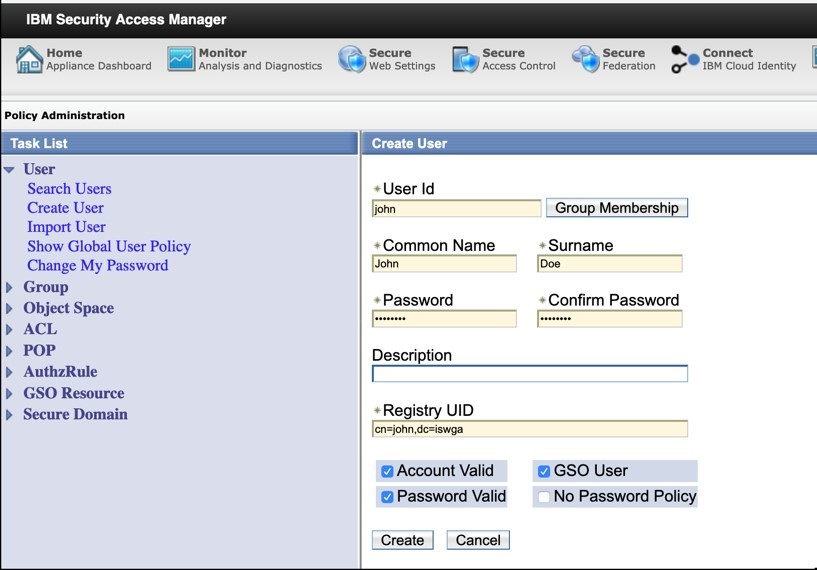
- Login to ISAM appliance UI as admin and click on Secure Web Settings -> Policy Administration under ‘Manage’ heading. This will open a login screen.
- Login to ISAM by providing user name as ‘sec_master’ and it’s password.
- Create new user e.g. madhura and specify password.
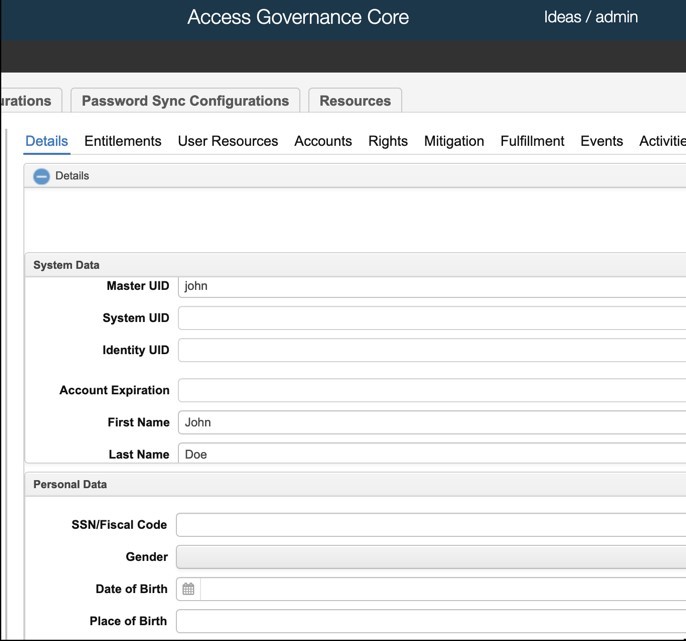
- Login to IGI admin console and create user with same Master UID i.e. madhura and specify a different password.
- Login to IGI service center UI and observe that login page is redirected to ISAM for authentication. Login with user and password created in ISAM.
- Observe the consent as shown below. This consent is shown as per settings done in step 6 under section OAuth2.0 API protection of this document.
- Observe the consent, select permit and click on submit.
- Observe user ‘john’ can view dashboard in IGI service center