I recently wrote a blog post about how, from MQ 9.1.4, MQ Internet Pass-Thru (MQIPT) is now an optional component of MQ, rather than a SupportPac. I mentioned in that blog post that there are some enhancements in MQIPT 9.2 that make the administration of MQIPT easier and more secure. In this blog post I’ll describe those enhancements in more detail.
MQIPT SupportPac - a quick reminder
But first, a quick reminder that as I highlighted in my earlier blog post, the end of service date for the MQIPT SupportPac (MQIPT Version 2.1) is 30th September 2020. So if you’re still using MQIPT Version 2.1, you need to plan to upgrade to MQIPT 9.1.4 or later as soon as possible.
An overview of MQIPT administration
Now, back to the main topic of this blog post!
MQIPT is quite a simple product to configure and administer. The configuration is all stored in a file named mqipt.conf. If you need to change the configuration you can edit this file and change the values of the properties that it contains. Previous versions of MQIPT had a GUI that you could use to change the configuration, but that’s been removed in MQIPT 9.2.
Administering a running instance of MQIPT is also easy. You can use the mqiptAdmin command to issue a command to MQIPT. With the mqiptAdmin command, you can either stop or refresh an instance of MQIPT. Refreshing MQIPT is how you bring configuration changes into effect without having to restart an active instance of MQIPT.
Problems with this approach
There is a problem with this approach to administering MQIPT, which is that the mqiptAdmin command needs a way to connect to the instance of MQIPT to administer. In previous versions of MQIPT, this was achieved by configuring MQIPT to listen on a network port, known as the command port, for commands issued by mqiptAdmin. That had benefits of course as it allowed MQIPT (or several instances of MQIPT) to be administered remotely. Unfortunately, it was also not very secure as there was no security available on the command port, so if the command port was enabled, it had to be protected using a firewall, for example, to prevent any unauthorized access. If you disabled the command port to improve security, then you couldn’t issue administrative commands to refresh or gracefully stop MQIPT.
What’s changed in MQIPT 9.2?
MQIPT 9.2 makes administration easier and more secure by allowing local instances of MQIPT to be administered without the need for a command port, and allowing a secure command port with TLS and password authentication to be used for instances where remote administration of MQIPT is needed.
Administration without a command port
A popular enhancement in MQIPT 9.2 is the ability to administer instances of MQIPT without a command port. This is a very simple method to administer instances of MQIPT that are running on the same system as the mqiptAdmin command. Also, you don’t need to configure a command port to use this method, which makes your MQIPT installation more secure.
To issue a command to an instance of MQIPT using this method, you give mqiptAdmin the name of the MQIPT instance to administer, instead of the command port number.
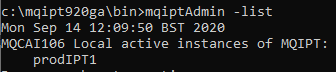
The name of the MQIPT instance is assigned at startup. To make administration easier, it’s useful to give an instance of MQIPT a descriptive name when it’s started, using the new -n parameter. For example, this command starts MQIPT and gives it the name prodIPT1:
mqipt c:\mqiptHome -n prodIPT1
If you don’t give the MIQPT instance a name, then it will use the name of the MQIPT home directory instead.
You can then use the name to identify the MQIPT instance to be administered, using the new -n parameter to mqiptAdmin. For example, this command refreshes the protIPT1 instance of MQIPT:
mqiptAdmin -refresh -n prodIPT1
You can also list all the local instances of MQIPT using the new -list option on the mqiptAdmin command.
The only restriction that you need to bear in mind is that to be authorized to administer an instance of MQIPT without using a command port, you’ll need to run the mqiptAdmin command under the same user ID as MQIPT. Alternatively, on Linux and UNIX you can run mqiptAdmin as root.
Command port security
If you want to administer a remote instance of MQIPT, then you can still do so by using a command port, but you can do so much more securely in MQIPT 9.2.
With MQIPT 9.2, you can configure a separate command port that is secured with TLS, and require a valid admin password to be entered to authenticate each command sent by mqiptAdmin. When mqiptAdmin connects to the TLS command port, it checks the identity of the MQIPT server by validating the command port server certificate using a CA certificate that’s stored in the mqiptAdmin trust store. The connection to the command port is then encrypted so that the admin password is protected on the network.
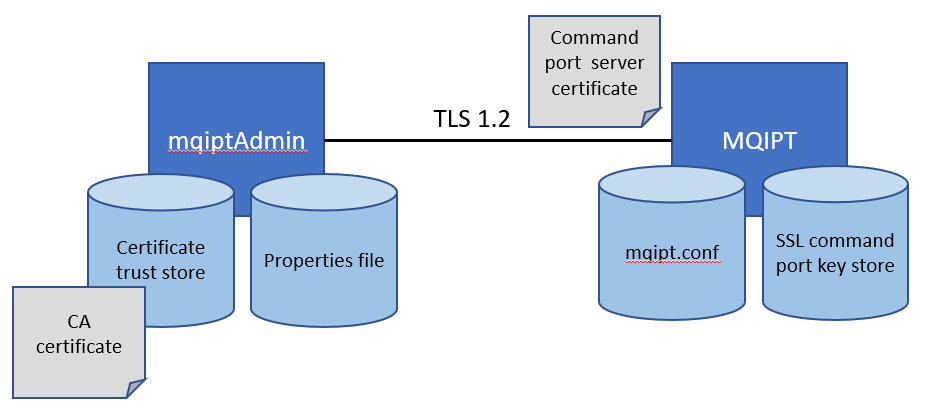
To configure this in MQIPT you need:
- A server certificate for the command port, in a PKCS#12 key store that’s accessible by MQIPT.
- Properties in the mqipt.conf configuration file containing the command port number, the name of the command port key store, the encrypted password to access the key store, and the certificate label of the command port certificate.
- Password authentication enabled with the RemoteCommandAuthentication property, and the encrypted admin password specified in the AccessPW property.
For example, the following mqipt.conf properties enable the TLS command port and password authentication for every command:
# SSL command port configuration
SSLCommandPort=1881
SSLCommandPortKeyRing=c:\\mqiptHome\\ssl\\commandport.pfx
SSLCommandPortKeyRingPW=<mqiptPW>1!68SsH1a38fQmQoqvi/kPBw==!4i7KYpT1dbCqlhjpY10hqw==
SSLCommandPortSiteLabel=mqiptadmin

# Command port authentication configuration
RemoteCommandAuthentication=required
AccessPW=<mqiptPW>1!t3sxZIC7IWBU07t7tYSYvg==!WZycUqqvWK6OdPsurjWCyQ==
On the mqiptAdmin side, you need:
- The CA certificate of the CA that signed the server certificate, in a PKCS#12 trust store that’s accessible by the mqiptAdmin command.
- A properties file containing the name of the trust store, the password to access it, and (optionally) the name of the file containing the key used to encrypt the password.
For example, the properties file looks something like this:
SSLClientCAKeyRing=C:\\mqiptHome\\ssl\\mqiptclient.pfx
SSLClientCAKeyRingPW=<mqiptPW>1!VIf3PMQPEfLiRrTphzvoyg==!3m3Sv/GqJL2QU+kyR6iU3A==
PasswordProtectionKeyFile=C:\\mqiptHome\\ssl\\adminProt.key
Now that’s all set up, you can use mqiptAdmin to refresh or stop MQIPT, connecting using the TLS command port. You’ll notice that the syntax of the mqiptAdmin command has changed (although you can still use the old syntax with the unsecured command port). You just need to remember to specify the -s parameter to specify that this is a secure connection, the name of the properties file with the -p parameter, and the MQIPT host name and port with the -r parameter. For example:
mqiptAdmin -refresh -s -p c:\mqiptHome\adminSSL.properties -r localhost:1881
When mqiptAdmin connects to MQIPT, it prompts for the admin password to be entered.

More information
There’s more information about administering MQIPT, using the TLS command port to administer MQIPT, and configuring command port authentication, in the MQ Knowledge Center.
If there are other topics in MQIPT that you would like to see a blog article about, then please leave a comment.
#IBMMQ#MQ