The prerequisites.py script streamlines the setup process by gathering essential deployment details, generating key configuration files—including the custom resource (CR) for the FNCM Operator—and running basic validation checks. Instead of manually following documentation to create databases, secrets, and CR, this script automates the generation of SQL templates and YAML files, helping you get deployment-ready with minimal effort. You can also review and modify the generated files to add any additional configurations as needed.
The script can be run either interactively—prompting you for each required inputs—or in silent mode using a predefined configuration file. In silent mode, it reads all the inputs from container-samples/scripts/silent_config/silent_install_prerequisites.toml, where you can customize all necessary deployment details in advance. By default, it includes and deploys the CPE, GraphQL, and ICN components, but you can easily modify the file to include optional components and specific configurations as needed.
Note: There isn’t a separate script for each FNCM version—the same prerequisite script is designed to work across all supported versions of FNCM Standalone. At the time of writing, the latest script version is 5.1.0. As improvements are made, the script version is updated, so be sure to always use the latest version available from the source repository.
To check the version of the script you are using, run the following command:
python3 prerequisites.py --version
The script has 3 different modes:
-
Gather mode: helps to collect all the information required for your deployment.
-
Generate mode: helps to generate all the required files for your deployment.
-
Validate mode: helps to validate all the prerequisites of your deployment.
You can run the script interactively using the following command:
python3 prerequisites.py MODE
The value of the parameter ‘MODE’ can be either gather, generate or validate. For example, to run the prerequisites script in gather mode, you can run the following command:
python3 prerequisites.py gather
By default, the script runs in the interactive mode. You can customize the execution to be in silent mode by using the --silent flag. But make sure you have already filled in the required details in the container-samples/scripts/silent_config/silent_install_prerequisites.toml file. For example, you can run the gather mode silently using the following command:
python3 prerequisites --silent gather
For more details on the usage of prerequisites scripts, run the following command:
python3 prerequisites.py --help
Running the prerequisites script in gather mode helps to collect all the information required for your deployment. To launch this mode interactively, use the following command:
python3 prerequisites.py gather
This will start the gather process and prompt you step-by-step for all required inputs. In this walkthrough, I’ll demonstrate using the 5.7.0 build, released in June 2025.
Once the command is executed, the script begins by displaying key information—such as the script name, version, and the selected mode—as shown below:
The first prompt asks you to select the version of the FNCM Operator to install. Available versions are listed with indexes; simply enter the index corresponding to your desired version. In this case, I’m installing the 5.7.0 build, so I select option 5:
Note:
The prompts and available configuration options may vary depending on the version of the FNCM Operator you select. Make sure to review each prompt carefully, as newer versions may introduce additional settings or changes in behaviour.
The second prompt displays the links to all relevant product licenses for the version you selected. You’ll be asked whether you accept the International Program License:
Do you accept the International Program License? [y/n]:
Note: You must choose ‘yes’ to proceed—declining will halt the execution.
After accepting, you’ll be prompted to specify the License Type and License Metric based on your deployment needs.
The next prompt asks you to select the platform type. The prerequisites script supports three options: OpenShift (OCP), Red Hat OpenShift on IBM Cloud (ROKS), and CNCF. Since this guide focuses on OpenShift deployment, I selected 'OCP' as shown below:
With the platform type selected, the next set of prompts focuses on deployment-specific configuration details, starting with the authentication type. The authentication type determines how users will log in and where their credentials and identities are managed. FNCM Standalone support three different authentication types: LDAP, LDAP + IDP and IDP + SCIM. For more information on authentication and authorization, see Deployment Authenticating Authorizing in Filenet Content Manager .
The next prompt relates to FIPS (Federal Information Processing Standard) compliance—a U.S. government standard for cryptographic security. You’ll be asked whether you want to enable a FIPS-compliant deployment:
Do you want to configure a FIPS enabled deployment [y/n]:
Note:
Make sure your OpenShift cluster is running on FIPS-enabled nodes before selecting ‘yes’. Enabling FIPS without proper node support may cause deployment issues.
The next prompt is related to Network Policies. Starting with version 5.7.0, the FNCM Operator no longer installs network policies automatically. Instead, it can generate a set of network policy templates for you.
You’ll be prompted as follows:
Do you want the operator to generate network policy templates [y/n]:
If you choose ‘yes’, the operator will generate the network policy templates in the FNCM Operator pod, in the path: /tmp/<your_namespace>/network-policies. These can be retrieved and applied later using the mustgather.py script. For more information on configuring network policy, see Configuring Cluster Network Policy.
If you select ‘no’, no templates will be created.
Note:
This behaviour is new in 5.7.0 and later. Older versions handle network policies differently.
Next, the script will prompt you to select the FNCM components you want to install. By default, the following components are pre-selected:
You can also select these following additional components which are optional:
-
CSS
-
CMIS
-
Task Manager
-
External Share
-
IER
-
ICCSAP
To select or deselect a component, enter its corresponding index. If a component is already selected, entering its index again will remove it from the selection.
To complete the selection process and proceed, enter 0 as shown below:
The next set of prompts will guide you through enabling and configuring optional features for various components. As of this writing, the available options include:
Next, the script prompts you to select the database type for your deployment. As of version 5.7.0, FNCM Standalone supports the following seven database types:
You can choose any one of the supported databases based on your requirement by entering the corresponding index from the list.
The script will now prompt you to specify the number of Object Stores you want to deploy.
How many Object Stores do you want to deploy? (1):
-
If your deployment includes Content Platform Engine (CPE), at least one Object Store is required by default.
-
If you’ve included IBM Enterprise Records (IER), a minimum of two Object Stores is required by default.
Enter the number of Object Stores based on your deployment needs or leave the default value.
Once you’ve selected the number of Object Stores, the script will ask whether you want to enable SSL for your database connection. Enabling SSL is recommended for enhanced security.
Do you want to enable SSL for your database selection? [y/n]:
If you choose ‘yes’, you’ll be required to provide the SSL certificate for the database later in the configuration process.
Next, the script prompts you for authentication configuration.
If you selected LDAP earlier as a part of your authentication method, you’ll be asked how many LDAP directories you want to configure. The default is 1. After that, you’ll choose the LDAP type from a list. FNCM Standalone supports the following seven LDAP types:
After selecting the LDAP type, the script will ask if you want to enable SSL for the LDAP connection. Enabling SSL is recommended for enhanced security. If you choose ‘yes’, you’ll be required to provide the SSL certificate for the ldap server later in the configuration process.
If you have selected Identity Provider (IDP) as part of your authentication method, you’ll be prompted to specify how many IDPs you want to configure (default is 1).
Next, you'll be asked whether your IDP supports discovery. Most OIDC-compliant IDPs do support this via a discovery endpoint—a well-known URL that provides configuration metadata. If you answer ‘yes’, you'll be prompted to enter the discovery endpoint URL. The script will then fetch the JSON configuration from that endpoint and automatically pre-fill the IDP configuration values.
Finally, the script prompts you to choose whether to initialize and verify the content in your deployment.
Do you want to initialize content? [y/n]:

Do you want to verify content? [y/n]:
Enabling Content Initialization is recommended and automates the setup of essential FileNet objects and configurations, including:
-
Creation of the P8 domain
-
Setup of directory services
-
Assignment of users and groups to the P8 domain and object store(s)
-
Creation of object store(s)
-
Deployment of add-ons for each object store
-
Optional enablement of Process Engine Workflow
-
Setup of Content Search Services (CSS) servers, index areas, and optional Content-Based Retrieval (CBR)
-
Creation of a Navigator desktop
The Content Verification step helps ensure that FNCM and BAN components are functioning as expected. It includes:
-
Creating a CPE folder and uploading a document
-
Performing a CBR search
-
Verifying Process Engine Workflow setup
-
Validating the ICN desktop
At the end of the gather mode execution, the script displays a summary of the collected configuration and provides a list of next actions to perform—ensuring you’re ready for the next stages of deployment, as shown below:
For silent installation you can use the --silent flag and run the following command:
python3 prerequisites.py --silent gather
Before executing the script in silent mode, ensure that you’ve completed the required fields in the container-samples/scripts/silent_config/silent_install_prerequisites.toml file. This file contains helpful comments and default values to guide you in entering the correct information.
For instance, the following section defines the FNCM Operator version. By default, the value is set to 5 corresponding to version 5.7.0:
# ####################################################
# ##     Filenet Content Manager Version            ##
# ####################################################
# Filenet Content Manager version to be deployed - Valid values: [1; 2; 3; 4; 5]
# 1. 5.5.8
# 2. 5.5.11
# 3. 5.5.12
# 4. 5.6.0
# 5. 5.7.0
FNCM_VERSION = 5
Once the script completes gather mode execution, it will generate the necessary property files. You can review the structure of these generated files in the summary output at the end of the gather process.
Move Feature of Gather Mode
If you are moving from an on-premises installation to a container-based deployment, you can run the --move flag with the gather mode to pre-fill the property files using your existing configurations.
When an on-prem environment is set up, the Content Manager User Interface (CMUI) creates a CPE configuration manager profile that stores the configuration data in XML files.
The script accepts the following files:
configurejdbcecm.xmlconfigureldap.xmlconfigurejdbcgcd.xmlconfigurejdbcos.xml
You can provide either:
-
The entire Configuration Manager profile folder, or
-
A subset of files, depending on what configurations you'd like to reuse (e.g., only LDAP or DB files).
To exclude specific configurations, simply remove the corresponding file from the folder. You can also supply multiple XML files for Object Stores or LDAP, named as configurejdbcos.2.xml, configureldap.2.xml, etc.
The script parses the supplied XML files and pre-fills the .toml property files with necessary values.
Note: For security reasons, passwords are not extracted from the configuration manager files and always need to be reentered.
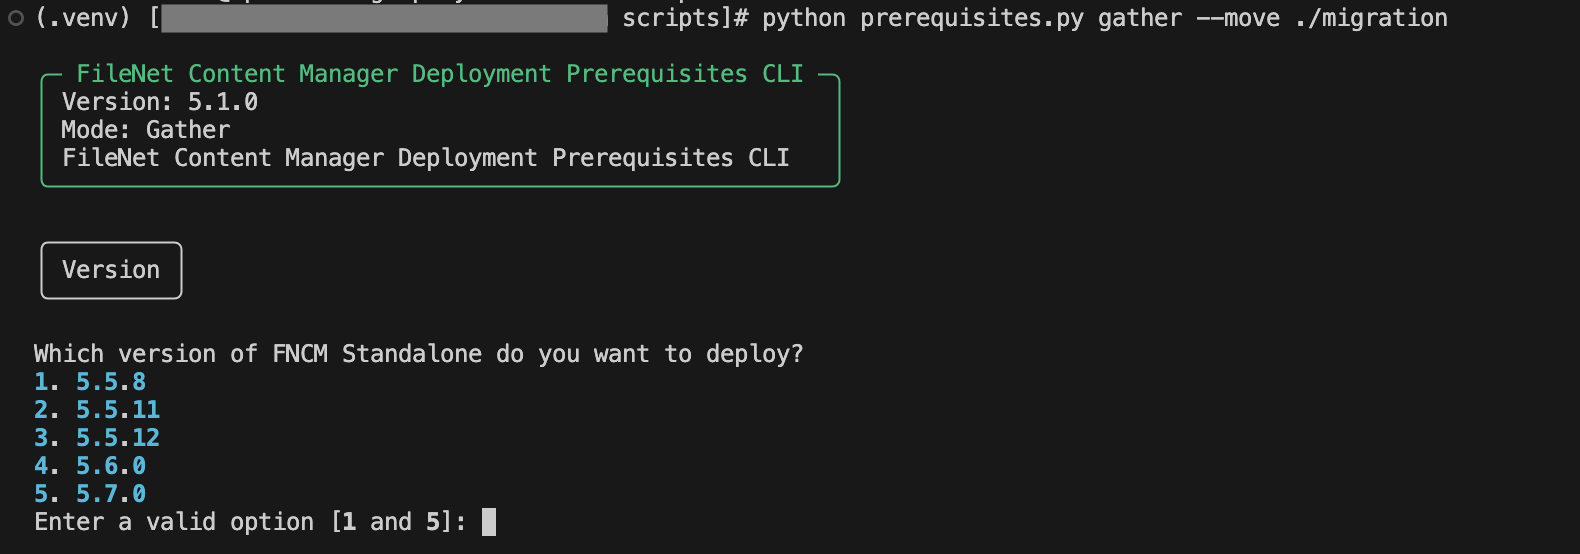
You can use these files to run the gather mode with move feature with the following command:
python3 prerequisites.py gather --move <PathToFolder>
Replace <PathToFolder> with the path to your Configuration Manager profile folder as shown in the example:
When you run the prerequisites in gather mode, it generates a set of property files. These files are essential for the generate mode, which uses the values provided in them to create the necessary configuration files for your deployment.
The generated property .toml files are saved inside the following directory:
../container-samples/scripts/propertyFile
You must edit these files before proceeding to generate mode by filling in all the <Required> placeholders. By default, the following files will be created:
Additional files will be created based on the authentication type you selected:
Each .toml file generated in gather mode serves a specific purpose and contains configuration parameters that must be filled before you proceed with generate mode:
-
fncm_deployment.toml : Contains general deployment settings such as the FNCM version, components to be installed, and storage class names.
-
fncm_components_options.toml Holds details about optional components. This includes configuration for Java SendMail, Task Manager custom users and groups, and other component-specific settings.
-
fncm_db_server.toml Defines database connection details for each database used in the deployment. Each database (e.g., GCD DB, ICN DB, and object store DBs) is identified by a unique ID.
-
fncm_user_group.toml Specifies application login credentials for P8 CPE and ICN, keystore and LTPA passwords, and user/group assignments needed for configuring access and roles.
-
fncm_ldap_server.toml Captures LDAP configuration including server URLs, credentials, base DNs, and SSL settings if applicable. Each LDAP is identified by a unique ID.
-
fncm_identity_provider.toml Contains IdP configuration details such as discovery endpoint, credentials, and token-related settings. Each IDP is identified by a unique ID.
-
fncm_scim_server.toml Stores SCIM server details including server URLs, context paths, SCIM client credentials, and token URL.
Each file includes helpful comments and templates for helping you enter the information without errors. For instance, the template to enter the database server name is given below:
# Provide the database server name or IP address of the database server. If using IPv6, enclose the address in square brackets ([...])
DATABASE_SERVERNAME = "<Required>"
In this case, replace <Required> with your actual database server name.
Notes:
-
Usernames and passwords must be enclosed in triple quotes (""") to properly handle special characters.
-
If FIPS is enabled, you should provide a keystore password of atleast 16 characters in length.
Alongside the .toml files, there will be another folder ssl-certs. This folder will contain subdirectories for each component that may require SSL certificates:
If SSL is enabled for any of these services, place the required certificates in the corresponding sub-folder. Additionally, if you are connecting to any external services over SSL, you can place their certificates in: propertyFile/ssl-certs/trusted-certs.
The script supports certificate chaining as well as bundling of multiple peer certificates into a single file.
For certificate chaining, you can place a root certificate, any intermediate certificates, and the leaf certificate in the designated folder. The script will automatically combine them into a properly ordered certificate chain file, ensuring compatibility with TLS configurations that require full chain validation.
Additionally, for scenarios like DB2 HADR deployment, you can place the primary and secondary node certificates in the same folder. The script will merge them into a single bundle and generate the appropriate template for secret creation.
Note:
All supplied SSL certificates must be in PEM format. The script accepts the following file extensions:
-
.crt
-
.cer
-
.pem
-
.cert
-
.key
-
.arm
Make sure all required information is completed in the .toml files and the appropriate certificates are in place before proceeding to generate mode.
If you have enabled IBM Content Collector P8 support for IBM Content Search Services, you must create a secret to hold the encryption key information from IBM Content Collector.
This secret must be placed inside the icc subfolder located within the propertyFile directory.
For detailed instructions on creating the secret, see: Creating Secret Hold Encryption Key Information from Content Collector.
Running the prerequisites script in generate mode, helps to generate all the SQL templates for creating the databases, secrets, and CR YAML file.
To run the prerequisites script in generate mode, you can run the following command:
python3 prerequisites.py generate
If there are any errors or any missing values or certificates, the script will exit throwing a summary of the issues and provides some remediation steps to resolve the issues as shown in the image below:
Once you run the script in generate mode successfully, it generates all the templates and files inside the folder ../container-sample/scripts/generatedFiles and outputs a summary of the generated file structure and a set of next actions to be performed as in the below image:
The SQL templates for creating the databases will be generated in the database subfolder inside the generatedFiles directory. These are templates and should be reviewed and updated as needed before use.
For secrets, YAML templates containing configuration data such as login credentials will be created in the secret subfolder. Secrets containing SSL certificates will be placed in the SSL subfolder.
Additionally, the generatedFiles directory includes the Custom Resource (CR) YAML file of kind FNCMCluster. This CR file holds all the required configuration data that the operator will use to create the FNCMS deployment.
Note:
The passwords in these generated files are XOR encoded for security reasons.
You can review the generated files, and use the SQL templates to create the databases.
Running the prerequisites script in validate mode performs a round of sanity checks on the prerequisites—such as the storage classes, databases, and authentication mechanisms (LDAP/IDP/SCIM)—and also helps to create the necessary secrets and apply the generated CR file to your deployment.
You can run the prerequisites in validate mode with the following command:
python3 prerequisites.py validate
Notes: Before executing the prerequisites script in validate mode,
The logic in validate mode closely mirrors with that of the operator. It helps to catch configuration issues early before initiating the deployment. You can also run the validation directly from the operator pod. All the required dependencies are pre-installed. You can copy the script files and run the validation in the operator by using the following steps:
cd container-samples
export OPERATOR=$(kubectl get pods -l 'name=ibm-fncm-operator' | awk 'NR>1 {print $1}')
kubectl cp scripts  $OPERATOR:/opt/ansible
kubectl exec -it $OPERATOR -- bash
cd /opt/ansible/scripts
python3 prerequisites.py validate
The script also displays this usage information automatically at the beginning of the validate mode, along with the script version and execution mode, as shown below:
-
The script begins by creating a truststore to hold all required SSL certificates.

-
It first validates storage classes:
-
Checks if the specified StorageClass exists
-
Creates a sample PVC with the specified StorageClass (default size=1GB)
-
Checks the liveness of the created PVC
-
Waits for the PVC to reach the Bound state, confirming that the provisioner is functioning.
-
-
You can specify the custom size of PVC to be created by using the --pvc-size or -pvc flag. For example:
python3 prerequisites.py validate -pvc 2Gi
Note: The PVC size needs to be specified in either Mi or Gi.
-
To exclude the storage classes validation, run the command with -sc or --skip-storageclass flag:
python3 prerequisites.py validate -sc
-
Next, the script proceeds to validate the database connections:
-
- The script ensures that the database server is reachable over the network.
- This helps to catch common issues like:
- DNS resolution failures
- Incorrect hostnames
- Firewall blocks
- If SSL is enabled:
- A SSL context is created using the given server certificate.
- A secure socket is created.
- Attempts to connect to the database server.
- Validates the TLS protocol version in use
Note: Only TLSv1.2 and TLSv1.3 are supported. Validation will fail for any other protocol version.
- Checks and displays the supported cipher suite negotiated during the SSL handshake
- If you are using non-SSL (not recommended):
- The script attempts a plain TCP connection.
- A plain TCP socket is created.
- Attempts a direct socket connection to the server.
- If reachability over SSL is failed, the script will fall back to non-SSL connection.
-
Imports the supplied certificate into the truststore
-
Attempts to connect to at least one IP address associated with the server
- Authenticates the connection
- If SSL is enabled, the script performs additional validations:
- Imports the supplied certificate into the created local truststore
- Performs an SSL authentication using the imported certificate
-
Finally the script measures and displays the latency of the connection and checks whether it falls within the accepted range. If the latency exceeds the accepted range, it is highlighted in red, indicating a potential performance issue or network instability that could impact database operations.
- This is repeated for all the databases in the
fncm_db_server.toml file.
-
To exclude the database validation, run the command with -db or --skip-database flag:
python3 prerequisites.py validate -db
-
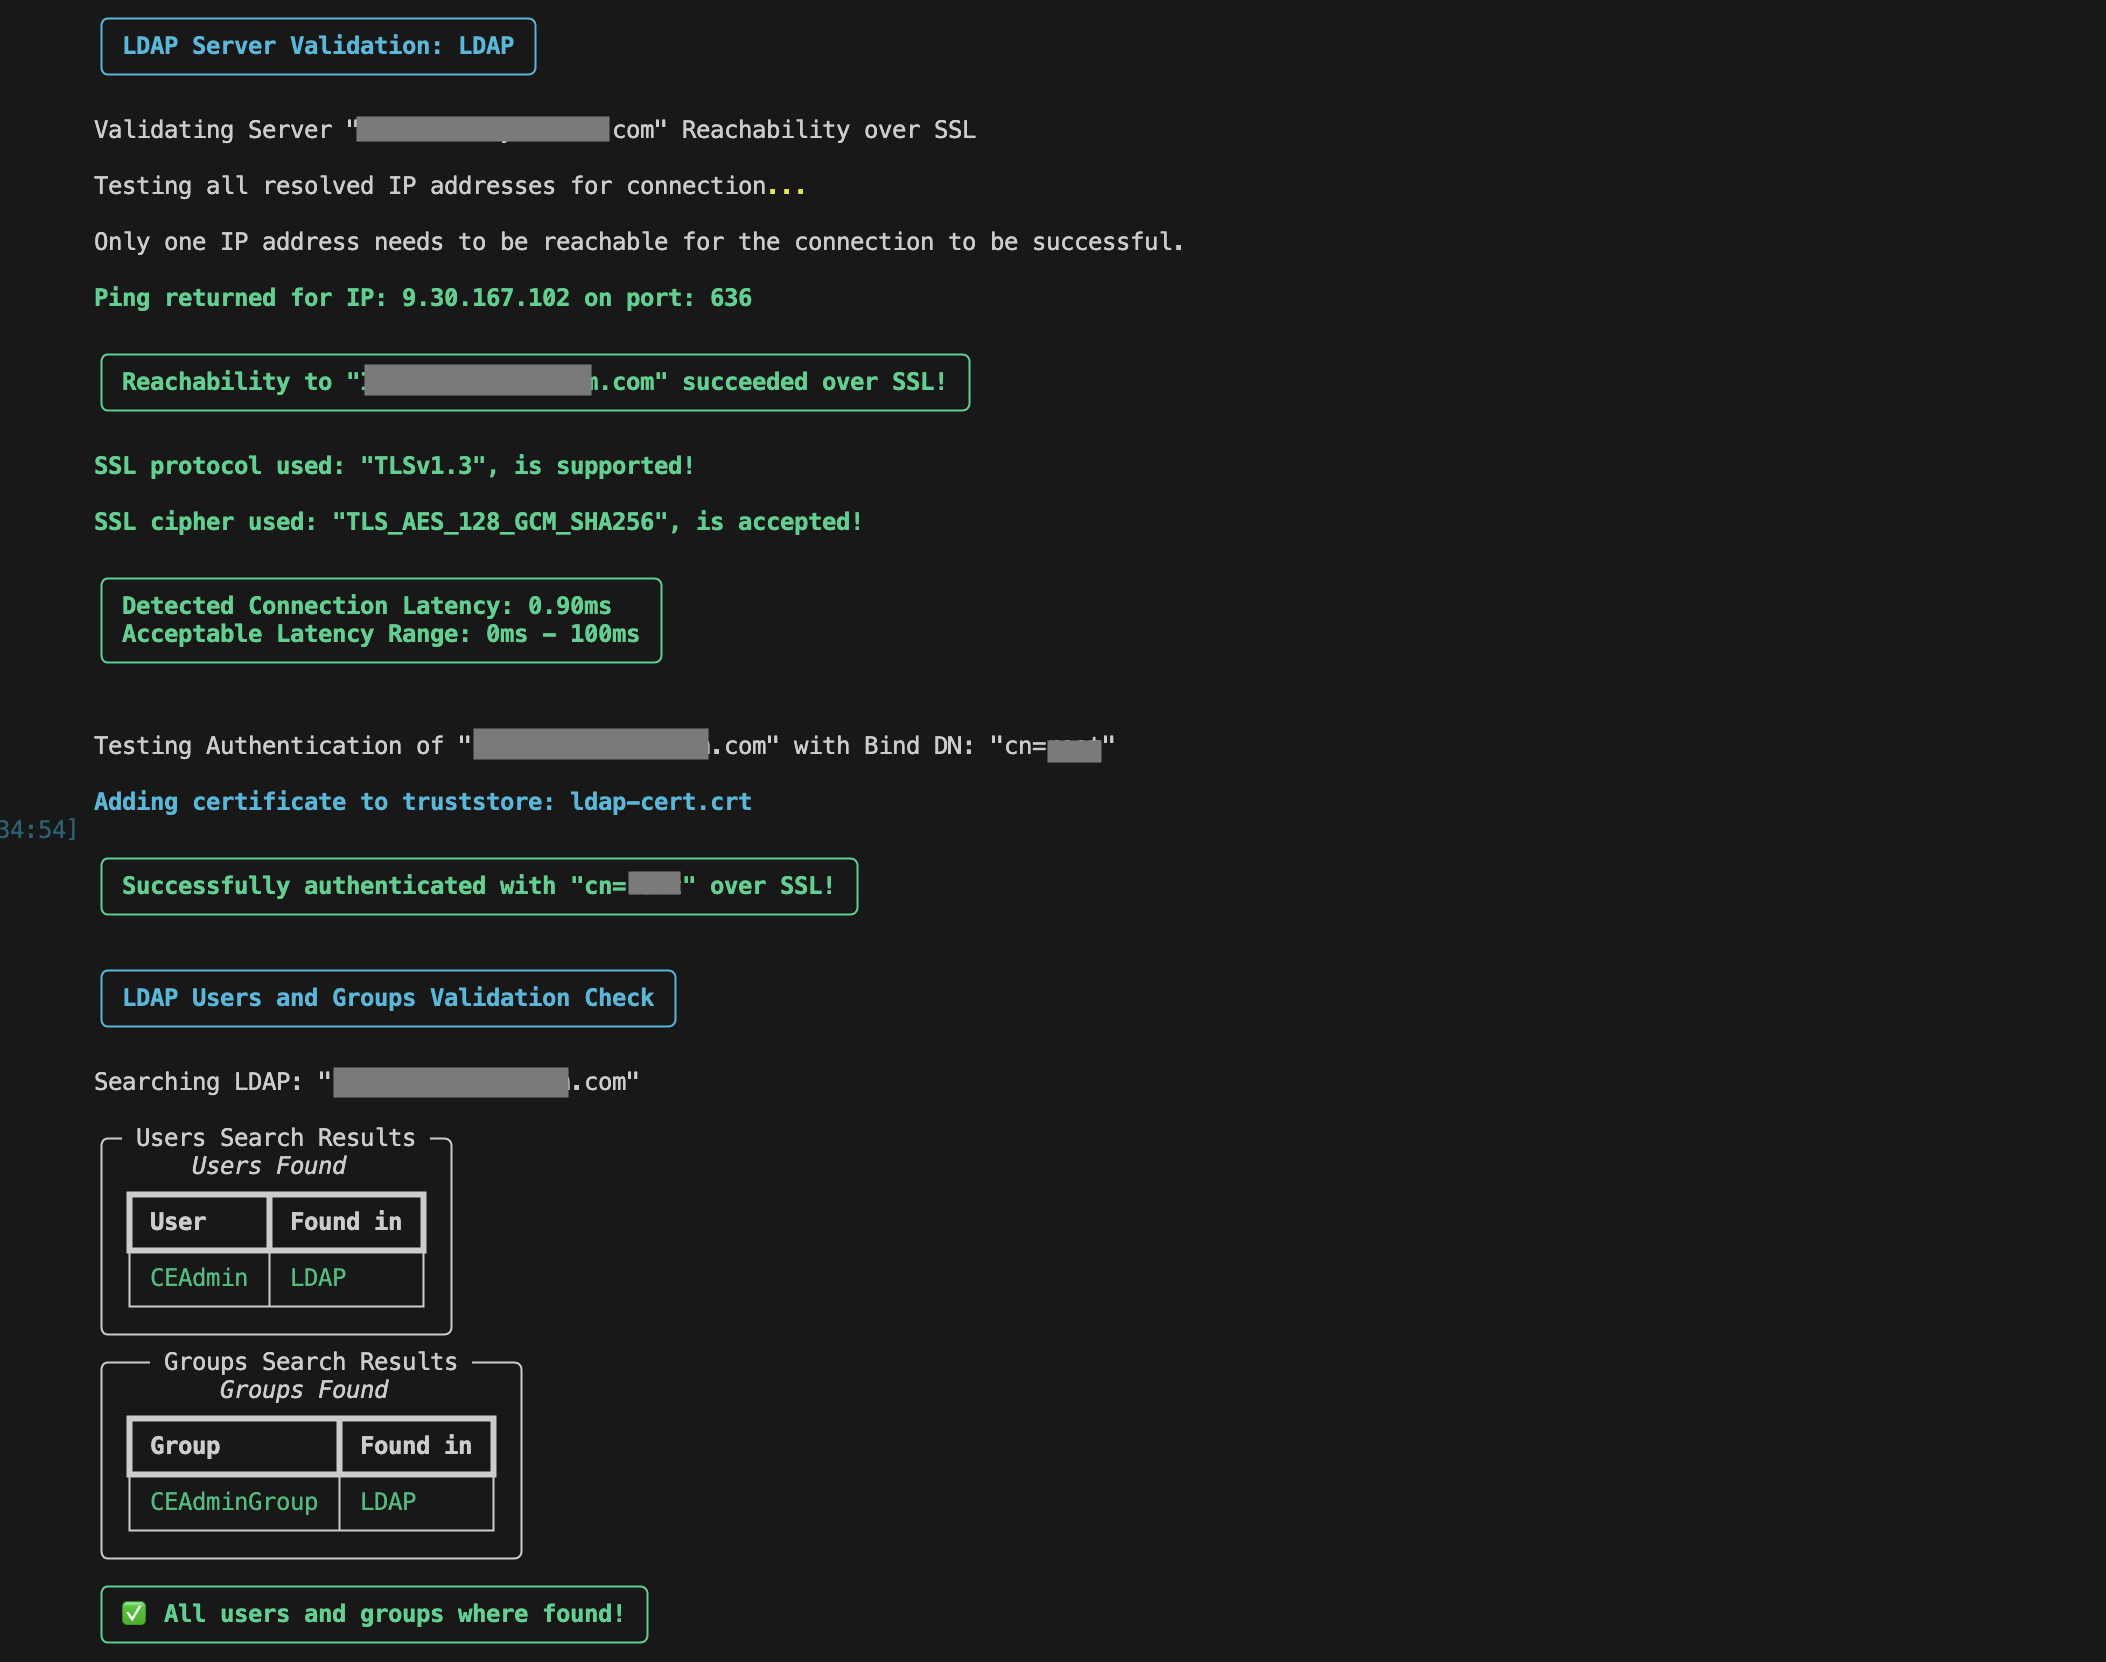
If LDAP is configured:
- Verifies the LDAP server reachability.
-
Once the connected, the script measures the connection latency
-
If the latency is within acceptable limits, it is logged as healthy.
-
If the latency exceeds the defined threshold, it is highlighted in red, signaling potential network performance issues or connectivity problems.
- Binding to the LDAP server
- The script attempts to bind to the LDAP server using the provided Distinguished Name (DN) and credentials.
- If SSL enabled:
- The supplied certificate is imported into the truststore.
- The connection is then established over SSL.
- The script attempts to bind using the imported certificate and the credentials.
-
Validates Users and Groups.
-
Once bound, the script performs a user and group validation check.
-
It queries the LDAP directory for the expected entries.
-
The results are displayed:
-
Valid entries are marked as found.
-
Missing users or groups are clearly indicated as "Not Found", helping to quickly identify configuration issues in the property file.
-
To exclude the LDAP validation, run the command with -l or --skip-ldap flag:
python3 prerequisites.py validate -l
-
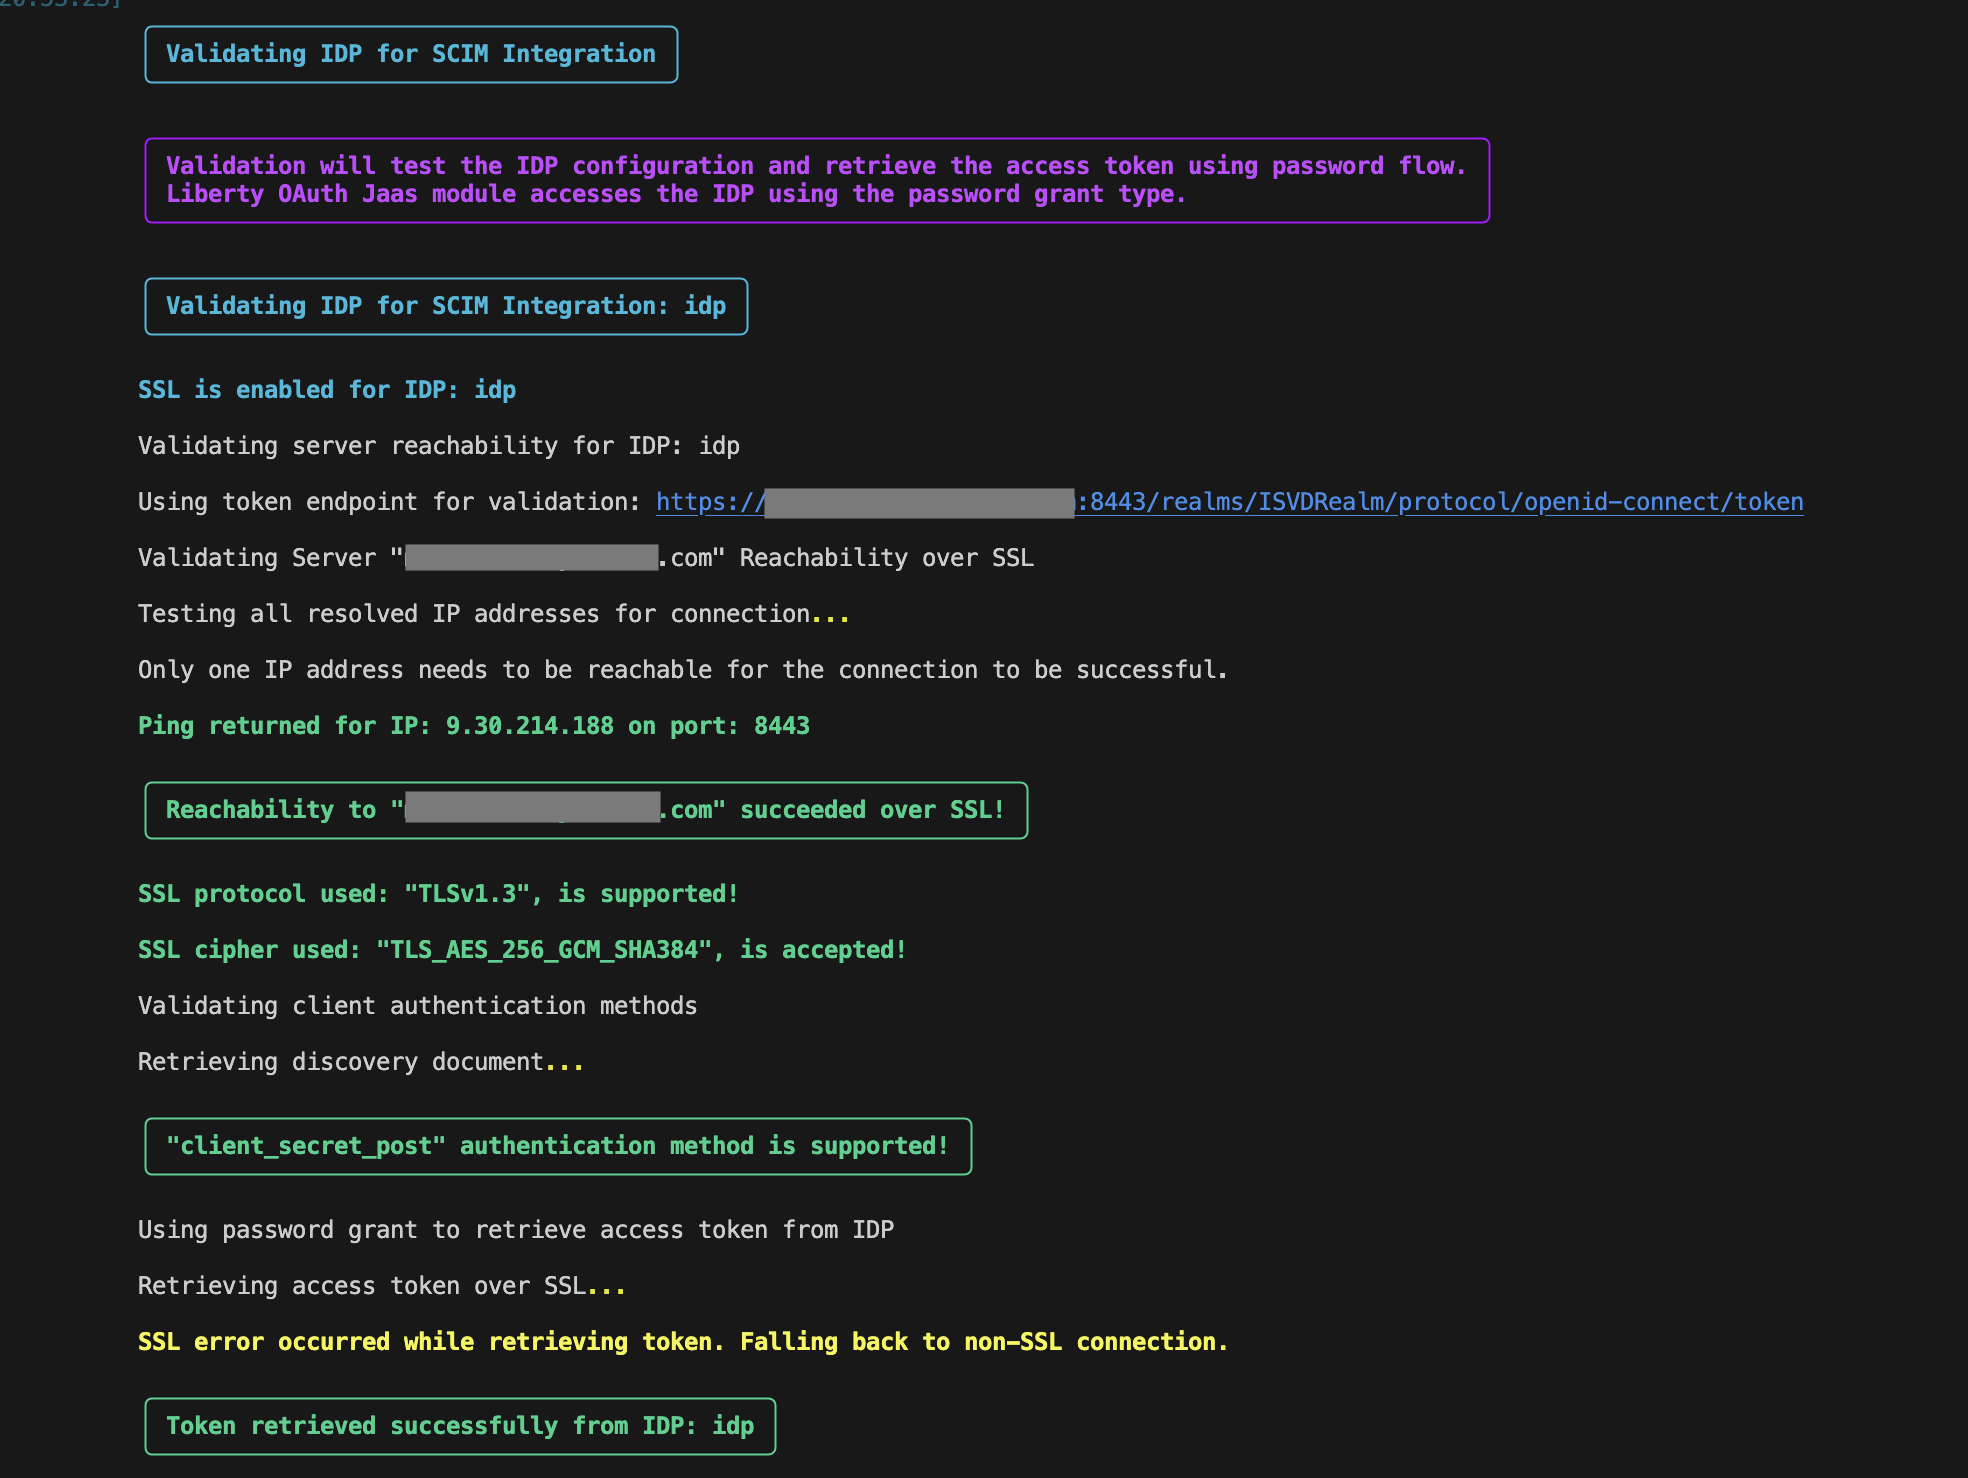
If IDP is configured:
- Validates the IDP server reachability
- This is similar to database server reachability check discussed above. (See: )
-
Attempts to retrieve an ID token from the configured IDP using the token URL and credentials.
-
Decodes the token using JWKS and validates its claims based on the configurations in fncm_identity_provider.toml.
-
The behavior differs based on the IDP configuration:
-
For LDAP-based IDPs, token retrieval is best-effort — if the token cannot be retrieved (e.g., password or client credentials grant is not supported), the validation does not fail, since IBM Liberty uses browser-based login through user interaction (OAuth authorization code flow)
-
For SCIM-based IDPs, token retrieval is mandatory. Both password grant and client credentials grant must be supported. If either fails, the validation will fail.
-
To exclude the IDP validation, run the command with -idp or --skip-idp flag:
python3 prerequisites.py validate -idp
-
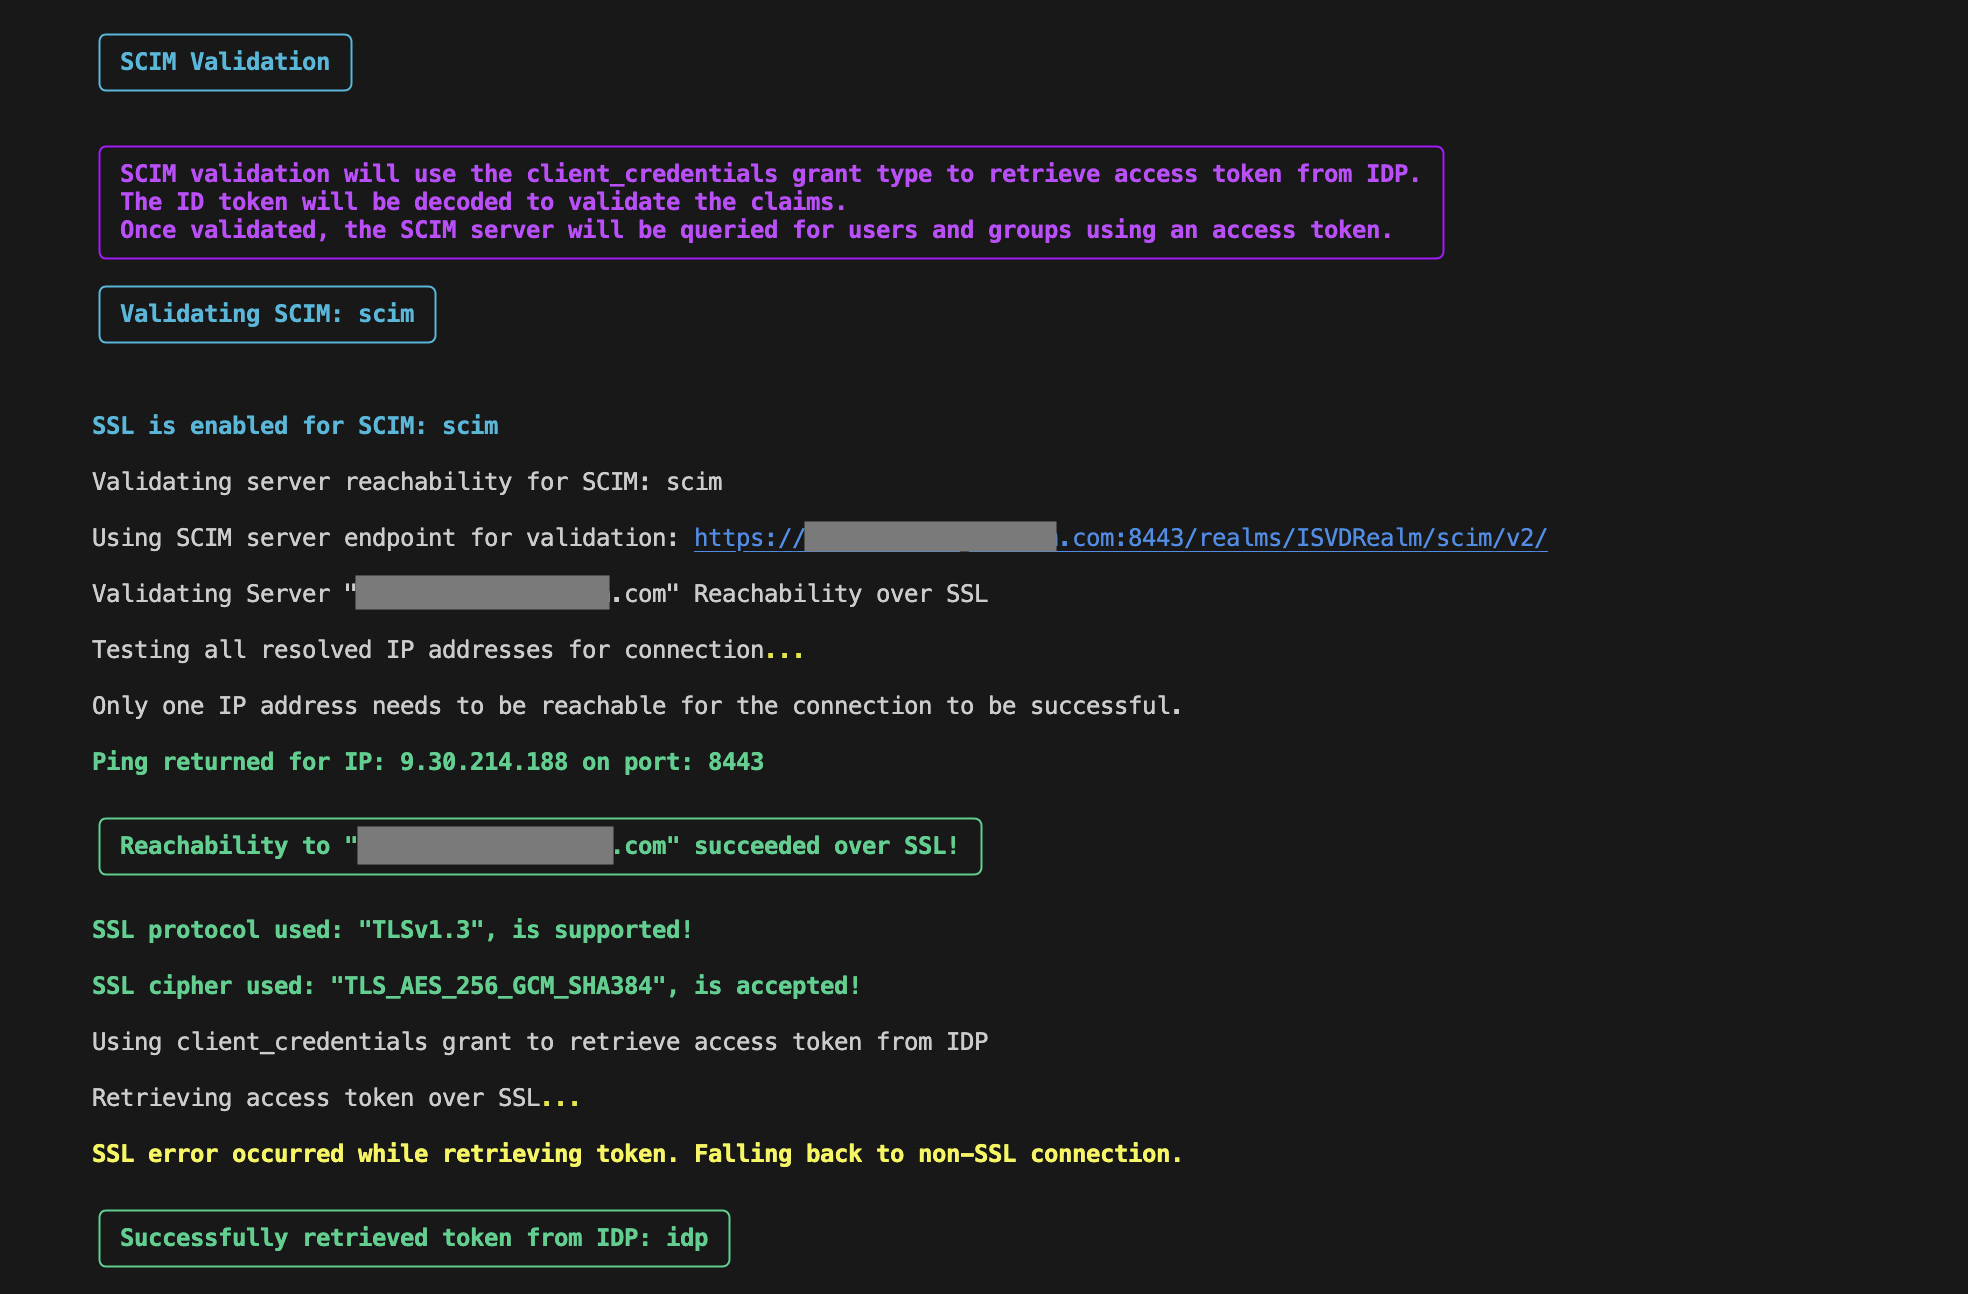
If SCIM is configured:
-
Verifies the SCIM server reachability.
- This is similar to database server reachability check discussed above. (See: )
-
An access token is requested using the client credentials grant via the configured IDP.
- This is an authentication where the client ID and secret is used directly to obtain a JWT (JSON Web Token).
-
Decodes the token using the JWKS Endpoint
- Once the token is retrieved, it is decoded and validated using the IDP's JWKS (JSON Web Key Set) endpoint exposed by the IDP.
- The JWKS URI is discovered automatically via the IDP’s Discovery Endpoint.
- This ensures the token is authentic, not expired and contains all the required claims and attributes configured.
- Validates SCIM Mapping Attributes
- The script then inspects specific SCIM-related attribute mappings defined in the IDP configuration:
-
USER_IDENTIFIER: Common user ID (e.g., username or email)
-
UNIQUE_USER_IDENTIFIER: A globally unique identifier used for cross-system identity mapping
USER_IDENTIFIER_TO_CREATE_SUBJECT: Used when creating user records (subjects).
Note: The script uses the UNIQUE_USER_IDENTIFIER for SCIM queries — not USER_IDENTIFIER.This approach ensures reliable users and groups resolution across different IDPs and environments, where USER_IDENTIFIER may not be consistent.
-
-
-
Validates the retrieved users and groups against the entries in the fncm_scim_server.toml.
-
Validates FileNet Admin User
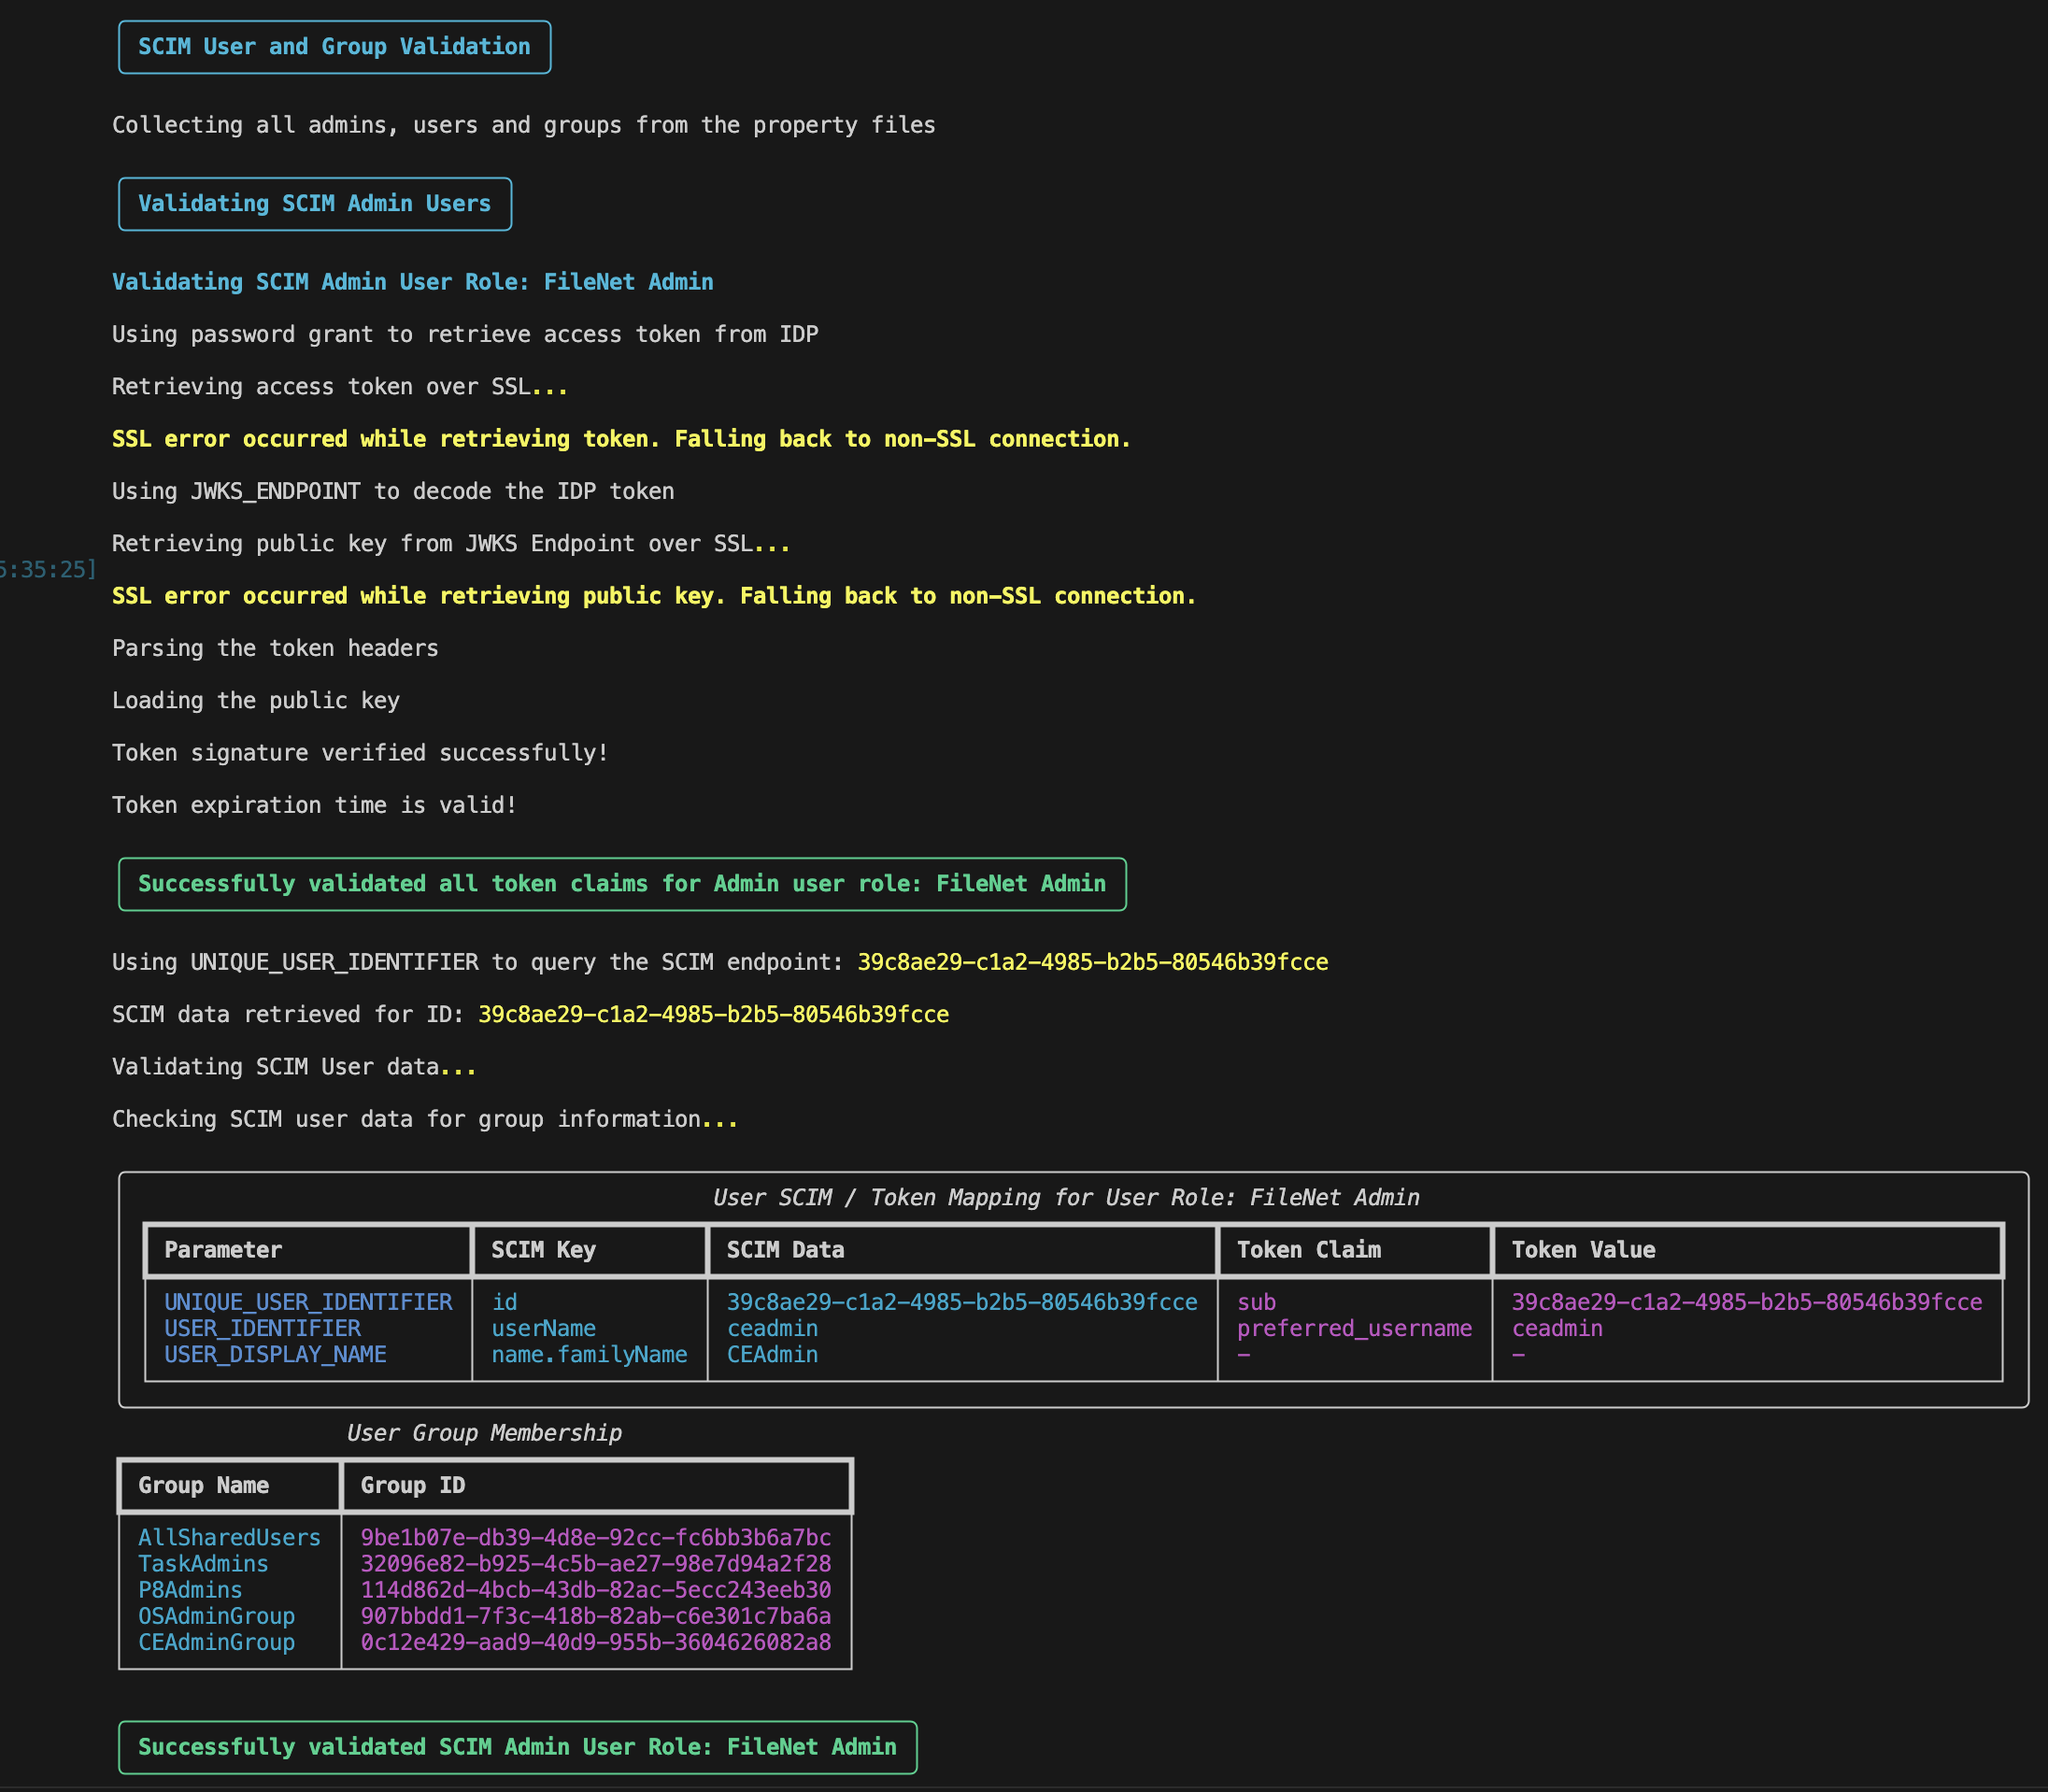
-
Validates Navigator Admin User
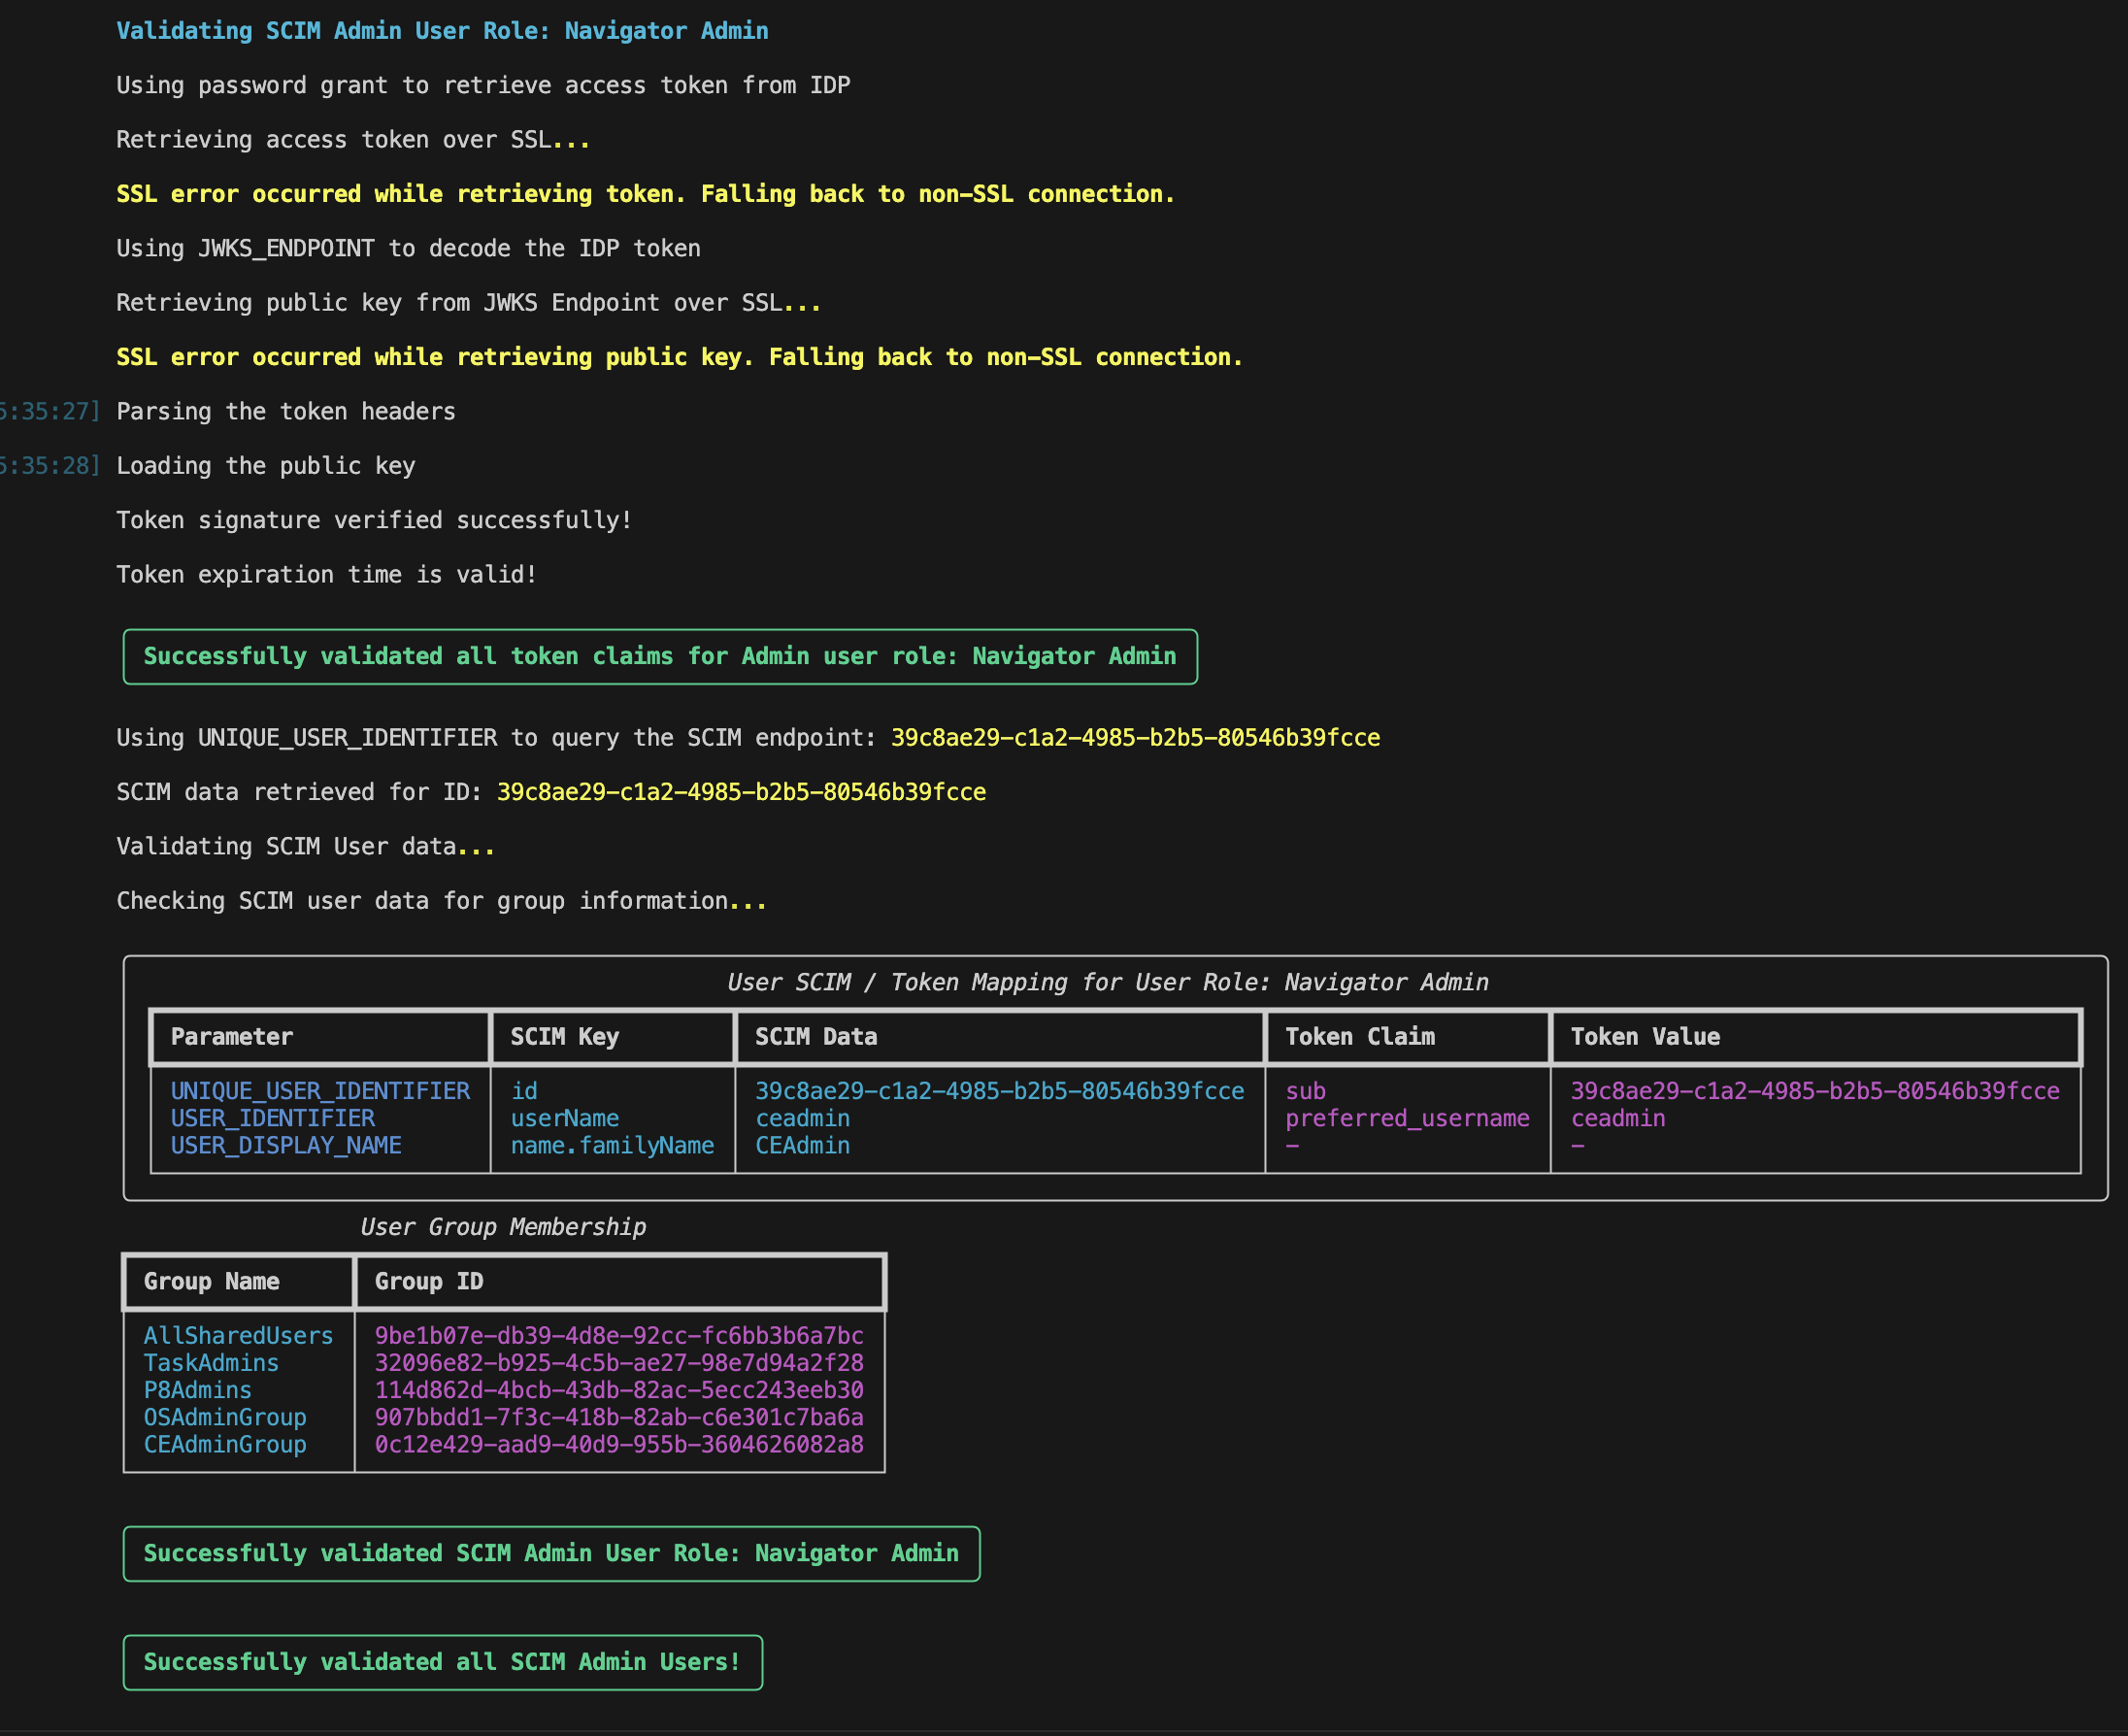
-
Validates the Admin Group
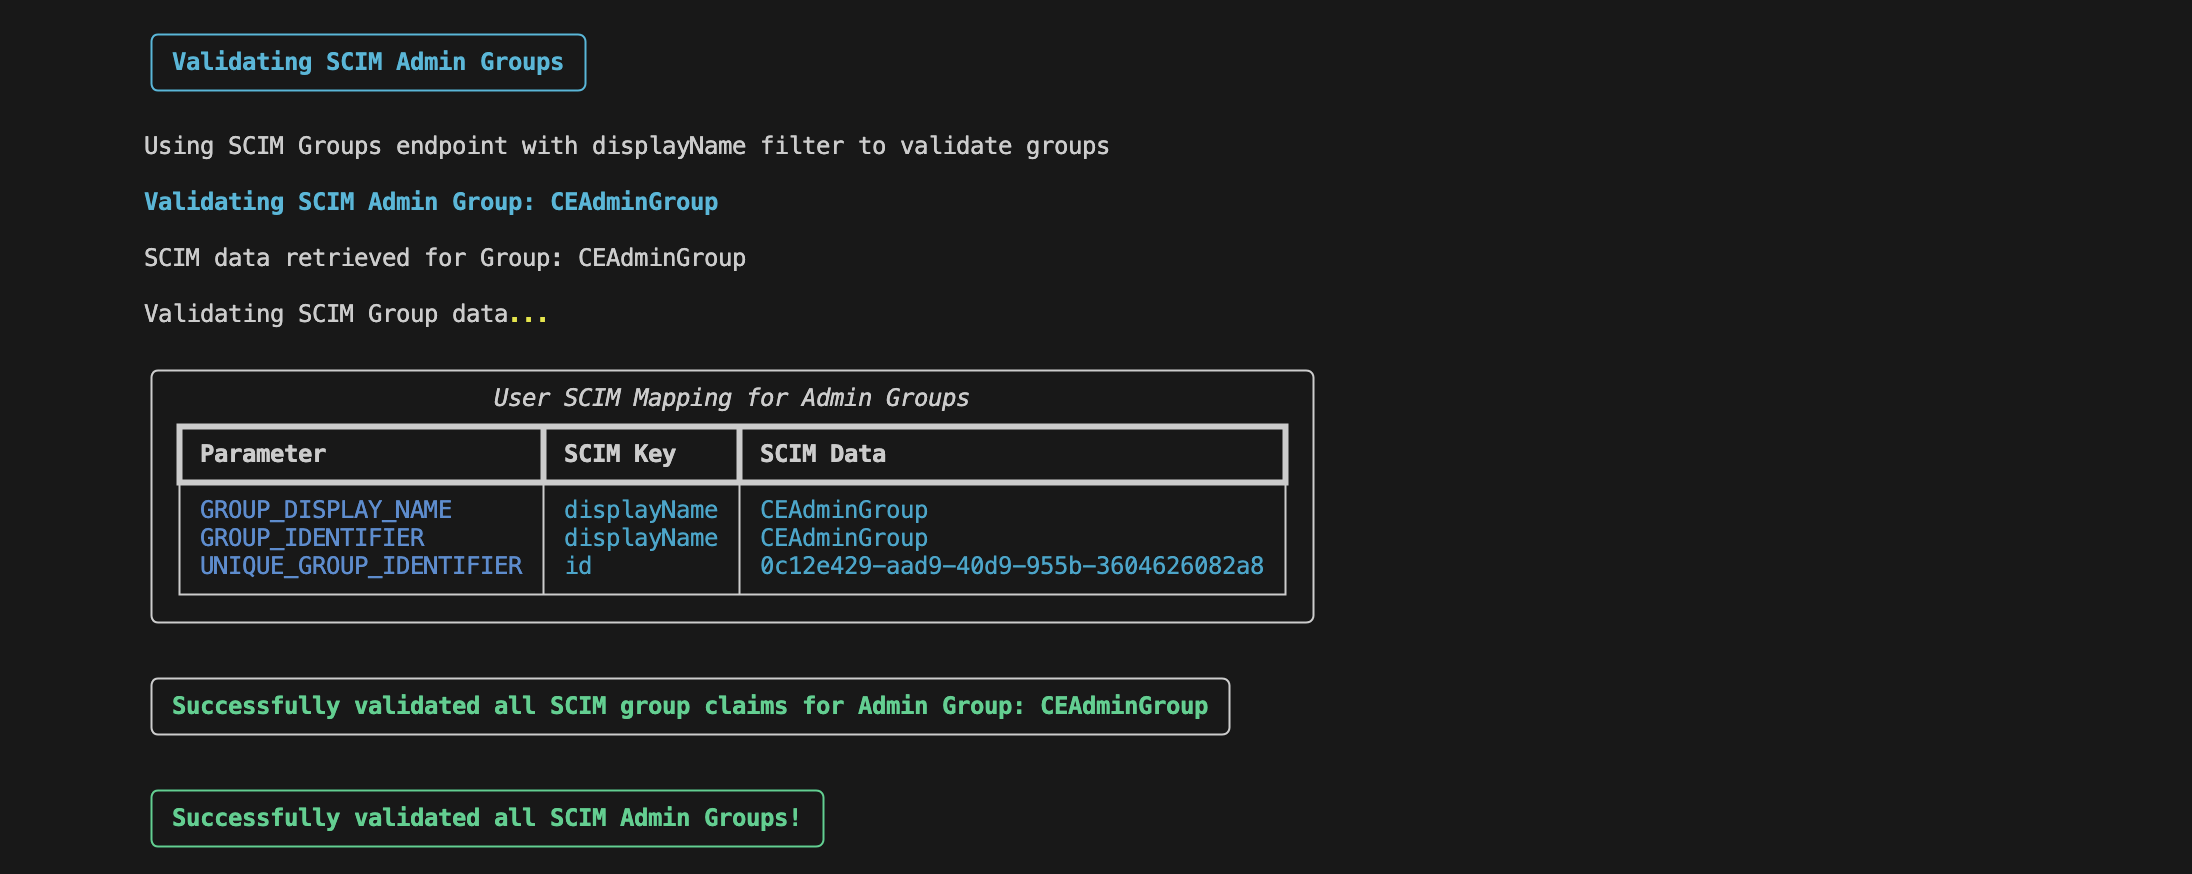
-
Validates Non-Admin Users and Groups
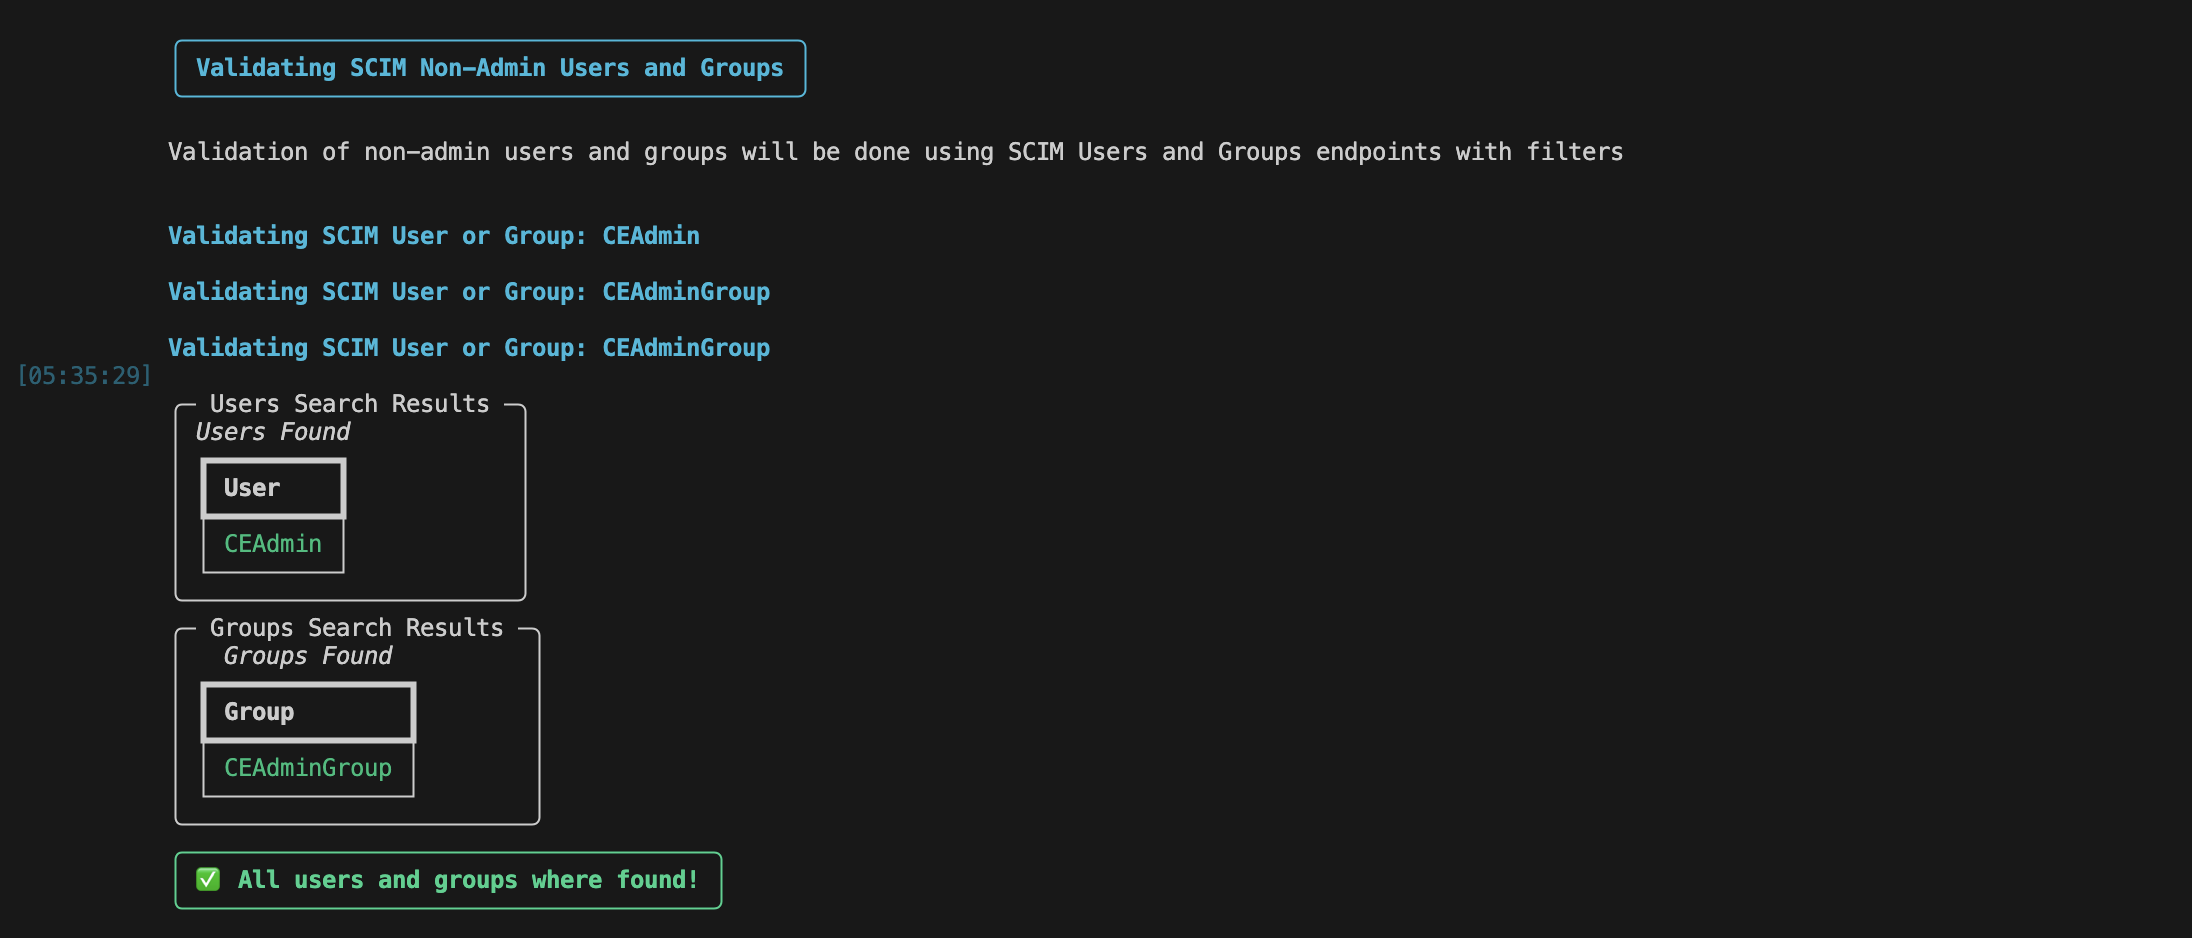
-
To exclude the SCIM validation, run the command with -scim or --skip-scim flag:
python3 prerequisites.py validate -scim
If any prerequisite check fails, the script will display an error message in the terminal, as shown below:

The script also displays information about what went wrong, relevant error details and debugging suggestions to help you resolve the issue. An example of a certificate issue is shown below:

If you encounter any errors:
- You should review and edit the property files and certificates to correct the configuration.
- Once changes are made, re-run the script in
generate mode to re-generate your template files.
- Then, execute the
validate mode again to confirm that all settings are correctly applied and the system is ready for use.
If all the validations are successful, the script displays a All prerequisites are validated message as below:
Then the script asks if you want to apply the generated secret templates in your deployment. If you select yes, all the generated secrets—such as credentials and SSL-related secrets—will be applied:
Finally, the script prompts you to apply the generated Custom Resource (CR) YAML file to initiate the deployment process.

Now you have successfully initiated the deployment of FileNet Standalone in OpenShift. You can monitor the operator logs for deployment progression and any possible errors.
-
You can run the script with the --help flag to view all the different modes and usage options:
python3 prerequisites.py --help
-
To get additional logs into the command line as you execute the scripts, you can enable verbose mode. For instance, to get additional information while validating the prerequisites, run the following command:
python3 prerequisites.py --verbose validate
-
To get the details on a specific MODE, you can use the --help flag. For instance, to get the different usage options of validate mode, you can run the following command:
python3 prerequisites.py validate --help
- All the execution logs will be stored in the file:
container-samples/scripts/prerequisites.log. You can refer to this log to debug issues or review script activity.
If you have any questions or run into issues, feel free to reach out to the FileNet Standalone community on GitHub: https://github.com/ibm-ecm/container-samples—we're here to help!
Thanks for reading!
Stay tuned for our next post.
Happy deploying!
Author: Anisha Suresh
Reviewers: Jason Kahn, Haresh Gautham S