This blog is part of a series. For the whole series list see here
One of the most common integration points is a database, and App Connect is well suited to connecting to a significant variety of datastores. One of the most common protocols used to connect to databases is ODBC, so that is the example that we will work through in this post.
Once again we have chosen a very basic flow as the point of the post is not to show off App Connect’s database manipulation capabilities, but more to show how to migrate an existing integration into containers. In the case of ODBC, this is mainly centered around the various configuration files involved.
As with previous articles, we’ll start with a basic migration, then build up to some more advanced topics at the end.
Description of the message flow
We have a very simple message flow that receives the request over HTTP and creates (inserts) a record into a database table.
Should you want to look at the flow in Toolkit, you can download the source for the flow in the file SimpleDatabaseApp.zip at the following location. However, note that we do not actually need to make any changes to the flow in this scenario:
https://github.com/amarIBM/hello-world/tree/master/Samples/Scenario-6
We use Database node for Database interaction using the ODBC protocol.
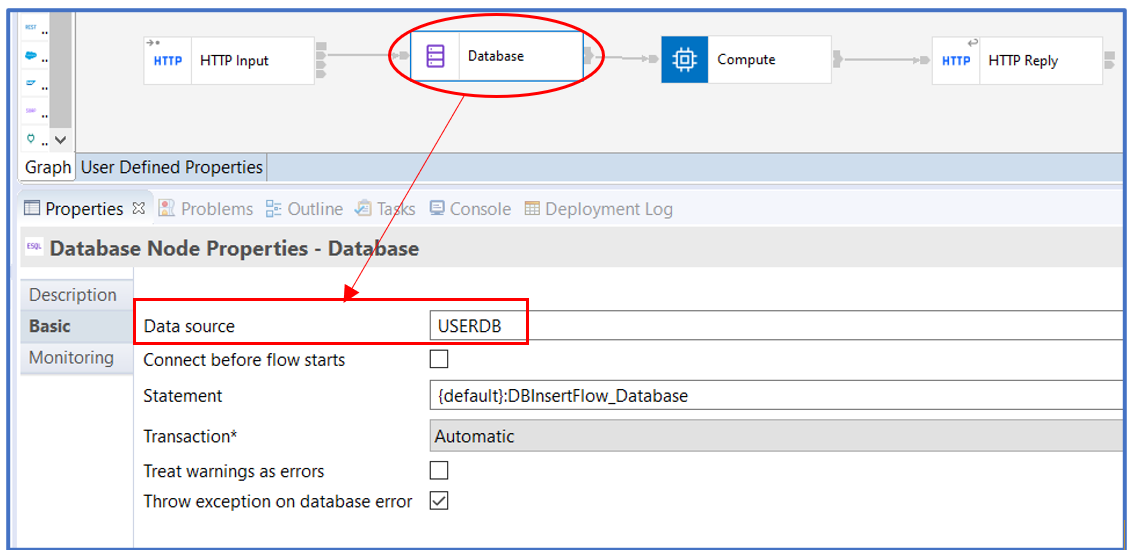
The Database node has a simple INSERT statement as below,
CREATE COMPUTE MODULE DBInsertFlow_Compute
CREATE FUNCTION Main() RETURNS BOOLEAN
BEGIN
INSERT INTO Database.EMP values('employee1', 1234);
RETURN TRUE;
END;
For brevity, we will not provide instructions for creating a DB2 (or any other) database. We will instead assume that you are reading this article because you already have a DB2 database that your existing integration is using, and/or that you already have the skills to create one.
Configuration files for ODBC connectivity
Let’s now look at how the connection to the database is defined in a current environment such as one created in IBM Integration Bus v10. We will then see how we would perform that same configuration on IBM App Connect v12 deployed in Kubernetes. We will primarily document how to configure for DB2, but we will refer to where the steps would be different for other databases.
Since IBM App Connect v11.0.0.11 the native DB2 driver is included in the shipped binaries of App Connect Enterprise. This enables you to configure App Connect Enterprise to connect directly to DB2 without having to acquire and install the DB2 client yourself. IBM App Connect can also connect to many other common databases such as (Oracle, Sybase, and SQL Server) using the included DataDirect ODBC Driver.
This means that the IBM App Connect Enterprise certified container already contains all the binaries you require to connect to a wide range of databases. All you need to do is add the connection configuration.
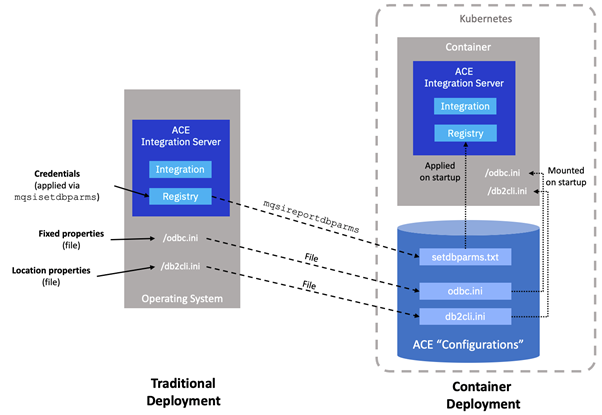
There are three mandatory parts to the database connection configuration:
- Fixed properties (odbc.ini): Values that don’t change from one environment to another such as the location of the database driver binaries, and properties pertaining to how the connection behaves (timeouts etc.).
- Location properties (odbc.ini or db2cli.ini): Where to find the data source, such as its host, port and name. Depending on your setup, these may or may not change as you move through the environments from development to production.
- Credentials (mqsisetdbparms): The user names and passwords used to connect to the data source. Clearly these almost always change from one environment to another.
Let’s look at each of these in turn, understanding where to find them in an existing environment, and then how to configure them in Kubernetes.
Fixed properties (odbc.ini file)
Most of the parameters needed to connect to a database using the ODBC standard are contained within a file named odbc.ini. In a real migration scenario from, for example, IBM Integration Bus v10, you would find the existing odbc.ini in the directory pointed to via the ODBCINI environment variable. A common location used is /var/mqsi but it could point to any directory on the current server.
An example of a DB2 odbc.ini file that matches our supplied integration flow is below:
[ODBC Data Sources]

USERDB=IBM Data Server Driver included in ACE
;# IBM Data Server Driver included in ACE

[USERDB]
DRIVER=/opt/ibm/ace-12/server/ODBC/dsdriver/odbc_cli/clidriver/lib/libdb2o.so
Description=IBM Db2 ODBC Database accessed using IBM Data Server Driver included in ACE
Database=USERDB

[ODBC]
InstallDir=/opt/ibm/ace-12/server/ODBC/drivers
UseCursorLib=0
IANAAppCodePage=4
UNICODE=UTF-8
odbc.ini files are slightly different for each database vendor. For the templates for other databases, refer to IBM Docs at:
https://www.ibm.com/docs/en/app-connect/12.0?topic=eocd-connecting-database-from-linux-unix-systems-by-using-integration-odbc-database-extender
As an example, here is a sample odbc.ini for Oracle:
[ODBC Data Sources]
ORACLEDB=DataDirect ODBC Oracle Wire Protocol

;# Oracle stanza
[USERDB]
Driver=/opt/ibm/ace-12/server/ODBC/drivers/lib/UKora95.so
Description=DataDirect ODBC Oracle Wire Protocol
HostName=my-machine.hursley.ibm.com
PortNumber=1521
ServiceName=my-oracle-service
CatalogOptions=0
EnableStaticCursorsForLongData=0
ApplicationUsingThreads=1
EnableDescribeParam=1
OptimizePrepare=1
WorkArounds=536870912
ProcedureRetResults=1
ColumnSizeAsCharacter=1
LoginTimeout=0
EnableNcharSupport=0

[ODBC]
InstallDir=/opt/ibm/ace-12/server/ODBC/drivers
UseCursorLib=0
IANAAppCodePage=4
UNICODE=UTF-8
Notice the lines marked in bold in the Oracle example odbc.ini file above. They contain the host, port and service name, even though these arguably in the next category (“location properties”) could change per environment.
Location properties (db2cli.ini file)
As we just saw, Oracle and other databases interleave the “location properties” within the odbc.ini file alongside the “fixed properties”. DB2 instead keeps them in a separate file named db2cli.ini. This can be useful if the location properties change between environments, but you want to retain a consistent set of “fixed properties”.
In a migration scenario from, for example, IBM Integration Bus v10, you would find the existing db2cli.ini in the directory pointed to via the DB2CLIINI environment variable. A common location used is /var/mqsi but it could point to any directory on the current server.
An example of a DB2 db2cli.ini file that matches the data source of our supplied integration flow is below:
[USERDB]
Hostname=9.145.146.224
Port=50000
Database=USERDB
You will of course need to change the Hostname and Port fields to match your database.
Credentials (mqsisetdbparms)
Historically, credentials (e.g. userid and password) for resources such as a database would have been configured on the integration server using the mqsisetdbparms command line utility. This command is still available in the current version for traditional IBM App Connect.
However, it is not a good cloud native practice for administrators to have to run commands against a running container. A container should be started up with all the information it needs, and then no further configuration should occur at runtime.
The App Connect Certified Container and its associated Operator have therefore been engineered to receive credentials from a properties file and automatically apply them to the integration server on start-up.
Create a file called "setdbparms.txt" with the following contents updating the details accordingly
odbc::<datasource name> <uid> <password>
Where <datasource name> is the name of the stanza in the odbc.ini file. For example:
odbc::USERDB my-user-id my-password
Apply the database configurations to Kubernetes
We have now prepared the necessary files (odbc.ini, db2cli.ini and setdbparms.txt). Let’s now apply them to the Kubernetes environment such that they can be referenced later during the deployment of our integration flow.
We do this by creating “configurations” (discussed in more detail later) containing the relevant files, just as we have done in previous examples such as the definition of a queue manager in “Moving an App Connect flow using MQ onto containers”.
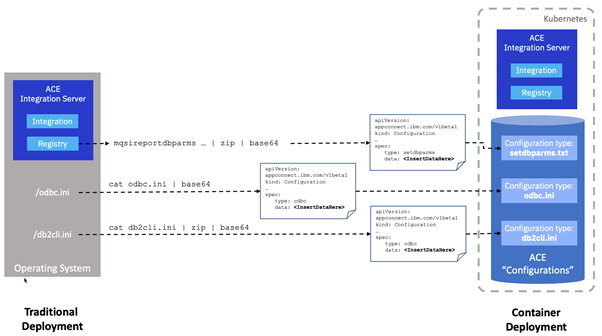
We demonstrate the creation of these configurations using the command line to demonstrate that they could be included in an automated build pipeline. However, in each case we will also refer to the instructions for applying them via the user interface too.
Create the fixed data source properties using an odbc.ini configuration type
It is possible to create the odbc.ini configuration type via the IBM App Connect dashboard, which is well documented already. We will instead create it via a command line as you might in an automated pipeline.
Pipe the odbc.ini file into base64 to get a base64 encoded version of the file. For example:
$ cat odbc.ini | base64
Next we need to create a "odbc.ini" configuration definition. Create a file (`odbcini.yaml`) with the following contents, taking the base64 output and update the following file in the data sections.
apiVersion: appconnect.ibm.com/v1beta1
kind: Configuration
metadata:
  name: db2-odbcini
  namespace: mynamespace
spec:
  type: odbc
  description: Configuration for Db2
  data: <InsertDataHere>
Paste the output from the base64 encoding in place of <InsertDataHere>
Deploy the configuration using
$ oc apply -f odbcini.yaml
Create the data source location properties using a generic configuration type
Since db2cli.ini is unique to DB2, it doesn’t fit under any of the standard configuration types, so we instead load it up as a “generic” configuration type. Generic types require an extra step as they are always supplied as zip files.
It is possible to create the generic configuration type via the IBM App Connect dashboard, which is well documented already. We will instead create it via a command line as you might in an automated pipeline.
Zip up `db2cli.ini` into a file called `extensions.zip`.
$ zip db2cli.ini > extensions.zip
Pipe the zip file into base64 to get a base64 encoded version of the file i.e.
$ cat extensions.zip | base64
Next we need to create a "generic" configuration definition. Create a file called “generic.yaml” with the following contents.
apiVersion: appconnect.ibm.com/v1beta1
kind: Configuration
metadata:
  name: extensions.zip
  namespace: mynamespace
spec:
  type: generic
  description: Files for configuring Db2
  data: <InsertDataHere>
Paste the output from the base64 encoding in place of <InsertDataHere>
Deploy the configuration using
$ oc apply -f generic.yaml
Create the data source credentials using the setdbparms configuration type
Credentials have a specific configuration type called “setdbparms”. They are treated differently to other configurations because they contain more sensitive data (passwords). Currently they are stored in Kubernetes “secrets”, but that’s all handled invisibly for you by the Operator.
It is possible to create the setdbparms configuration type via the IBM App Connect dashboard, which is well documented already. We will instead create it via a command line as you might in an automated pipeline.
Pipe setdbparms.txt file into base64 to get a base64 encoded version of the file i.e.
$ cat setdbparms.txt | base64
Next we need to create a "setdbparms" configuration definition. Create a file (`setdbparms.yaml`) with the following contents.
apiVersion: appconnect.ibm.com/v1beta1
kind: Configuration
metadata:
  name: db2-credentials
  namespace: mynamespace
spec:
  type: setdbparms
  description: Configuration for Db2
  data: <InsertDataHere>
Paste the output from the base64 encoding in place of <InsertDataHere>
Deploy the configuration using
$ oc apply -f setdbparms.yaml
Deploy the integration
Now we have all the database configuration stored in Kubernetes configurations, we can go ahead and deploy our integration.
For convenience we have pre-created a bar file and made it available on GitHub.
Create a Integration Server definition file (IS-database-db2-app.yaml) which includes the references to the configuration objects we created in the “configurations” section as shown below
apiVersion: appconnect.ibm.com/v1beta1
kind: IntegrationServer
metadata:
  name: test-database-app
  labels: {}
spec:
  adminServerSecure: false
  barURL: >-
    https://github.com/amarIBM/hello-world/raw/master/Samples/Scenario-6/SimpleDatabaseApp.bar
  configurations:
    - github-barauth
    - db2-odbcini
    - db2-credentials
    - extensions.zip
  createDashboardUsers: true
  designerFlowsOperationMode: disabled
  enableMetrics: true
  env:
    - name: DB2CLIINIPATH
      value: “/home/aceuser/generic”
  license:
    accept: true
    license: L-KSBM-C37J2R
    use: AppConnectEnterpriseProduction
  pod:
    containers:
      runtime:
        resources:
          limits:
            cpu: 300m
            memory: 350Mi
          requests:
            cpu: 300m
            memory: 300Mi
  replicas: 1
  router:
    timeout: 120s
  service:
    endpointType: http
  version: '12.0'
Note DB2CLIINIPATH in the “env” section. This needs a little explanation. The Operator will automatically place any files provided as “generic” configurations into the “/home/aceuser/generic” directory. This therefore will include our db2cli.ini file. However, the integration server will not look for a db2cli.ini file unless it sees a DB2CLIINIPATH environment variable. The line in the “env” section is creating that environment variable.
Deploy the integration server using
$ oc apply -f IS-database-db2-app.yaml
Testing the flow
The sample message flow that we have used in this demonstration creates a record (row) in database table called EMP with the employee name and employee id.
The message flow exposes the HTTP endpoint service called “/createRecord” .
To invoke the message flow, obtain the public URL using ‘ oc get routes’ and then call the service using curl command, replacing <hostname> with the service name you got back.
$ curl -X POST http://<hostname>/createRecord
On a successful record creation, you should see the response message returned as below :
<Response>
Successfully created an employee record into the database
</Response>
On the database side, you can verify by running the SELECT query on the database table.
SQL> select * from EMP;
NAME ID
---------- --------
employee1 1234
Great! So, you’ve deployed and tested a simple flow in a container that talks to a database via ODBC. Now let’s take a quick look at a couple of more advanced topics.
Applying additional configuration to database connections
There are quite a few further tuning parameters available for database connections beyond those that are defined in the ODBC layer. Examples include how the connections are managed and cached, some common examples being: maxConnectionAge, maxConnectionUseCount, maxStatementAge, and statementCacheSize.
On a traditional deployment these would have been set using the mqsichangeproperties command, and you can extract the values from a current environment using mqsireportproperties. An example command is shown below:
mqsireportproperties integration_node -e integration_server -o ComIbmDatabaseConnectionManager -r
In containers, and indeed in any deployment using App Connect v11 or above, these parameters should be set using a properties file named server.conf.yaml.
This is a good time to introduce this critically important file. This is the primary properties file used to configure an integration server. The App Connect Enterprise Certified Container comes with a default server.conf.yaml file (/home/aceuser/ace-server/server.conf.yaml). We haven’t needed to know about this file so far as the default has matched our needs.
Should we need to add or change properties of the server.conf.yaml we can provide a further server.conf.yaml file via a “configuration” just as we have done for the other properties files in this article. The details on how to do this are here:
https://www.ibm.com/docs/en/app-connect/containers_cd?topic=types-serverconfyaml-type
Ultimately, our additional server.conf.yaml file will be pulled from the configuration on start up and placed into the /home/aceuser/ace-server/overrides/ directory. Any properties specified in it will override those in the default file.
The database connection properties live in a specific stanza of the file. Taking our earlier example properties, we could add the following to a server.conf.yaml file:
ResourceManagers:
  DatabaseConnectionManager:
    maxConnectionAge='60'
maxConnectionUseCount='100'
maxStatementAge='600'
statementCacheSize='40'
The full set of database related properties, and more detail on database connections in general, is available here:
https://www.ibm.com/docs/en/app-connect/12.0?topic=overview-database-connections
Capturing ODBC Trace
We will at some point need to perform deeper diagnostics on our database connections, perhaps by enabling tracing. This is done via another file (odbcinst.ini) which is added as a “generic” configuration just in the same way as we did for the db2cli.ini file earlier. More detail on how to do this is documented here:
https://community.ibm.com/community/user/integration/blogs/amar-shah1/2021/05/05/enabling-odbc-trace-for-integration-server-in-cp4i
What are “configurations” and what happens to them at runtime
This post, more than any so far in this series, made extensive use of configurations. Configurations provide a general mechanism specific to App Connect Enterprise storing properties files that an integration server will need at runtime.
Under the covers, the configurations are stored natively in Kubernetes either as a ConfigMap or Secret depending on the type of configuration. A full list of the different types of configuration objects is available in the documentation.
https://www.ibm.com/docs/en/app-connect/containers_cd?topic=reference-configuration-types
You will have noticed that we reference all of the configurations that we have created in the Integration Server definition file (IS-database-db2-app.yaml above). On start up, the App Connect Enterprise certified container goes through the list of configuration references and loads them into the correct place in the directory tree as shown in the diagram below.
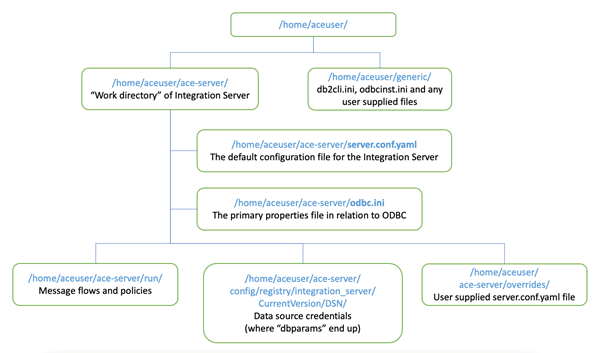
As such, once running, App Connect runs identically in a container as it would if installed directly onto an operating system, simply reading information from properties files on the file system.
In theory, when running in a container you should never need to know where these files are on the file system of the container, and the above is provided for reference/interest only. You should never attempt to make changes directly to the files within a running container. You should instead always interact with the “configuration” objects. If you need to make a change to properties within one of the files held in a configuration, you should go through the same process as we did in this post – place the changed file into a configuration yaml file and then re-apply it to Kubernetes. The Operator will realise that a configuration has been changed and restart the servers on your behalf such that the new value is picked up.
This cloud native approach to configuration management ensures that there is no danger of drift between the running container and the configuration, ensuring that environment configurations are consistent and repeatable.
Acknowledgement and thanks to Kim Clark for providing valuable inputs to this article.
#IntegrationBus(IIB)#AppConnectEnterprise(ACE)#Docker#containers #database_config#ODBC