Overview of the problem
When connecting to z/OSMF, you might see a warning message “Your connection is not private” in your browser. Along with this message, the browser also provides a reason code like NET::ERR_CERT_INVALID for your reference. Many people have seen this message and have clicked the “proceed to HOSTNAME (unsafe)” link directly without knowing what it means. The message won’t be shown since next time you visit z/OSMF in the same browser.
However, sometimes the browser doesn’t provide you a link to proceed, as shown below.
User gets blocked and may have to switch to another browser to use z/OSMF. So is there a way to proceed to z/OSMF when the browser doesn’t provide a “proceed to HOSTNAME (unsafe)” link? The answer is yes. You might now be interested in why the message is presented. The error might be because the server is mis-configured, and if so, only z/OSMF administrator or security administrator can fix the error permanently. But in this blog, we would like to focus on another aspect of the problem which is to help people workaround this error in four steps, without asking your administrator to change the server configuration or requiring you to switch to another browser. Now let’s start!
Step 1 – Identify your browser running environment
The most common reason you see “Your connection is not private” is because the certificate of z/OSMF server is not trusted. And the most common reason that the server certificate is not trusted is because the CA certificate that signs z/OSMF server certificate is not trusted by your browser or operating system.
When a browser doesn’t trust the CA that signs your server certificate, the browser will either warn you before you access the website or prevent you access the website directly. Browsers running on different Operating Systems behave differently. Please locate the browser you use in tables below and find the link to the instructions.
Windows
MacOS
Step 2 – Review your issues
Firefox (Windows & MacOS)
When the CA that signs server certificate is not trusted, Firefox warns user when the website is loaded at the first time. The message body is “Warning: Potential Security Risk Ahead”. Firefox behaves similarly on Windows and MacOS.
If you confirm that the URL you are connecting is correct and is trusted, you can click the “Advanced…” button. Then a new button “Accept the Risk and Continue” will be shown.
Click on “Accept the Risk and Continue” button, Firefox will start loading the website. You will always see a yellow notification icon on the top of the lock icon ahead of the URL in the address bar but you will not be asked to accept the risk next time when you access the website.
Internet Explorer (Windows)
Internet Explorer might warn you that “This site is not secure”. If you trust this site, you can click the “More information” link and “Go on to the webpage (not recommended)”. The browser will start loading the page.
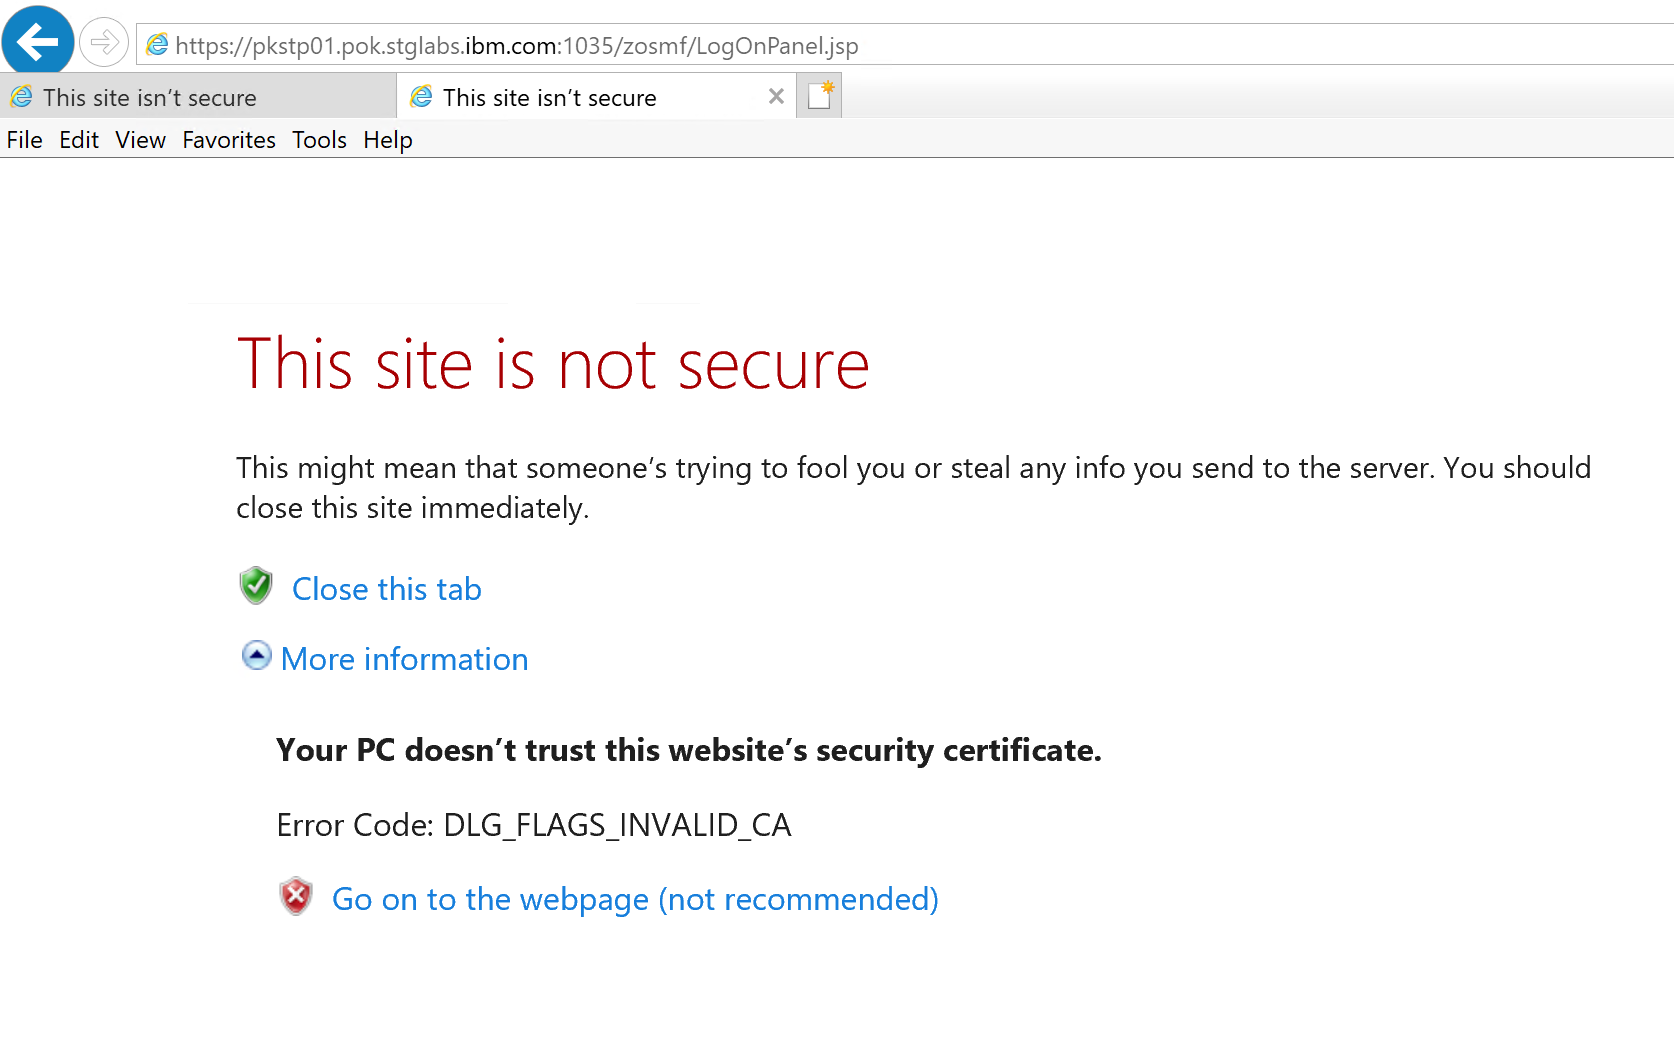
This message will be shown every time when you revisit the website after you close your browser. To get rid of this warning message permanently, you must import the CA that signs the server certificate to your Windows Certificates. Once you have imported the CA into Windows Certificate, the message for Error Code: DLG_FLAGS_INVALID_CA will not be shown any more.
You can follow the guide in Step 3 and Step 4 to download and import the certificates into Windows
• Step 3 – Download CA and server certificate• Step 4 – Import CA and server certificatesSometimes you might see multiple error codes in Internet Explorer.
The image above indicates that there are 2 issues with the server.
• Issue 1 – Your PC doesn’t trust this website’s security certificate.
• Issue 2 - The hostname in the website’s security certificate differs from the website you are trying to visit.
Importing the CA into your Windows Certificate will fix only issue 1. You will continue seeing issue 2 every time you access the website as shown below.
The error is caused by misconfiguration of the server. There’s nothing you can do to prevent IE showing it unless the administrator modifies the server configuration which makes the hostname of the server and the certificate be consistent.
Chrome and Edge (Windows)
Both Chrome and Edge are based on the Chromium open-source project. They behave similarly when running them in the same operating system. This section describes the browser behaviors on Windows. If you are running Chrome or Edge on MacOS, please follow
this instruction.
The first on board screen when accessing z/OSMF may look like this in Chrome.
You will see the exact same error message on Edge. The only difference is that there’s no Tips on Microsoft Edge.
If you trust the z/OSMF URL you are connecting, click the “Advanced” button and click the link “Proceed to HOSTNAME (unsafe)”
The browser will start loading the website and will disable the warning screen automatically for you. Next time when you type in the z/OSMF URL in the browser, the homepage of z/OSMF will be loaded directly.
To re-enable the warning, you can click on the red triangle notification icon on the left of your address bar. On the popup window, click “Re-enable warnings”.
Safari (MacOS)
On Safari, when you open z/OSMF by the first time, you might see the message “This website has an outdated security configuration, which may allow an attacker to steal personal or financial information”. This message isn’t always true. Even the server supports TLS 1.2 which is not out dated, you might still see the message when MacOS doesn’t trust the CA certificate that signs your server.
If you confirm the server supports TLS v1.2. This message usually indicates
1. the CA that signs the server certificate is not trusted
2. neither of the CA certificate nor the server certificate is installed in your MacOS Keychains.
Clicking on the “Show Details” button gives you a link “visit this website”.
Clicking on the “visit this website” link doesn’t actually load the website but gives you another error message saying that Safari Can’t Open the Page because Safari can’t establish a secure connection to the server “HOSTNAME”, as shown on screenshot below.
If you are experiencing this syptom, you must follow the guide in
Step 3 and
Step 4 to install the certificates to your MacOS Keychains and override the default trust status of the certificates.
Some users were seeing different symtoms using Safari. They were able to connect to the server without issues until they installed a MacOS maintenance or upgrade. The following error is shown when opening z/OSMF
This page gives you two buttons “Show Details” and “Close Page”. This usually happens when the server certificate is already installed in your Keychains. You might not be aware of when the certificate was installed but never mind, click on the “Show Details” button, gives you another page as shown below.
On the new page, you can click the button “Visit Website”. If the server certificate is installed, you will see a warning as shown in the snapshot below.
Click “Visit Website”, then you will then be asked to input your MacOS user password or use Touch ID to authorize Safari update your Certificate Trust Settings in your Mac OS keychains.
In some versions of the MacOS, Safari might fail to modify the Trust Settings even you have successfully authenticated with Touch ID or input your password. The symptom is that Safari prevents you accessing the website and keeps asking you authenticate your Touch ID or enter your password. In that case, you will need to go to Keychain Access application and modify your server certificate trust status manually. You can follow
this instruction to override the Trust status of your certificates.
Once you have authorized the update of the certificate in Keychains, you can review the update status in Keychain Access as shown in below. (Your hostname will be different from what is shown on the screenshot)
Chrome and Edge (MacOS)
At the time this blog is written, the latest Chrome version is “Google Chrome Version 89.0.4389.90 (Official Build) (x86_64)”. The latest Edge version is “Microsoft Edge Version 89.0.774.57 (Official build) (64-bit)”. Both browsers have enabled more strict rules when accessing websites in HTTPs.
By the first time you access the server, you get an error “Your connection is not private” as shown below.
Clicking on the “Advanced” button doesn’t give you a link to proceed. Instead, you might be told “You cannot visit HOSTNAME right now because the website sent scrambled credentials that Google Chrome cannot process. Network errors and attacks are usually temporary, so this page will probably work later.”.
If there’s not a network break which is the common case, the page will NOT be shown unless either
• Your z/OSMF administrator modifies the server configuration
• You manually import both CA cert and server cert into your MacOS Keychains and manually modify the trust status of both certificates.
If you ever used Safari to access the webpage successfully, you might have already imported the server certificate into your MacOS and you might have already overridden the trust status of the server certificate. By doing so, Safari on MacOS will continue loading the webpage. In some early Chrome/Edge versions that run on early MacOS versions (before Big Sur), Chrome and Edge behave similarly with Safari, which doesn’t check CA certificate trust status if the server certificate trust value is customized. But on the most recent Chrome and Edge versions running on MacOS Big Sur, for instance Version 11.2.3, you must perform additional steps to override status of the CA certificate which signs your server certificate. I’ll guide you step by step to accomplish this.
Before you continue, you can first check your server certificate status in your browser. Click on the Red Notification Icon in your address bar, on the popup window, click “Certificate (Invalid).
If both CA certificate and Server certificates are not trusted, it may look like this
You won’t be able to change the trust status of the certificates in the popup window. Even you do so, it won’t take effect. To get it work, you must
1. Download CA and server certificate if they are not installed.
Instructions2. Import both CA certificate and Server certificate into MacOS Keychain.
Instructions3. Modify trust status of both CA certificate and Server certificate in Keychain Access.
Instructions
Step 3 – Download CA and server certificate
To import the certificates into your “Windows Certificates” or “MacOS Keychain”, you must download the certificates from the server. If you have already installed Mozilla Firefox on your Windows or MacOS, the whole download process will be much simple.
Instructions using Firefox to download certificates onto your Windows or MacOS in PEM format.
You can also export the CA and server certificates from RACF. Due to the complexity and special authorities required on z/OS, it’s recommended to use Firefox to download the certificates as the primary option.
Instructions exporting CA and server certificates from RACF.
Download CA and server certificates using Firefox (Recommended)
Type in your z/OSMF URL in Firefox. If this is the first time you open z/OSMF, you would see the warning screen as shown in below.
Click on the Advanced button, then click “View Certificate”.

If z/OSMF is loaded in your browser, click the lock button in Firefox Address bar. On the popup window, click on the “>” arrow next to “Connection not secure”.
Then click “More Information”
Then click “View Certificate”
Firefox shows both server certificate (default view) and CA certificate in the new browser Tab/Window. Scroll down the page to the “Miscellaneous” section. Click on the PEM(chain) link. Firefox will download both server certificate and CA certificate in a single .pem file.
Save the file locally on your workstation. It will be used later.
If you prefer to save server certificate and CA certificate separately, just click the PEM(cert) link on each Tab of the certificates.
Download CA and server certificates from z/OS
• You don’t have to run this step if you already downloaded certificates using Firefox.
• It’s recommended to use Firefox to download CA and server certificates. This step is the alternative step if you are not able to download certificates in Firefox.
To export both server certificate and CERTAUTH certificate, you must be authorized CONTROL authority to IRR.DIGTCERT.EXPORT. You may contact your security administrator to confirm if you have the access or ask your security administrator export the certificates for you.
Before you export the certificates, you should review the server configuration by issuing Display IZU command in your console. Check the output KEYRING_NAME. By default, it is IZUKeyring,IZUDFLT. Your z/OSMF Administrator might have customized this value.
Then you can review your digital certificates in RACF. Go to RACF ISPF panel,
• select 7. DIGITAL CERTIFICATES, KEY RINGS, AND TOKENS
• then select 2. Key Ring Functions
• then select 3 List existing key ring(s). Input your server ID in For user: _________ . Your server ID (started task ID) can be checked in SDSF panel. It’s default to IZUSVR. Your z/OSMF administrator might have customized this value
![]()

• then input * or the KEYRING_NAME you reviewed in previous step.
• Make a note about the screen output, you will need to use the CERTAUTH certificate lable name and the default certificate lable name later . In my case, the CA name is zOSMFCA, the default certificate lable name is DefaultzOSMFCert.IZUDFLT. Your security administrator might have customized these values.
If your user ID is authorized to do export, you can now go to ISPF home panel
• select 6 Command
• Type in the following command to export the default server certificate. Make sure you replace the lable name and server ID with your values.
RACDCERT EXPORT(LABEL('DefaultzOSMFCert.IZUDFLT')) ID(IZUSVR) DSN('CERT.IZUSVR.DER') FORMAT(CERTDER)
• Type in the following command to export the CA certificate. Make sure you replace the lable name with your value
RACDCERT EXPORT(LABEL('zOSMFCA')) CERTAUTH DSN('CERT.AUTH.DER') FORMAT(CERTDER)
Now you have exported both CA and server certificate into datasets CERT.AUTH.DER and CERT.IZUSVR.DER. You should now transfer these two datasets from z/OS to your desktop (Windows or MacOS). If you use FTP to transfer these datasets, make sure the files are transferred in BINARY mode.
Step 4 – Import CA and server certificates
Import CA and server certificates into Windows Certificates
Before proceeding, make sure you have downloaded your CA certificate and server certificate onto Windows.
To import the certificates, you need to
• Open your Internet Options, switch to “Content” tab, then click on the “Certificates” button
• Click the “Import” button
• Click Next on the Certificate Import Wizard panel
• On the File to Import panel, select the certificate you downloaded. If you have downloaded CA and server certificate in a chain, you just need to import the chain certificates once.
• On the “Certificate Store” panel, select “Automatically select the certificate store based on the type of certificate” and click “Next”
• Click the “Finish” button
• Dismiss the confirmation information
Import CA and server certificates into MacOS Keychain Access
Before proceeding, make sure you have downloaded your CA certificate and server certificate onto your MacOS.
To import the certificates into MacOS Keychain Access, you need to
1. Open Keychain Access.app, you can use Command+Space to call out Spotlight, then type in Keychain Access
2. Click “System” under “System Keychains”, switch to “Certificates”
3. Open your finder windows and locate your downloaded certificates in step 3
4. Drag the certificates from the Finder window onto the Keychain Access window
5. Enter your MacOS user password and allow Keychain Access to modify the system keychain
6. Once authenticated your user, select “System” Keychain and click “Add”
7. You might be asked to input your MacOS user password for every single certificate
You now have imported your CA and server certificates into MacOS, but they can not be used yet. Next you will need to modify the trust status of the certificates imported just now.
Override Trust Status of your certificates in MacOS
• Locate the server certificate you just imported. The certificate name is default to the hostname of the server.
• Double click on the certificate. Expand the “Trust” section, modify the “Secure Sockets Layer (SSL)” options, make it “Always Trust”.
• Close the popup windows. MacOS will ask you input your username and password to modify the Trust Settings.
• Then you should do the same customization on your CA Cert. Please note your CA Cert might name differently from snapshot below.
• You will be asked to input your MacOS username and password when modifying the CA certificate trust status.
You can now go back to your browser and press “Refresh Page”. A proceed link should now be shown when you click the “Advanced” button.
After clicking “Proceed” link, this warning will not be shown in the future unless you restore this warning manually.
Disclaimer:
All recommended statements are not guaranteed by IBM. Please contact the author if the proposed solution doesn’t solve your problem.