Table of Contents
- Introduction
- Prerequisites
- What is Kerberos SSO?
- Real-World Use Cases
- Auto-Provisioning New Users
- Troubleshooting Authentication Failures
- Step-by-Step Setup Guide
7.1 Create a Service Account in Active Directory
7.2 Generate the Keytab File
7.3 Configure Kerberos SSO in IBM Verify
7.4 Browser Configuration via Group Policy
- Multi-Realm Support
- Complete Authentication Flow
- Security Best Practices
- Conclusion
- Get Started
- Resources
- Authors
Introduction
Eliminate login prompts for your enterprise users. IBM Security Verify's Kerberos Single Sign-On (SSO) capability enables seamless, credential-free authentication to web applications using existing Active Directory identities. Users access applications like Salesforce, Microsoft 365, or any SAML/OIDC-protected app without ever seeing a login screen.
Why IBM Security Verify for Kerberos SSO?
IBM Security Verify brings enterprise-grade identity to the cloud while preserving your existing AD investment. With Kerberos SSO, you get the best of both worlds: the familiar, zero-prompt experience users expect on-premises, delivered through a modern cloud identity platform.
Key Features
| Feature |
Description |
| ✅ Zero Login Prompts |
Users authenticate automatically using their existing AD credentials |
| ✅ Multi-Realm Support |
Handle users from multiple AD forests and domains in one configuration |
| ✅ Flexible Username Mapping |
Transform Kerberos principals using CEL expressions to match your identity store |
| ✅ Just-In-Time Provisioning |
Auto-create users on first login — no pre-provisioning required |
| ✅ Enterprise Security |
Native Kerberos protocol with keytab-based cryptographic validation |
| ✅ Centralized Browser Policy |
Server-side AuthServerAllowlist via Group Policy — no manual browser config |
Prerequisites
Before configuring Kerberos SSO, ensure the following are in place:
Active Directory
- A dedicated service account created in Active Directory (e.g.,
krb5-svc)
- A Service Principal Name (SPN) registered for each application hostname (e.g.,
HTTP/app.example.com@CORP.COM)
- A keytab file generated from the service account using
ktpass
DNS & Network
- The IBM Security Verify tenant hostname resolves correctly from client workstations
- Port 88 (UDP/TCP) open between IBM Verify infrastructure and Active Directory domain controllers
- No firewall rules blocking Kerberos ticket exchange
Time Synchronization
- All client workstations, IBM Verify infrastructure, and domain controllers are synchronized via NTP
- Clock skew between any two systems is less than 5 minutes (Kerberos hard requirement)
Browser Policy
- Windows Group Policy configured to deploy
AuthServerAllowlist for Chrome/Edge
IBM Security Verify
- An active IBM Security Verify tenant
- API access token with permission to configure the Kerberos policy (
/v1.0/config/krb5)
- At least one identity directory (cloud directory or LDAP) configured as the user store
What is Kerberos SSO?
Kerberos is a battle-tested network authentication protocol that provides strong, ticket-based authentication using secret-key cryptography. It is the backbone of Microsoft Active Directory authentication and has been the enterprise standard for decades.
IBM Security Verify's Kerberos SSO integration bridges your existing Active Directory infrastructure with modern cloud applications. Users who are already logged into their Windows workstation carry a valid Kerberos ticket — IBM Security Verify validates that ticket transparently, granting access to SAML, OIDC, or other federated applications without any additional login prompts.
How It Works
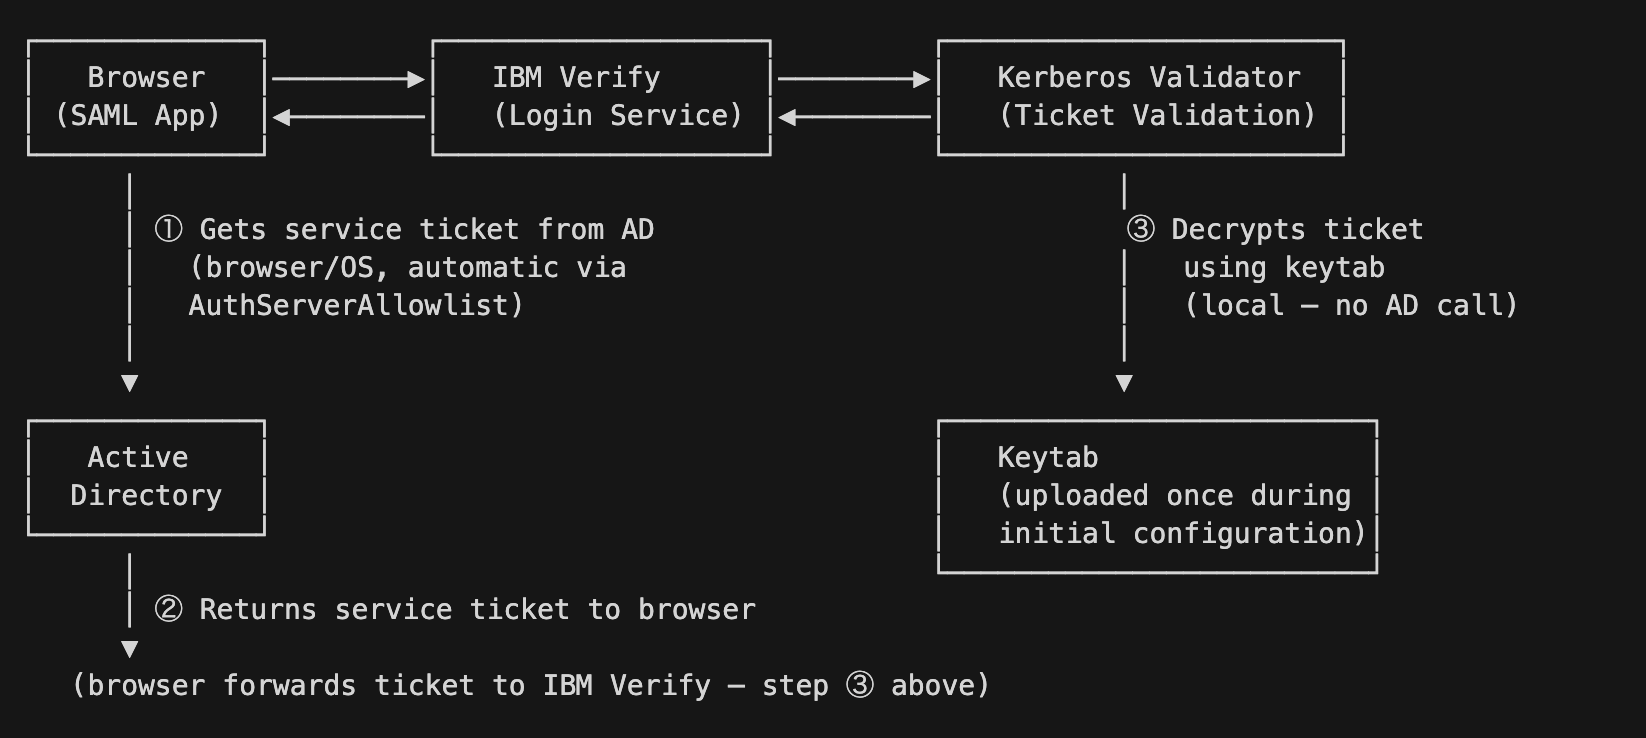
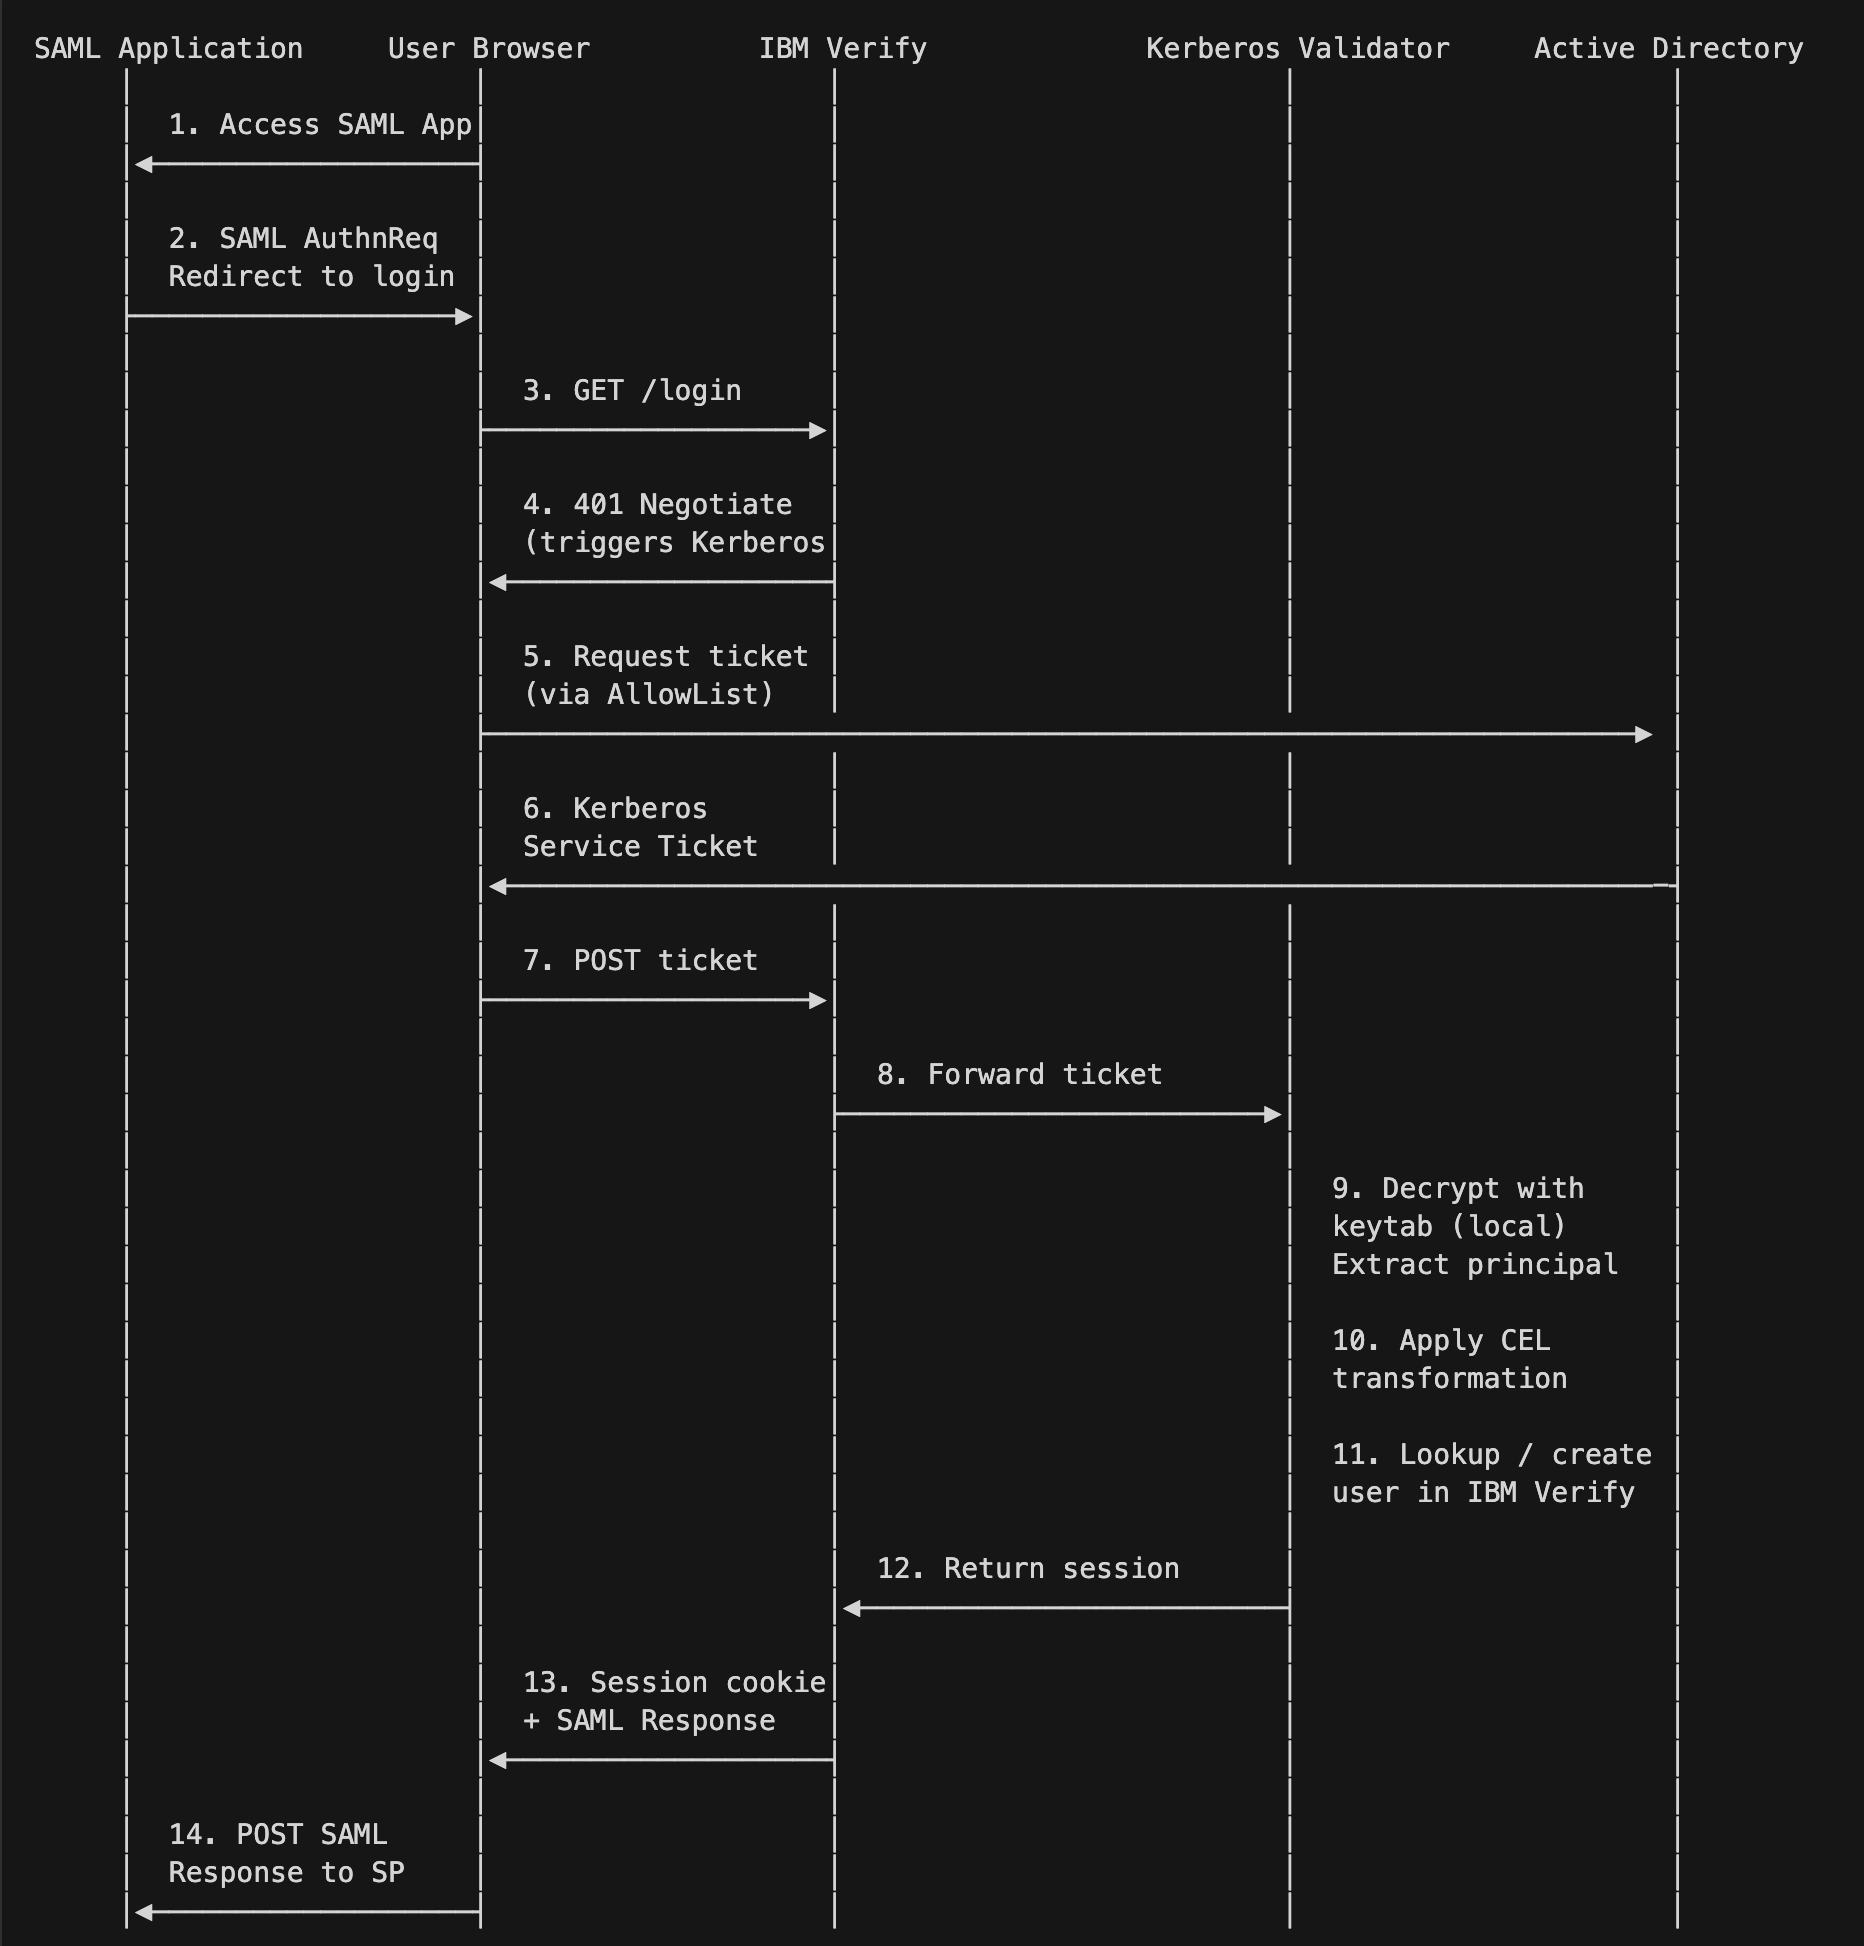
How validation works without an AD call: The keytab file — generated from the AD service account during setup and uploaded to IBM Verify once — contains the shared secret IBM Verify needs to decrypt any Kerberos service ticket. AD is only involved when the browser fetches its ticket (steps ① and ②). After that, IBM Verify validates entirely offline using the local keytab.
Step-by-step flow:
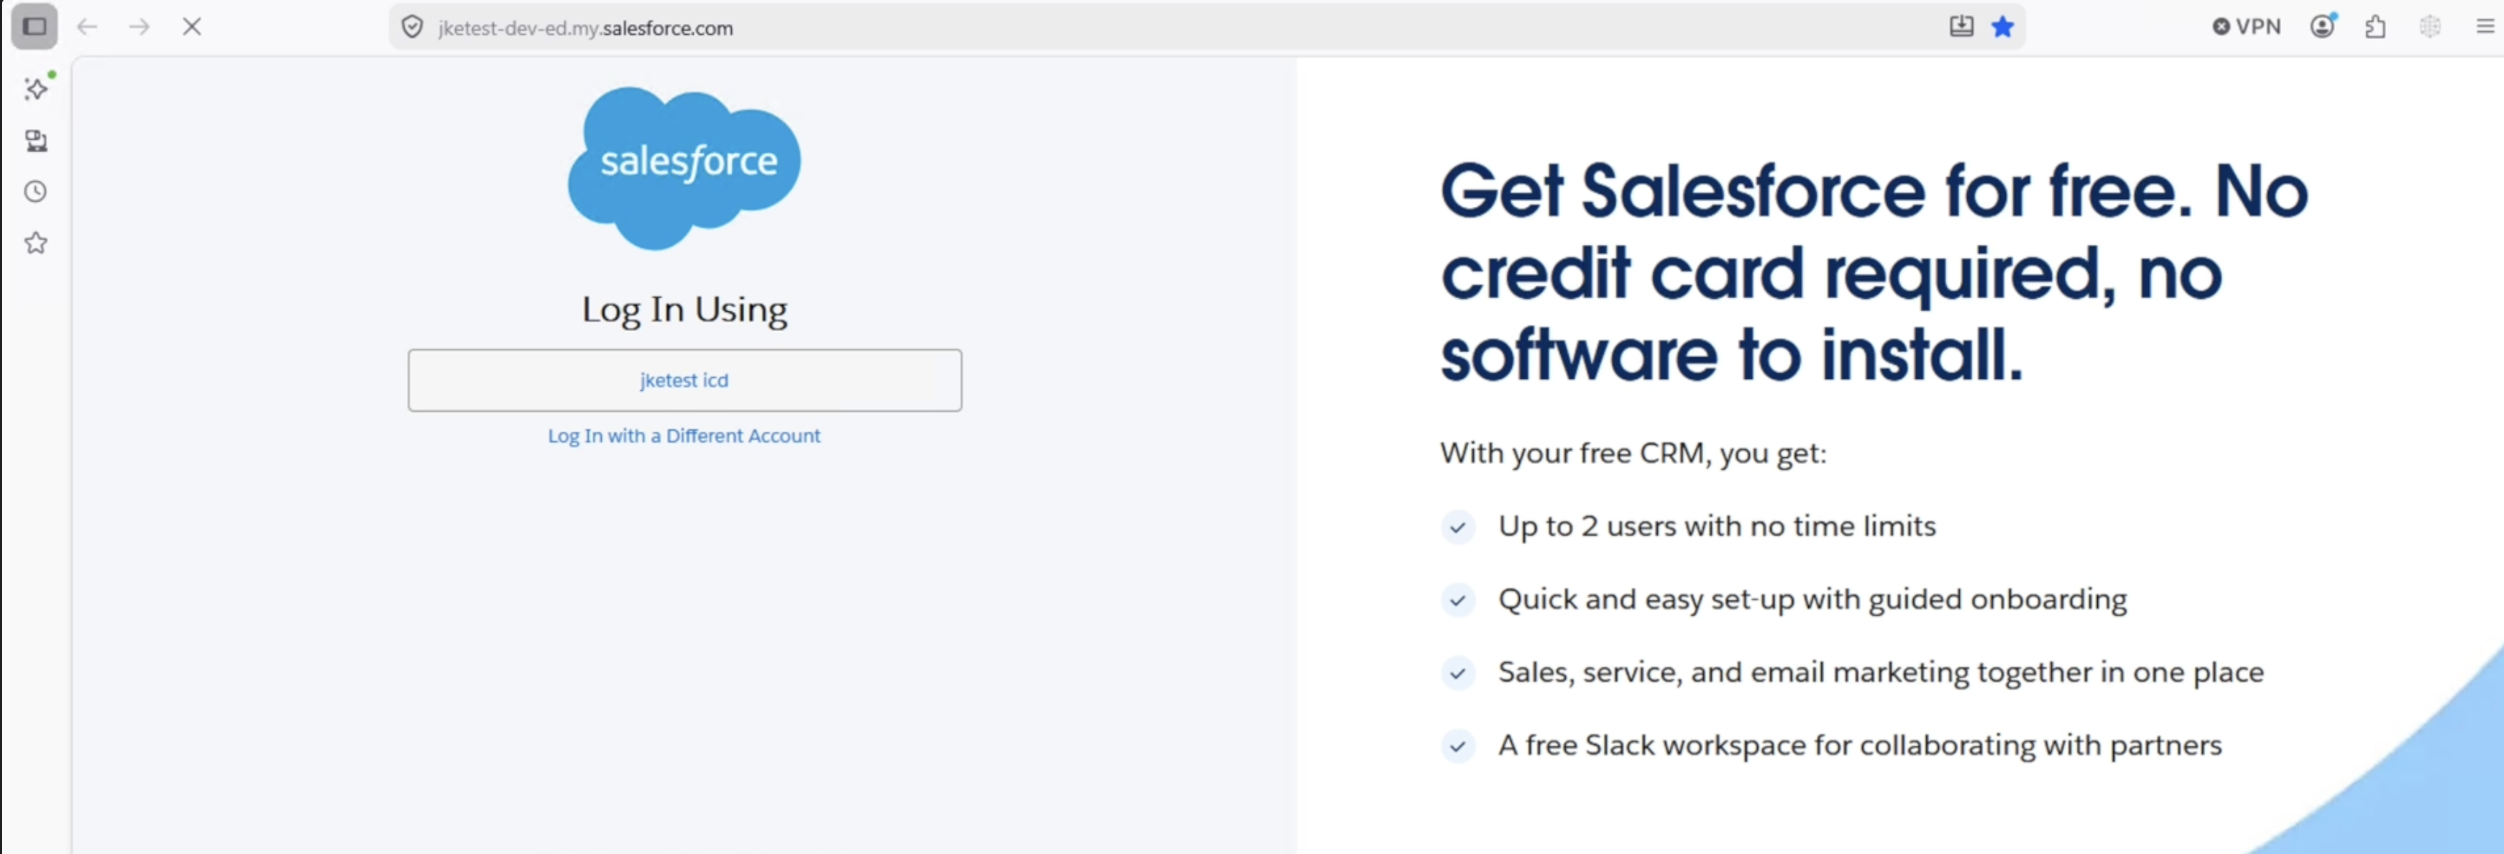
- User accesses a SAML-protected application (e.g., Salesforce)
- Application redirects to IBM Verify's login endpoint
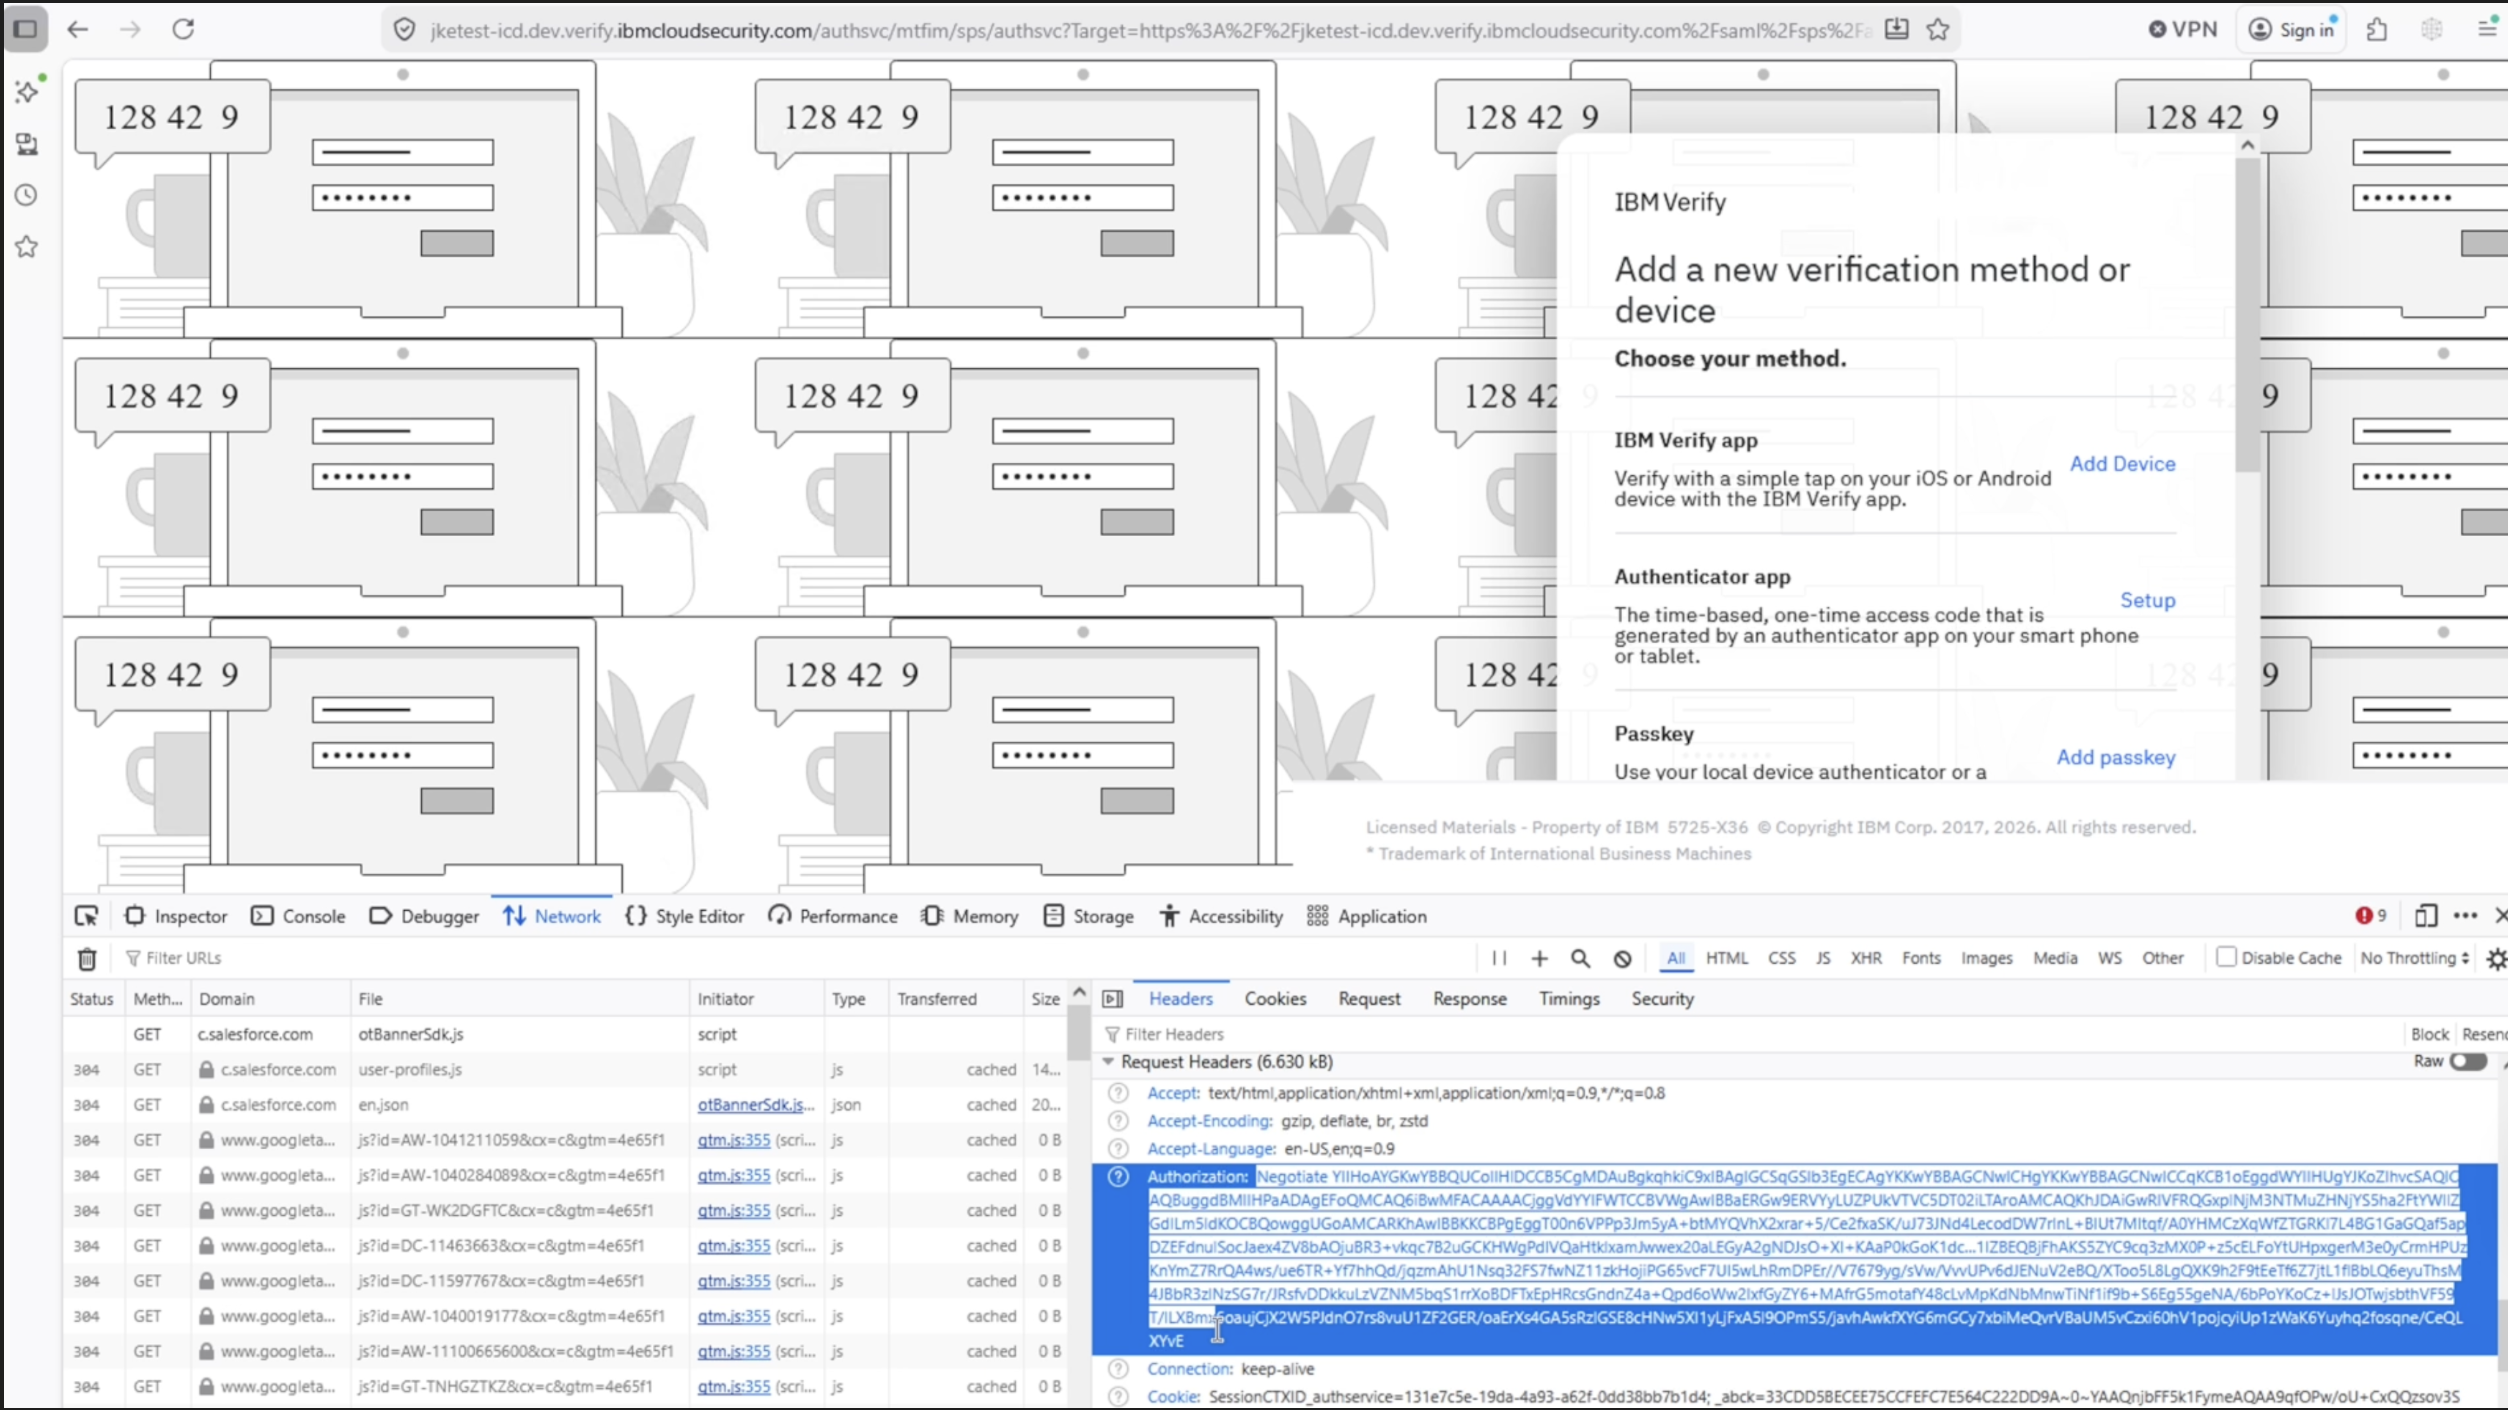
- IBM Verify sends a
WWW-Authenticate: Negotiate challenge to the browser
- Browser automatically presents its Kerberos service ticket (via
AuthServerAllowlist policy)
- IBM Verify's Kerberos validator decrypts the ticket using the keytab — no call to Active Directory needed
- The Kerberos principal is extracted, optionally transformed via CEL, and matched to a user identity
- User receives a session valid for all federated applications
Real-World Use Cases
Auto-Provisioning New Users
A user whose account exists in Active Directory but has no IBM Verify account yet gets instant application access — no IT intervention required.
Note: This requires Just-In-Time Provisioning (JITP) to be enabled (jitEnabled: true) in the Kerberos SSO configuration.
What happens:
- New employee
john@SUBSIDIARY.COM accesses the application
- IBM Verify validates the Kerberos ticket successfully
- System detects John has no existing IBM Verify account
- Account is automatically created with the correct realm mapping
- Instant access — provisioned on first login, zero IT intervention
Configuration (IBM Verify admin portal — Security → Kerberos):
| Field |
Value |
| Service principal name (SPN) |
Add one SPN per realm using Add SPN +, e.g. HTTP/app.example.com@CORP.COM, HTTP/app.example.com@SUBSIDIARY.COM |
| Identity provider |
Select your identity directory (e.g. Cloud Directory) — this is where IBM Verify will look up or provision the user |
| Enable just-in-time (JIT) provisioning |
Check this box so users are auto-created on first login |
| Subject attribute |
Preferred username |
Each SPN corresponds to a separate Active Directory realm. IBM Verify selects the correct keytab entry based on the realm in the Kerberos ticket.
Business benefits:
| Benefit |
Impact |
| Zero manual provisioning |
Reduces IT helpdesk tickets on Day 1 |
| Mergers & acquisitions |
Instantly onboard users from acquired companies |
| Partner and vendor access |
Extend SSO to external collaborators |
| Automatic realm detection |
No per-realm configuration needed per user |
Troubleshooting Authentication Failures
When things go wrong, IBM Verify's audit logging makes diagnosis fast.
| Symptom |
Root Cause |
Resolution |
| "Clock skew too great" |
Time difference > 5 minutes between client and KDC |
Sync with NTP: ntpdate -u pool.ntp.org |
| "Server not found in Kerberos database" |
Missing or incorrect SPN registration |
Verify: setspn -L krb5-svc |
| CEL transformation fails |
Invalid CEL expression syntax |
Check audit logs for AUDIT_CELX_FAILURE_REASON |
| User not found after authentication |
Username mismatch between Kerberos principal and identity store |
Review CEL logic or enable JITP |
| Ticket decryption fails |
Mismatched or expired keytab |
Regenerate keytab with matching SPN and encryption type |
| 401 on every request |
AuthServerAllowlist not configured |
Deploy Group Policy with correct tenant hostname |
Pro Tip: IBM Verify's audit log captures the full Kerberos authentication lifecycle — from ticket receipt to user lookup, when diagnosing failures.
Step-by-Step Setup Guide
Step 1: Create a Service Account in Active Directory
IBM Verify's Kerberos validator uses a keytab file derived from an AD service account. Create a dedicated account for this purpose.
New-ADUser -Name "krb5-svc" `
-AccountPassword (ConvertTo-SecureString "<desired-password>" -AsPlainText -Force) `
-Enabled $true `
-PasswordNeverExpires $true
setspn -A HTTP/app.example.com@CORP.COM krb5-svc
setspn -L krb5-svc
Best Practice: Use a dedicated service account with a strong, rotated password. Never share this account with other services.
Step 2: Generate the Keytab File
The keytab file enables IBM Verify to decrypt Kerberos service tickets without contacting Active Directory at validation time.
ktpass -princ HTTP/app.example.com@CORP.COM \
-mapuser krb5-svc@CORP.COM \
-pass <desired-password> \
-out service.keytab \
-ptype KRB5_NT_PRINCIPAL \
-crypto AES256-SHA1
klist -k -t service.keytab
Security Note: Treat the keytab file like a private key. Store it encrypted at rest and restrict access to the IBM Verify service only.
Step 3: Configure Kerberos SSO in IBM Verify
Log in to the IBM Verify admin portal and navigate to Security → Kerberos.
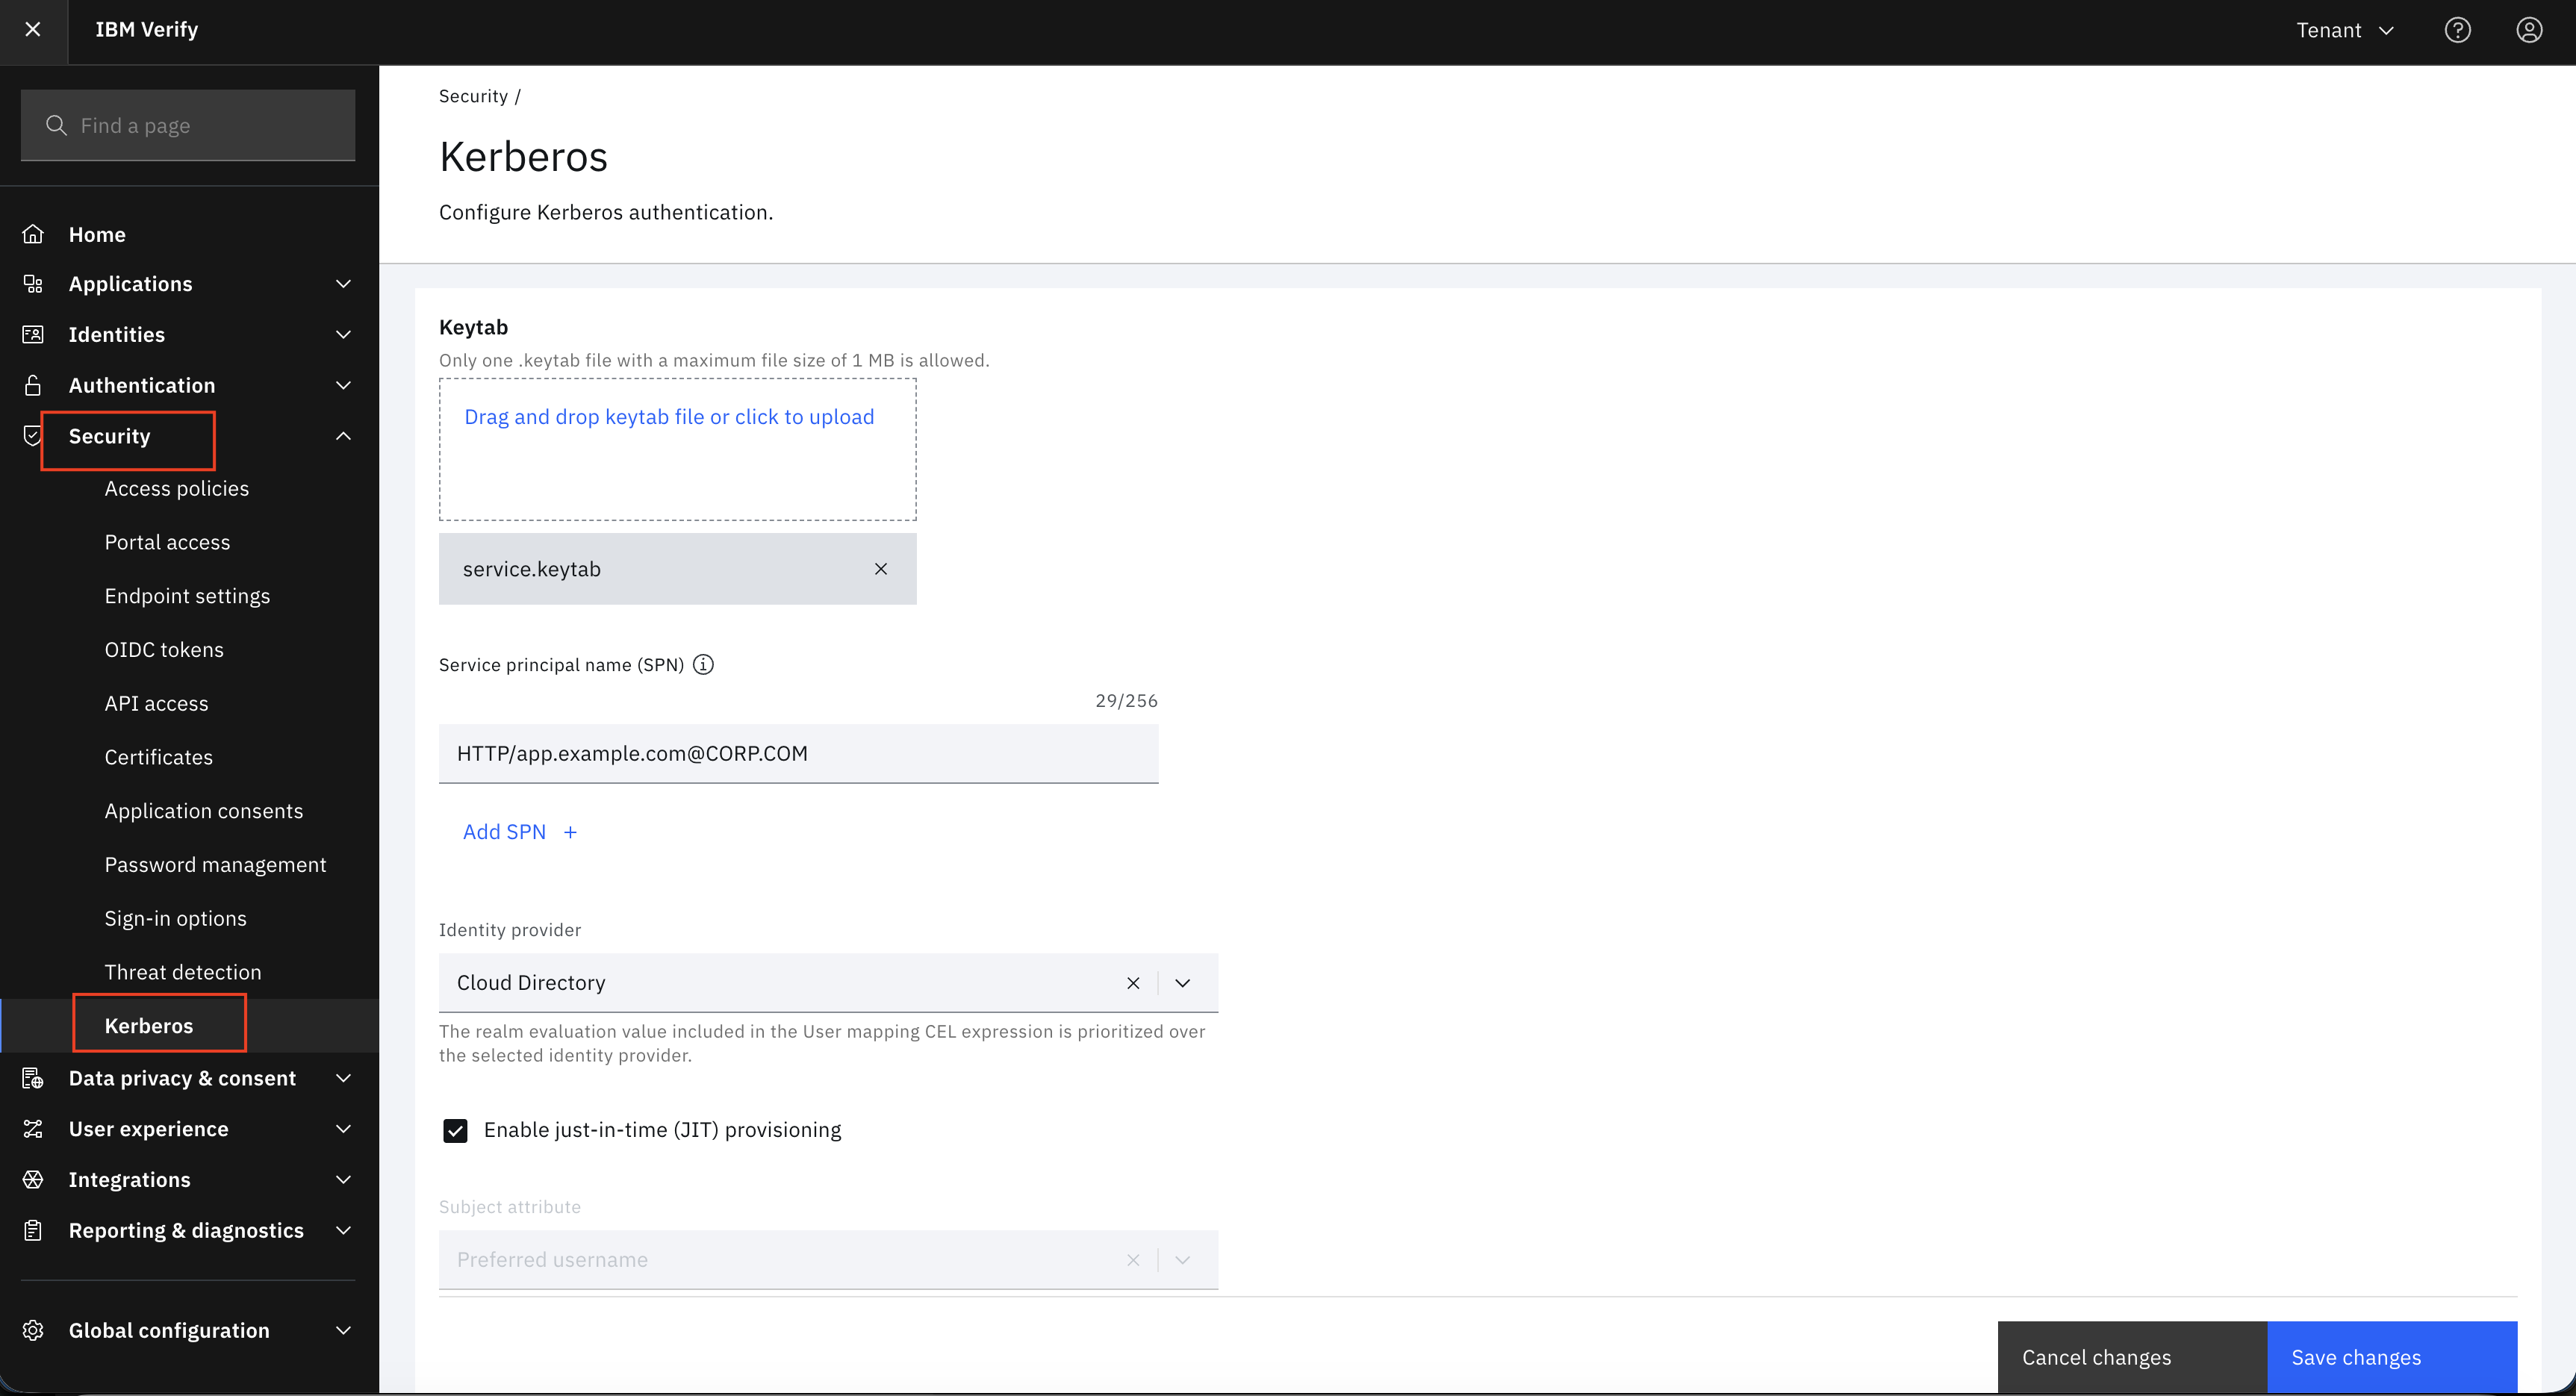
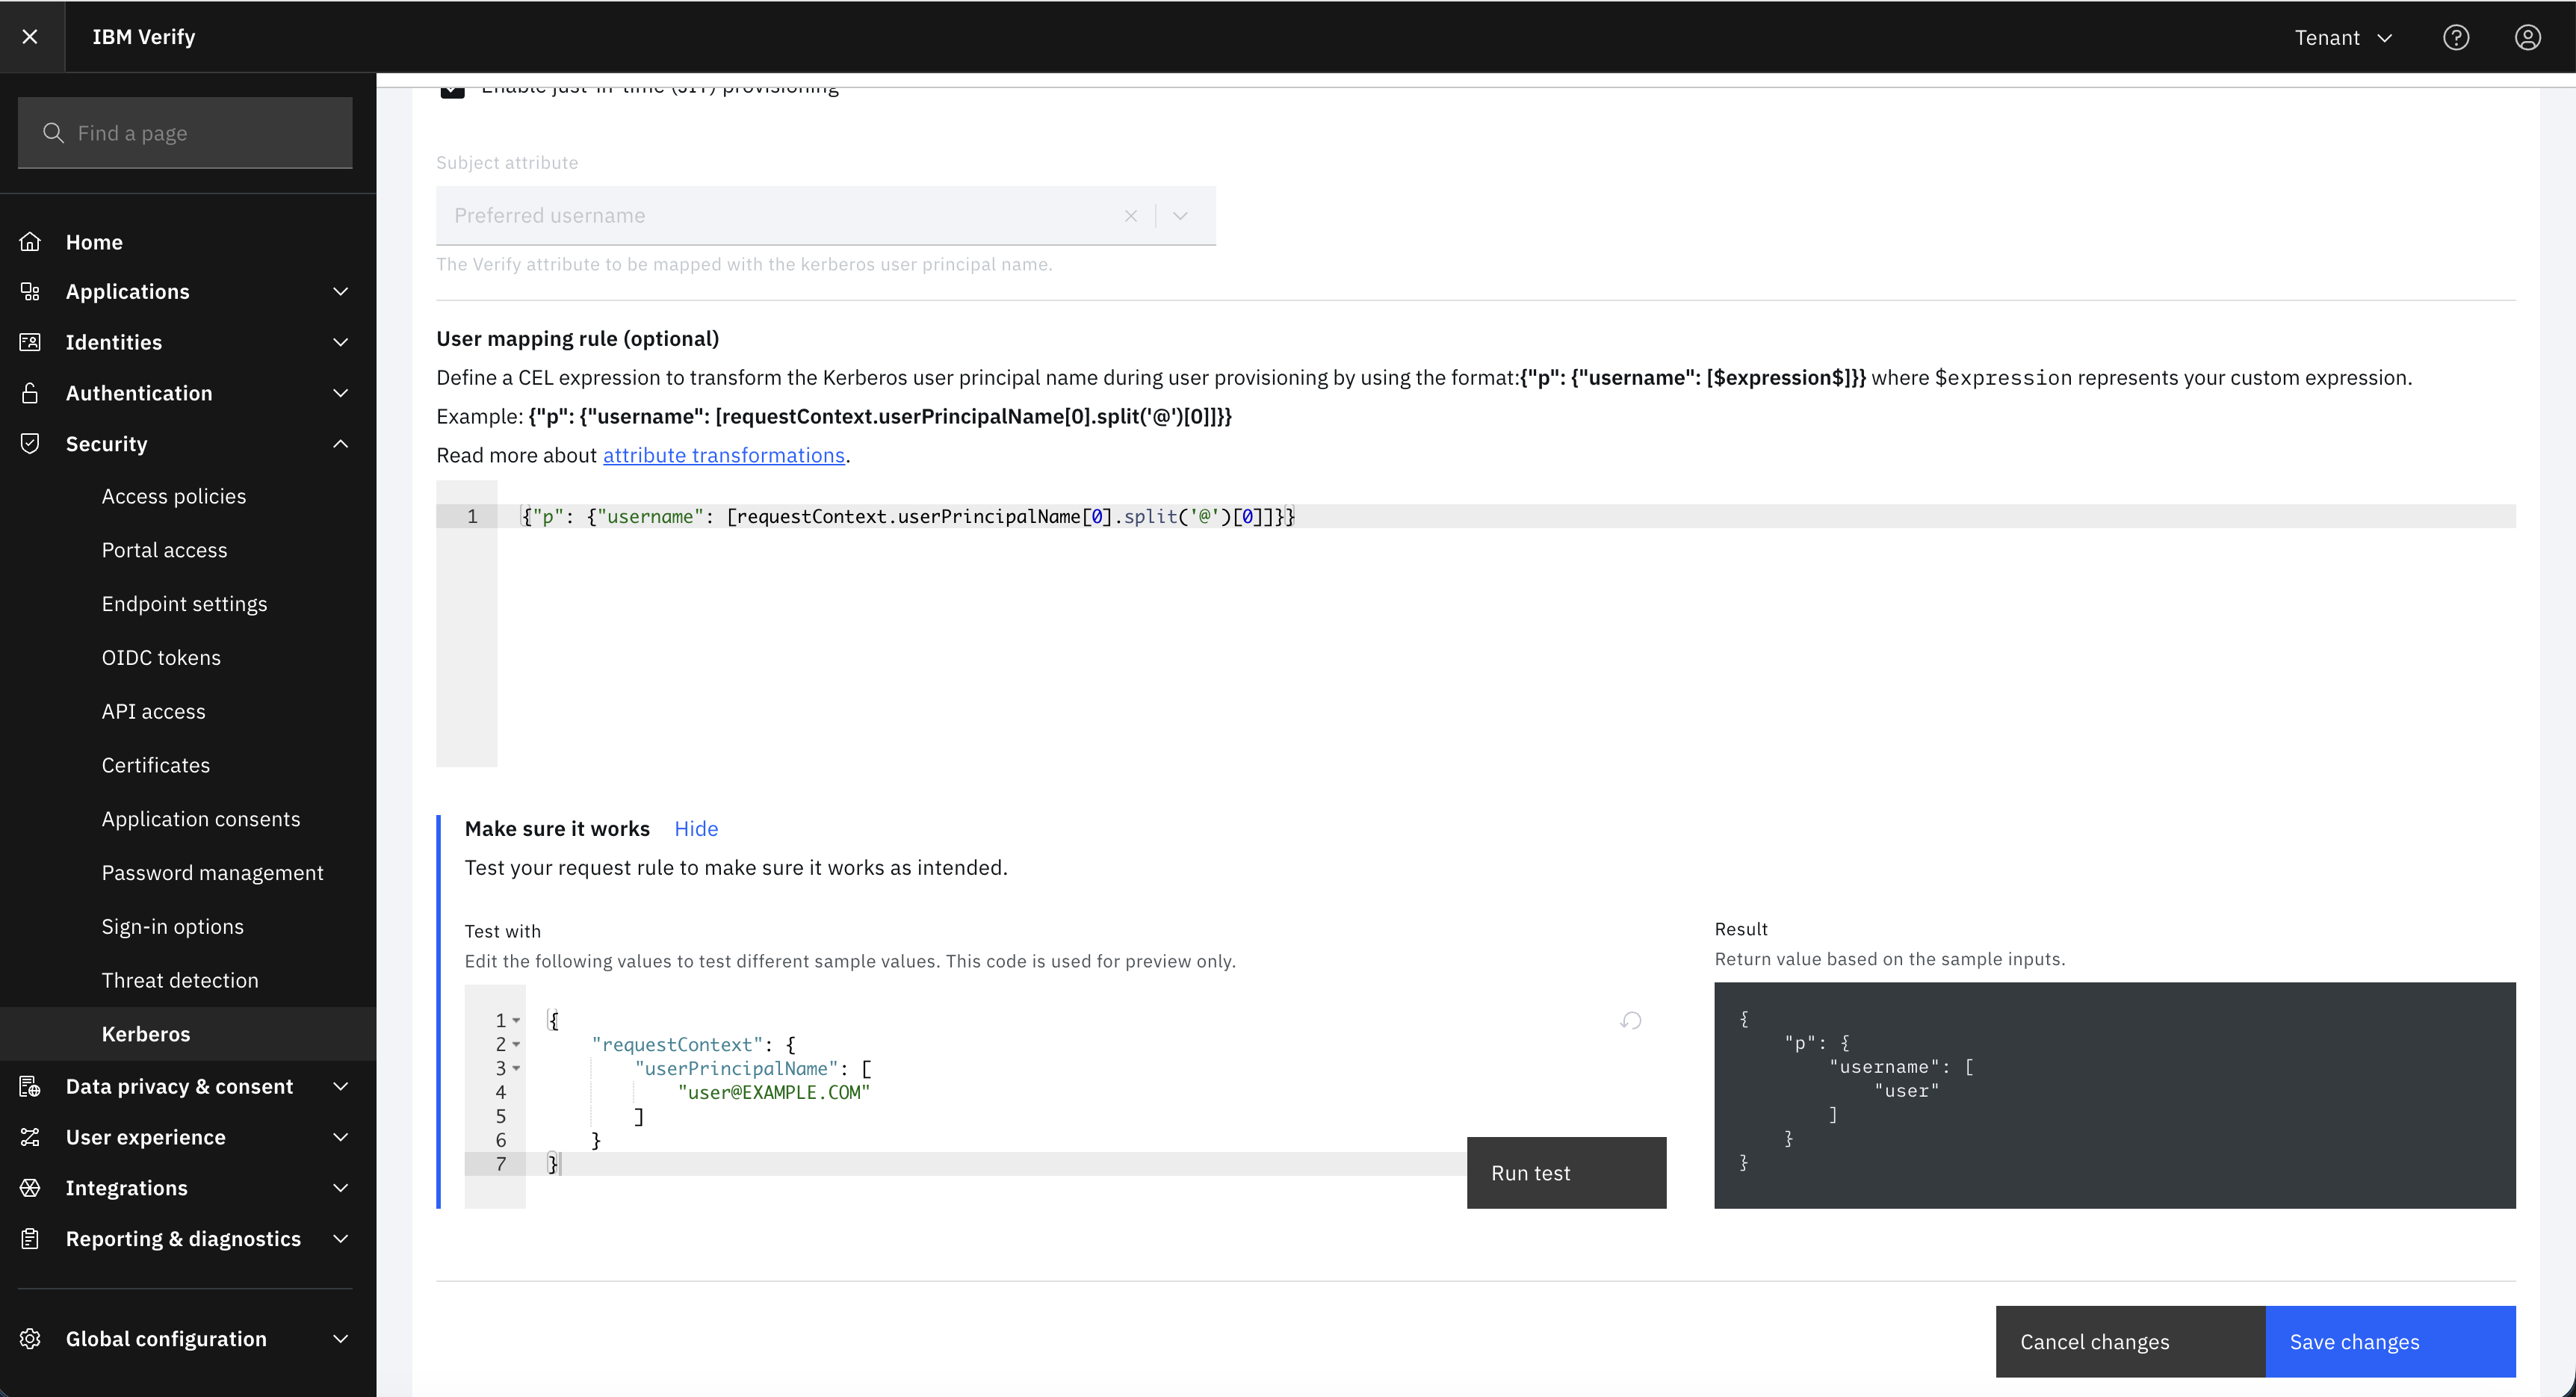
Fields to complete:
| Field |
What to enter |
| Keytab |
Drag and drop or upload the service.keytab file generated in Step 2 |
| Service principal name (SPN) |
Enter the SPN registered in AD (e.g. HTTP/app.example.com@CORP.COM). Use Add SPN + for additional realms |
| Identity provider |
Select the identity directory where users will be looked up — e.g. Cloud Directory |
| Enable just-in-time (JIT) provisioning |
Check this box if users should be auto-created on first login |
| Subject attribute |
Select Preferred username to map the Kerberos principal to the user's IBM Verify username |
User mapping rule (optional):
If your Kerberos principal format does not match usernames in your identity directory, scroll down to the User mapping rule section and enter a CEL expression. For example, to strip the realm suffix from user@EXAMPLE.COM:
{"p": {"username": [requestContext.userPrincipalName[0].split('@')[0]]}}
Use the built-in Make sure it works test panel to validate the expression against a sample principal before saving.
Note: If you provide a User mapping rule, IBM Verify uses the CEL result to resolve the user — the Identity provider selection above is used as a fallback for users without a realm mapping in the expression.
Step 4: Browser Configuration via Group Policy
No end-user configuration required for Chrome or Edge.
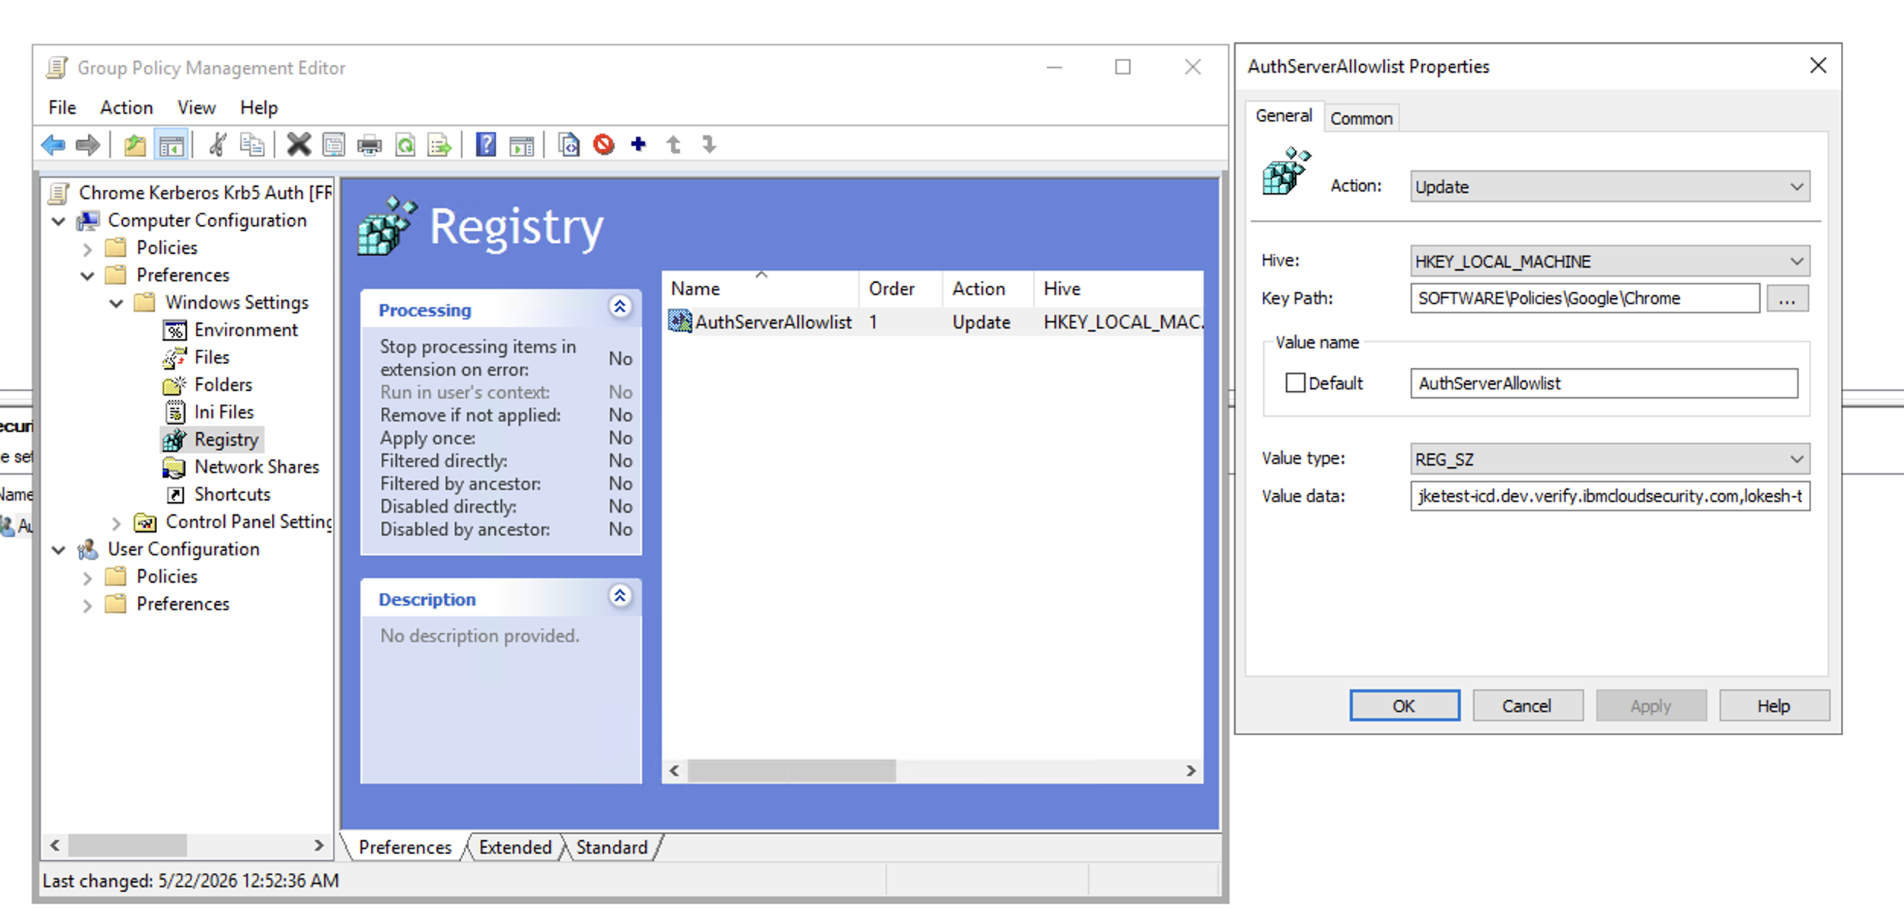
IBM Verify's Kerberos SSO relies on the browser trusting the IBM Verify tenant hostname for Negotiate/Kerberos authentication. For enterprise deployments, this is managed centrally by IT administrators via Windows Group Policy — no action is needed from users.
GPO registry value to deploy:
| Setting |
Value |
| Registry hive |
HKEY_LOCAL_MACHINE |
| Key path |
SOFTWARE\Policies\Google\Chrome (or Microsoft\Edge) |
| Value name |
AuthServerAllowlist |
| Value type |
REG_SZ |
| Value data |
https://tenant.verify.ibm.com (your IBM Verify tenant hostname) |
Why centralized configuration matters:
- Consistent policy across all enterprise workstations
- Automatically applies to new machines joined to the domain
- No end-user training or support calls
- Seamlessly updates when tenant URLs change
Testing from a non-domain browser? If you need to verify the flow from Firefox or a non-domain workstation, you can temporarily set network.negotiate-auth.trusted-uris to your tenant hostname in about:config. This is for local testing only and is not part of an enterprise rollout.
For eg:
Multi-Realm Support
IBM Security Verify supports users from multiple Active Directory forests or domains in a single Kerberos SSO configuration — ideal for complex enterprise environments.
1. Register one SPN per realm
In the IBM Verify admin portal under Security → Kerberos, use Add SPN + to register one SPN per AD realm:
HTTP/app.example.com@CORP.COM
HTTP/app.example.com@SUBSIDIARY.COM
HTTP/app.example.com@PARTNER.COM
2. Merge keytabs into a single file
Each realm requires its own keytab generated on its respective domain controller. Merge them into a single file using ktutil before uploading to IBM Verify:
ktutil <<EOF
rkt corp.keytab
rkt subsidiary.keytab
rkt partner.keytab
wkt merged.keytab
EOF
Upload merged.keytab in the Keytab field. IBM Verify automatically selects the correct entry from the merged keytab based on the realm in each incoming ticket.
3. Add the User mapping rule
In the User mapping rule (optional) section, enter the following CEL expression. It extracts the username (left of @) and the realm (right of @) from the Kerberos principal, allowing IBM Verify to route users from any realm to the correct identity directory partition:
{
  "p": {"username": [requestContext.userPrincipalName[0].split('@')[0]]},
  "c": {"realm":    requestContext.userPrincipalName[0].split('@')[1]}
}
Enable the Principal attribute transform and configure it to extract the realm from the Kerberos principal (the part after @). This lets IBM Verify route each user to the correct realm in the identity directory.
IBM Verify automatically selects the correct keytab entry based on the realm present in each incoming ticket — no per-realm configuration is needed beyond registering the SPNs.
Common Multi-Realm Scenarios:
| Scenario |
Configuration |
| Multi-forest AD environment |
One SPN per forest, shared keytab |
| Merger & acquisition |
Add new company's realm SPN without disrupting existing users |
| Partner/vendor access |
Scope JITP to partner realm only |
| Realm migration |
Run both old and new realm SPNs in parallel during cutover |
Complete Authentication Flow
The sequence below shows the full end-to-end Kerberos SSO flow from application access to session issuance.
Security Best Practices
Quick Reference
| Area |
Practice |
Priority |
| Keytab |
Store encrypted at rest, rotate annually |
🔴 Critical |
| Keytab |
Restrict file system access to IBM Verify service only |
🔴 Critical |
| Keytab |
Never expose in logs or API responses |
🔴 Critical |
| SPN |
Use unique SPNs per service and hostname |
🟡 High |
| SPN |
Audit registered SPNs quarterly |
🟡 High |
| Time |
Configure NTP on all systems; Kerberos requires < 5 min skew |
🔴 Critical |
| Service Account |
Use PasswordNeverExpires + manual rotation schedule |
🟡 High |
| Audit |
Enable IBM Verify audit logging for all Kerberos events |
🟡 High |
1. Keytab Security
- Store the keytab file encrypted at rest using your organization's secrets manager
- Rotate the keytab whenever the service account password changes
- Grant read access only to the IBM Verify service identity — never expose to application owners
- Verify that keytab contents are never captured in debug logs or API trace output
2. SPN Management
- Register a unique SPN per hostname and service — avoid wildcard SPNs
- Confirm DNS resolves correctly to the IBM Verify tenant before registering SPNs
- Review and document all registered SPNs in your AD environment quarterly
- Remove stale SPNs when decommissioning services
3. Time Synchronization
Kerberos is particularly sensitive to clock drift. A difference of more than 5 minutes between the client, IBM Verify, and the KDC will cause all ticket validations to fail.
- Configure NTP on all endpoints, IBM Verify infrastructure, and domain controllers
- Set up monitoring alerts for clock drift > 3 minutes (giving 2 minutes of buffer)
- Include time sync in your pre-deployment checklist for new environments
Conclusion
IBM Security Verify's Kerberos SSO delivers a seamless, zero-prompt authentication experience for enterprise users — without requiring any changes to your existing Active Directory infrastructure.
| Capability |
Benefit |
| ✅ Seamless User Experience |
Zero login prompts — access just works |
| ✅ Enterprise Security |
Native Kerberos with keytab cryptographic validation |
| ✅ Multi-Realm Flexibility |
Single configuration for multiple AD forests |
| ✅ Just-In-Time Provisioning |
Auto-provision users on first login |
| ✅ Centralized Browser Policy |
Server-side Group Policy — no end-user configuration |
| ✅ Rich Audit Trail |
Full visibility into every authentication event |
By combining the reliability of the Kerberos protocol with IBM Security Verify's modern cloud identity platform, organizations can eliminate login friction while strengthening their security posture.
Get Started
Ready to implement Kerberos SSO with IBM Security Verify?
- Review Prerequisites — Confirm AD service account, DNS, and NTP are in place
- Generate your keytab — Follow Step 2 of the setup guide above
- Configure IBM Verify — Upload the keytab and set your SPN and CEL policy
- Deploy browser policy — Push
AuthServerAllowlist via Group Policy
- Pilot with a small group — Validate the flow with 5–10 users before full rollout
- Roll out enterprise-wide — Enable for all users once the pilot is stable
Resources
Authors: