Target audience: ODM user with ODM Administrator role
Estimated duration: 1 day (for big database)
What does the archive repository tool do?
The goal of the archive tool is to reduce the size of the in-use schema by removing the records that are inactive. A smaller schema can improve the overall performance of Decision Center.
Active database records are in use by the current rule projects. Inactive records are no longer in use, but are made use of when you run a query. A schema is a set of objects associated with a user.
Before you begin
The first thing to do is to backup the current database before you start.
Step 1: Create a new schema in your database
Run the SQL commands to create the new schema in your database.
Example in Oracle
See: https://docs.oracle.com/en/cloud/paas/exadata-express-cloud/csdbp/create-database-schemas.html#GUID-C20C60A5-A655-4CAA-957A-93BF28F4E5FA
CREATE USER ILOGNEW IDENTIFIED BY <password>;
GRANT CONNECT, RESOURCE, CREATE VIEW TO ILOGNEW;
Example in PostgreSQL
psql -U postgres -p 5433 -d rtsdb -t -A -F"," -c "CREATE SCHEMA ILOGNEW;" > output.txt;
Where ILOGNEW is the name of the new user that will be used to create the new schema and <password> is the password of this user.
Nota 1: Be sure that the new user has enough tablespace for the new data. For my test, I’ve used a simplification by launching the following additional command:
GRANT UNLIMITED TABLESPACE TO ILOGNEW;
Nota 2: This new ILOGNEW schema will not be accessible for all users. In our example, we are using the admin user which has access to all schemas (it is not recommended to do that in production env). If you use a dedicated user which has not the administrator rights, then you must grant access to the new schema as follow:
ALTER USER <userName> set search path to ILOGNEW;
Nota 3: In Oracle, users and schemas are essentially the same thing.
A user is the account you use to connect to a database, and a schema is the set of objects (tables, views, etc.) that belong to that account.
At the end of all the steps, you’ll use this new schema in the main Decision Center repository.
Step 2: Retrieve your Custom Extensions
Make sure you use your own Model and Data extension files.
If you have extension files, you can consult the most up-to-date version in the database by doing the following actions:
-
Open a command window from the following folder: <ODM_INSTALL>/teamserver/bin
-
Run the following CURL command to grab the registered custom extensions in the previous ODM schema
curl -X 'GET' --user rtsAdmin:rtsAdmin --output extensions.zip\
  'http://localhost:9080/decisioncenter-api/v1/DBAdmin/modelextensionfiles' \
  -H 'accept: */*'
unzip extensions.zip
Where localhost:9080 is the endpoint of your application server.

You should have 3 additional files in your folder.
Archive:  extensions.zip
  inflating: messagesFile_en_US.properties
  inflating: DataExtension.brdx
  inflating: ModelExtension.brmx
Step 3: Change your datasource target schema to point to the new schema
-
Configure your application server datasource to use the new schema.
Example in Websphere

Example in Tomcat
Change the server.xml directly.
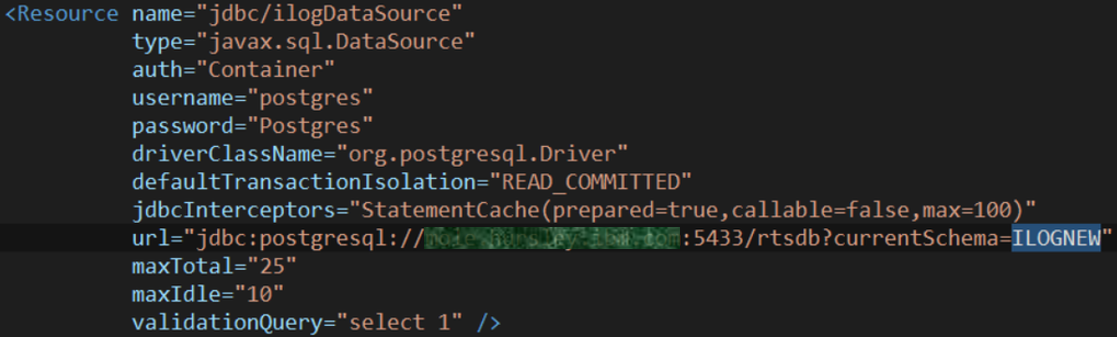
-
Restart your application server.
You should have the following message now when your log in to the Business Console as the schema is not yet created.

Step 4: Create your database tables using the Decision Center wizard
See: https://www.ibm.com/docs/en/odm/8.11.0?topic=cdsumf-create-database-schema-upload-message-files-by-using-ant-tasks
Pre-requisites: Be sure that ant is installed in your machine.
If you’ve collected the extensions from step 2, you should be in the correct folder. Otherwise, open a command window from the following folder: <ODM_INSTALL>/teamserver/bin.
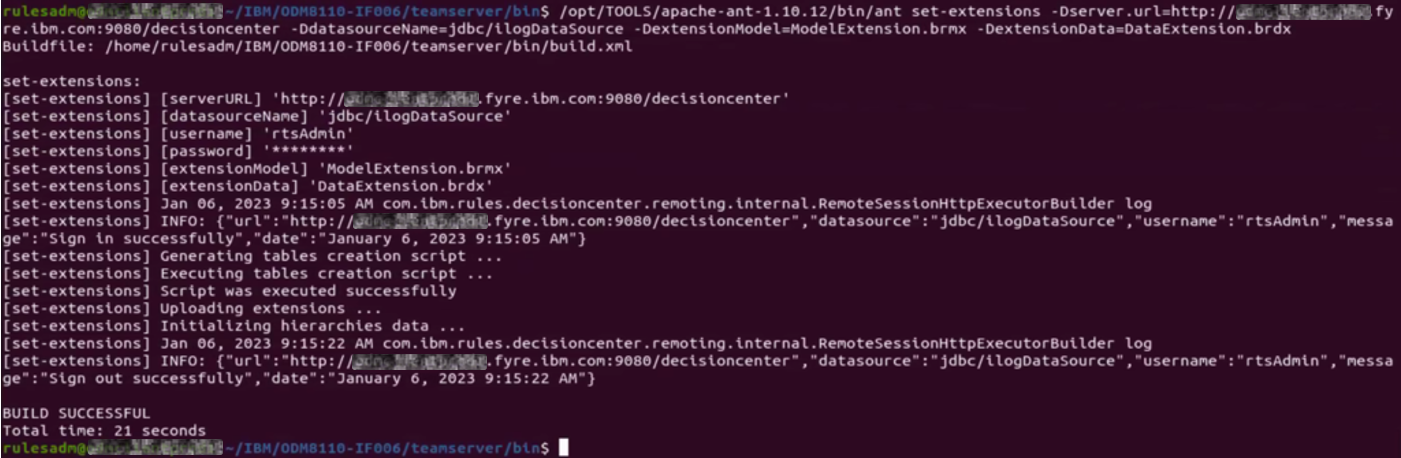
Run the following ANT task to generate a scipt the new user to access the old schema.
ant set-extensions -Dserver.url=http://localhost:9080/decisioncenter -DdatasourceName=jdbc/ilogDataSource -DextensionModel=ModelExtension.brmx -DextensionData=DataExtension.brdx
Where localhost:9080 is the enpoint of your application server.
Starting from 8.11+, you can also create the tables through the Decision Center REST API now:
See: https://www.ibm.com/docs/en/odm/8.11.0?topic=cdsumf-create-database-schema-upload-message-files-by-using-rest-api
Step 5: Generate an SQL script to grant the required privileges to copy data from the old schema
-
Open a command window from the following folder: <ODM_InstallDir>/teamserver/bin
-
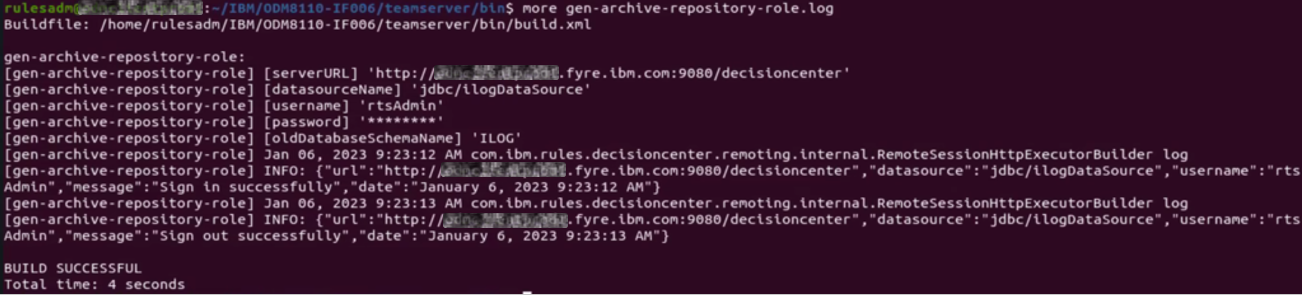
Run the following ANT task to authorize the new user to access the previous schema.
ant gen-archive-repository-role -Dserver.url=http://localhost:9080/decisioncenter -DdatasourceName=jdbc/ilogDataSource -DoldDatabaseSchemaName=ILOG -Dusername=rtsAdmin -Dpassword=rtsAdmin -DoutputFile=gen-archive-repository-role.sql >> gen-archive-repository-role.log
Where localhost:9080 is the endpoint of your application server and ILOG the previous schema name.
Open the generated log file to be sure that nothings bad happens during the generation.
Step 6: Grant user access to the database
-
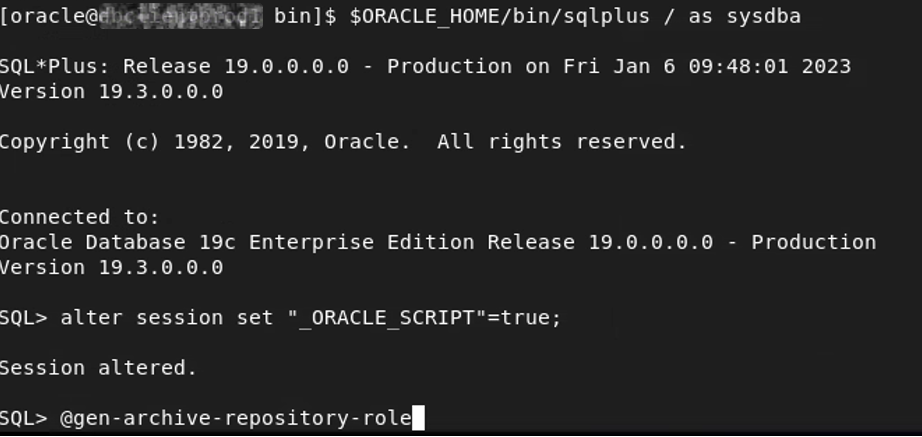
From a SQL command line or using a SQL Client tool, run the SQL file to grant access for the new user.
Example in Oracle
 Example in PostgreSQL

Ignore any errors related to a non-existing table.
-
Restart your application server to load the new authorization in the datasource connection.
Step 7: Generate an SQL script to copy the active records of the previous schema
See: https://www.ibm.com/docs/en/odm/8.11.0?topic=database-archiving-decision-center
Be careful: The database should not change from step 7 to 8. Do not re-use “old” generation from this script to perform further archiving.
Run the following ANT task to generate a script that populates the new schema tables with the active records in the previous schema.
Example using a date (best choice)
Prefer using the date mode as it permits to clean the DsDeployment kind of the baselines stored in the repository.
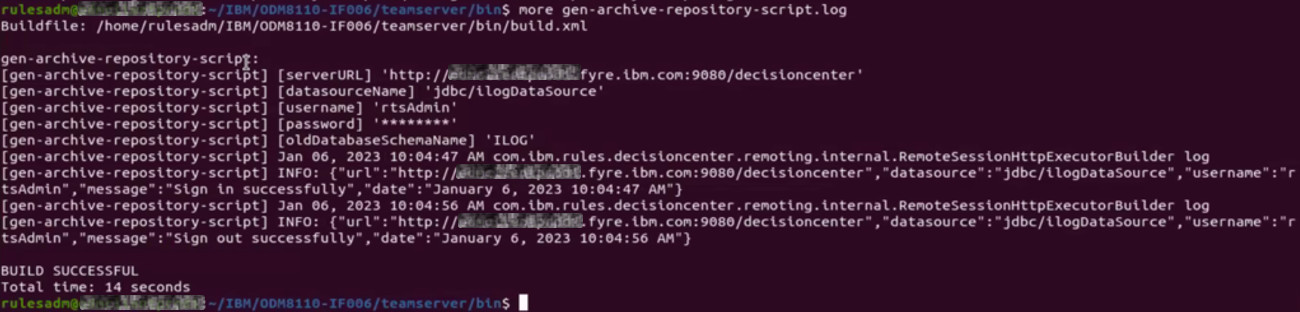
ant gen-archive-repository-script -Dserver.url=http://localhost:9080/decisioncenter -DdatasourceName=jdbc/ilogDataSource -DoldDatabaseSchemaName=ILOG -Dusername=rtsAdmin -Dpassword=rtsAdmin -DarchiveDate=2022-08-31 -DoutputFile=gen-archive-repository-script.sql >> gen-archive-repository-script.log
Example using surfaceMode
By default, active records are referenced by a baseline, for example a deployment baseline. This is called surfaceMode.
ant gen-archive-repository-script -Dserver.url=http://localhost:9080/decisioncenter -DdatasourceName=jdbc/ilogDataSource -DoldDatabaseSchemaName=ILOG -Dusername=rtsAdmin -Dpassword=rtsAdmin -DoutputFile=gen-archive-repository-script.sql >> gen-archive-repository-script.log
Open the generated log file to be sure that nothings bad happens during the generation.
Step 8: Run the SQL script to populate the new schema table with the active records
-
From a SQL command line or using a SQL Client tool, run the SQL file to copy the data to the new schema.
Example in Oracle

Example in PostgreSQL

The script ordinarily executes without errors.
The database is now stored in your new schema and the previous schema still contains all of the inactive data.
You can now gather some statistics about the new light schema by running a command on the database.
-
Restart your application server to load the new authorization in the datasource connection.
In general, database have to be forced to re-compute all the statistics from these new data arrival.
Example in Oracle
In Oracle, you can run the following command :
EXECUTE DBMS_STATS.GATHER_SCHEMA_STATS('ILOGNEW');
ALTER SYSTEM FLUSH shared_pool;
Example in PostgreSQL
In PostgreSQL, you can run the FULL VACCUM command:
VACUUM FULL;
Step 9: Migrate all of your custom data in the old schema to the new schema
Complete the migration of any custom data in the old schema to the new schema.
As an example, if you have additional tables coming from the implementation of your Dynamic Domains or any other table that should be also reported to the new schema.
Note and Next Steps …
Some metadata attached to your rule may have change. As an example, the “created_by”, “created_on” and “ilog.rules.teamserver.elementID” are often changed as this value rely of the first element found in the database and because older element were removed during the process, it’s common to have changes on these values.
Launch the Diagnostic of the Business Console and correct the remaining issues following the recommendations from the support page below: https://www.ibm.com/support/pages/odm-decision-center-diagnostics
As an example, it's quite common to have to perform the check on the folders lft/rgt indexes.
Remove the old schema to free up some space.
Cleaning up the repository regularly using the new REST API (since 8.11.1): https://www.ibm.com/docs/en/odm/8.11.1?topic=database-cleaning-up-repository
#OperationalDecisionManager(ODM)#odm #performance #ibmodm